
You're probably looking at a registration renewal notice, checking the calendar, and wondering whether your car can make it through the test without drama. The mistake I see most often is treating a smog check as nothing more than a quick warm-up and a tailpipe measurement. In California, your vehicle has to pass two separate tests: its computer must report that the emissions self-checks are complete, and the emissions hardware must perform properly when the vehicle is inspected.
That first part is the silent failure. Since October 1, 2025, California's Bureau of Automotive Repair says all readiness monitors must be set for a vehicle to pass Smog Check (BAR's readiness monitor guidance). A car can feel fine, show no warning light, and still fail before the emissions portion starts if someone recently disconnected the battery or cleared a code.
Table of Contents
- How a Smog Check Actually Works
- Your Week-Before and Day-Of Prep Timeline
- Why Readiness Monitors Are the Silent Failure
- The Right Way to Warm Up Before You Drive In
- Paperwork, Coupons, and What to Bring
- If You Do Not Pass on the First Try
- Quick Checklist and Common Questions
How a Smog Check Actually Works
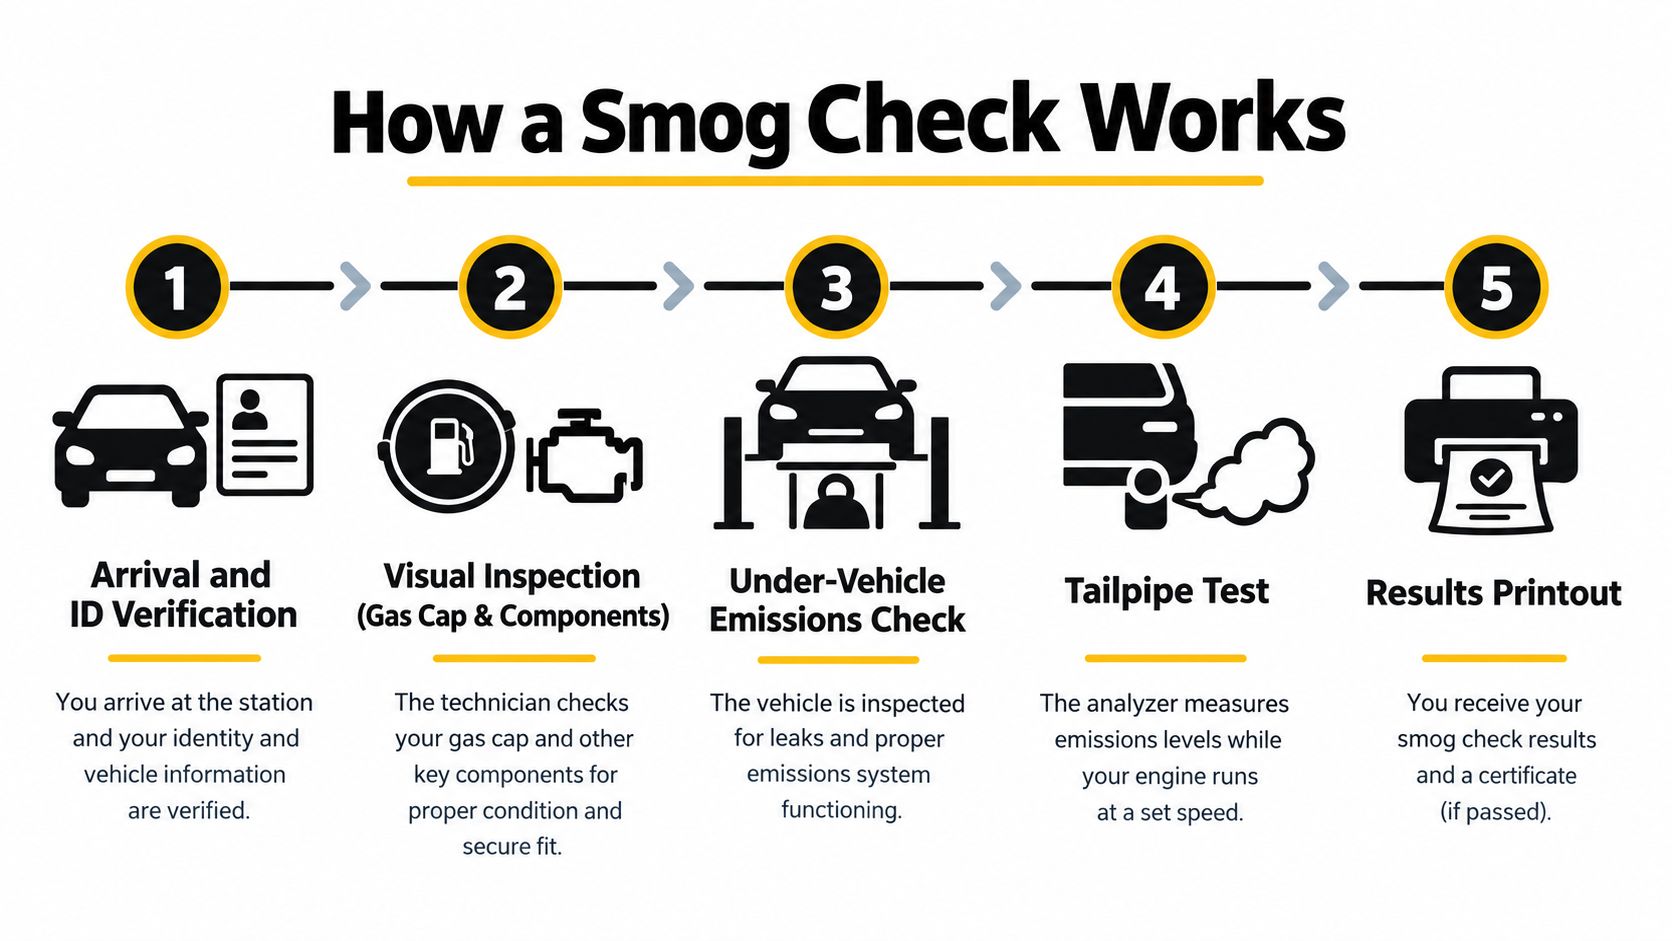
When you pull into the bay, the technician starts with the basics. They verify the vehicle information, look at the dashboard warning lights, check the gas cap, and inspect visible emissions equipment for damage, removal, or tampering. If the check engine light stays on while the engine is running, the inspection can stop there because the vehicle is reporting an emissions-related fault.
Next comes the OBD-II scan. The technician connects to the diagnostic port and checks stored trouble codes, permanent codes where applicable, and readiness monitor status. Readiness monitors are internal self-tests for systems such as the catalyst, oxygen sensors, and evaporative emissions controls. If required monitors show “Not Ready,” the vehicle may fail without the technician needing to measure tailpipe output.
The inspection has two failure paths
For most 1999-and-newer vehicles, the station uses California's OIS process. The scan evaluates the vehicle's computer data, while the inspection also checks the vehicle's condition and emissions-related components. Older vehicles may receive a different inspection, including a dynamometer test for applicable trucks and cars.
The tailpipe side looks at pollutants including hydrocarbons, carbon monoxide, and nitrogen oxides. A warm catalytic converter, correct fuel control, and a healthy engine help with this part. A proper smog check machine combines the computer inspection with the required emissions measurements.
Practical rule: A warm engine helps the tailpipe test. A completed drive cycle helps the computer test. You need both.
The final result prints after the technician completes the required checks. That printout tells you whether the issue was readiness, a warning light, visible equipment, or measured emissions. Your preparation should target the correct failure path rather than relying on one quick idle in the driveway.
Your Week-Before and Day-Of Prep Timeline
A car can run smoothly and still fail at the station entrance if its computer has not finished the required checks. Prepare for both sides of the inspection, readiness monitors and tailpipe emissions, with a short plan instead of a last-minute fix.
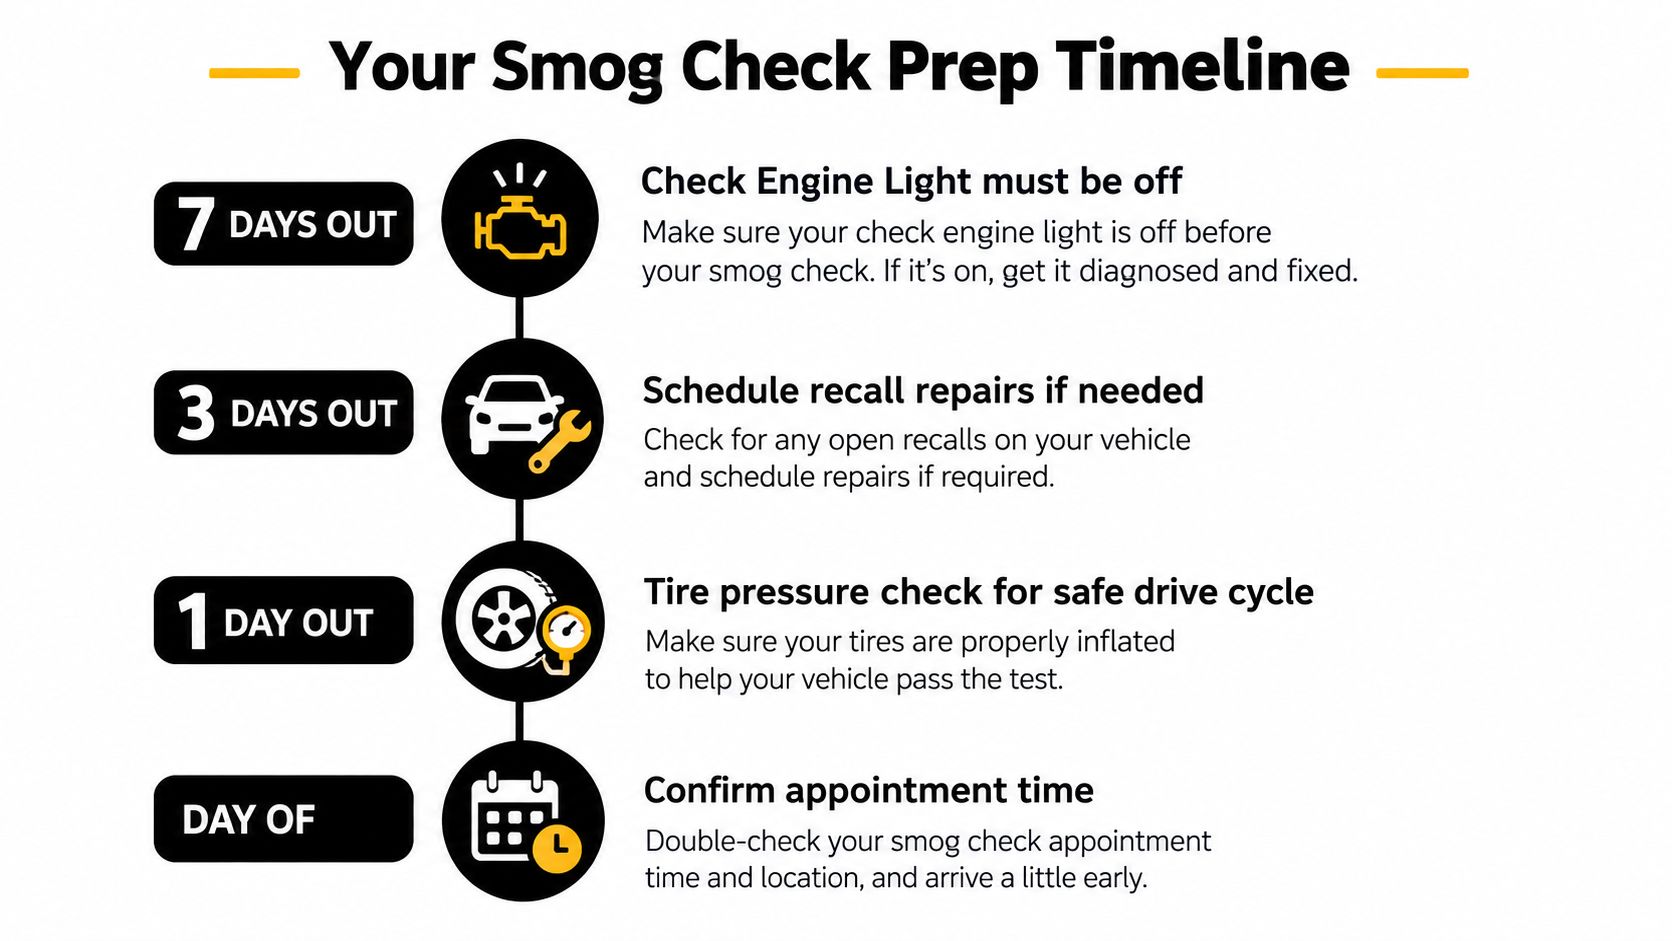
About a week before
Start with the check engine light. Turn the key without starting the engine and confirm the light comes on for its bulb check. Start the vehicle and verify that it turns off. If it stays on or flashes, diagnose the cause before scheduling the inspection.
Inspect the gas cap. Look for a cracked or flattened seal, then reinstall it until it clicks. A damaged cap can cause an EVAP fault, and tightening it after the warning light appears may not immediately complete the related monitor.
Check for an open safety or emissions recall and contact the manufacturer's dealer if a repair is required. Check tire pressure before completing the driving needed for monitor readiness. Correct pressure makes that preparation drive safer and prevents an avoidable problem.
Two or three days before
Drive normally across mixed conditions. Use stop-and-go streets, steady surface-road cruising, and freeway operation instead of taking only short trips. If recent repairs or a cleared code reset the computer, allow 50–100 miles after major work or a reset before testing, as recommended in Diamond Certified's smog preparation guide.
Do not disconnect the battery, clear codes, or erase a warning with a scanner before the appointment. Those steps can return monitors to Not Ready and leave the computer without enough completed self-test results. Check the oil level and take care of an overdue oil service before the inspection.
The day before and the morning of
Keep the fuel level moderate. One industry guide recommends roughly one-quarter to three-quarters full, since an extremely low or completely full tank can interfere with EVAP testing on some vehicles (Foxwell's readiness guidance).
On test day, drive for 15–20 minutes before arriving. Use mixed city and freeway conditions rather than idling in the driveway, following California smog check preparation guidance. Bring your renewal notice, payment, and any coupon you plan to use. Leave removable roof racks and unusual accessories at home if they could interfere with inspection access.
Why Readiness Monitors Are the Silent Failure
Your car can feel fine, show no warning light, and still fail before the tailpipe portion even matters. The hidden issue is often an incomplete readiness monitor, a self-test running inside the engine computer that checks an emissions system under specific conditions.
Common monitors cover the catalytic converter, EVAP system, oxygen sensors, and EGR system. Each result is either Ready or Not Ready. Smooth driving does not earn partial credit, and checking one related component does not complete the entire monitor.
What each monitor needs
Vehicles use different monitor sets and drive-cycle requirements, so the conditions below are practical examples rather than a replacement for the manufacturer's procedure.
| Monitor | What It Tests | Typical Set Conditions |
|---|---|---|
| Catalyst | Catalytic converter efficiency | Fully warm engine, steady cruise, and controlled deceleration |
| EVAP | Fuel-vapor leaks and purge operation | Appropriate fuel level, normal temperature, and specific parked or driving conditions |
| Oxygen sensor | Sensor response and fuel-control feedback | Engine at operating temperature with changing load |
| EGR | Exhaust-gas recirculation operation | Warm engine, light-to-moderate load, and controlled acceleration |
| Misfire | Combustion irregularities | Normal driving across different engine speeds and loads |
Battery replacement, battery disconnection, code clearing, and some emissions repairs can reset monitors to Not Ready. Electrical work or an aftermarket alarm installation can do the same if power is interrupted. A missing check engine light does not prove the computer is ready.
California's October 2025 rule change makes the status more important. BAR's guidance says all readiness monitors must be set for a vehicle to pass Smog Check (BAR's explanation of the new OBD readiness regulations). An incomplete monitor is now a disqualifying problem, not a minor detail.
I'd check the status before paying for an inspection. A basic OBD-II reader paired with an app such as Torque or OBD Fusion can display the results, although the station's equipment has final authority. For a technician-focused explanation, review this guide to car emissions test readiness monitors.
The Right Way to Warm Up Before You Drive In
Idling in the parking lot is a poor substitute for driving. It may raise coolant temperature, but it doesn't reproduce the changing speed, load, airflow, and deceleration that emissions monitors need. It also doesn't heat the catalytic converter as effectively as a real drive.
I'd leave early and use a controlled mixed route. Start with residential streets for 10–15 minutes, accelerate gently, and let the vehicle shift through its normal gears. Move onto surface roads around 35–45 mph, then include freeway operation where traffic allows. Vary the throttle lightly instead of holding one speed the entire time.
What the drive accomplishes
The first phase gives the engine time to reach normal operating temperature and enter closed-loop fuel control. Surface-road driving creates changes in load that help the oxygen-sensor and fuel-trim systems evaluate operation. A freeway stretch adds sustained exhaust flow and load, which helps the catalytic converter reach effective operating temperature.
Industry guidance commonly recommends 15–20 minutes of driving before inspection, while other consumer guidance recommends at least 20 miles, or 100–200 miles after maintenance when a recent repair may have reset the system (Edmunds' smog check preparation guide). Those are different jobs. The short drive warms the vehicle for the appointment. The longer post-repair driving gives the computer time to complete its monitors.
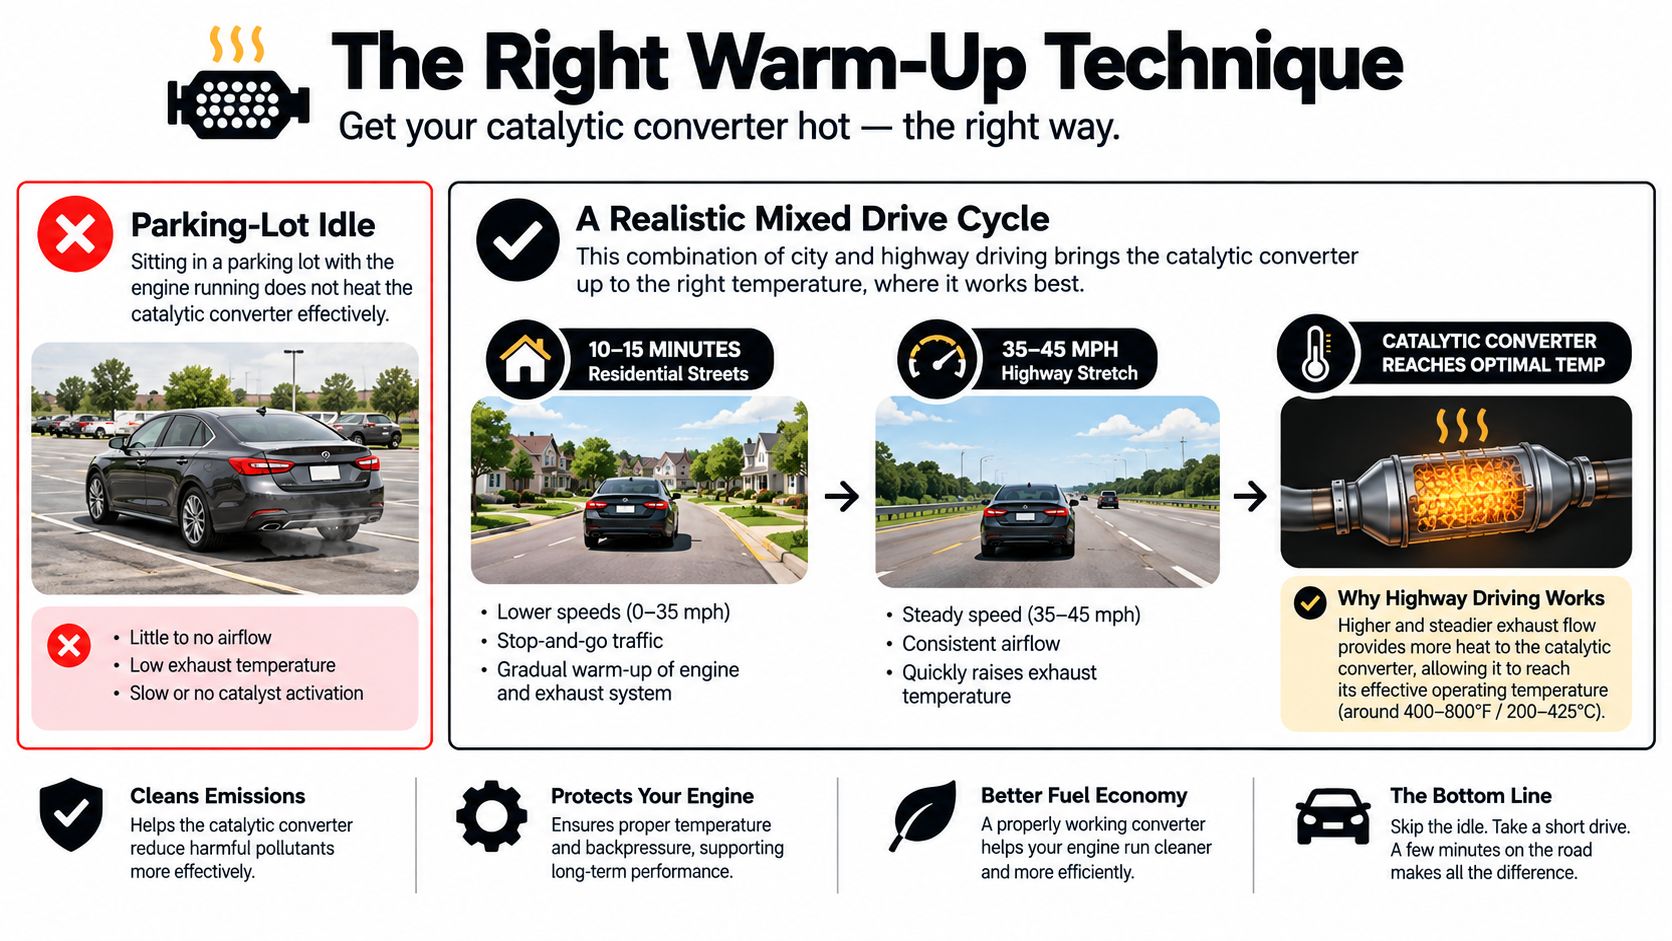
Finish driving shortly before you arrive, so the vehicle is already warm. Don't shut it off for a long wait if the station's process allows you to keep it running safely. Leave the A/C and rear defroster off during the inspection unless you need them for safety, because extra electrical and engine load can change test conditions.
Hybrids need a little more planning because the gasoline engine may shut off during portions of the route. Diesel vehicles also follow different emissions logic. If you drive either type, use normal operation and ask the station whether your vehicle needs a particular inspection procedure.
Paperwork, Coupons, and What to Bring
Most appointment problems are boring and preventable. Bring the renewal notice or current registration, a payment method the station accepts, and any repair or diagnostic paperwork that might help explain recent work. If your state or service provider sends an electronic certificate, have access to the email account or phone number used for delivery.
California drivers should check for available smog coupons before arriving. The state's Consumer Assistance Program may provide a $50 state assistance voucher, with eligibility rules and limits applying to the vehicle and applicant (California's official consumer assistance information). Don't assume every coupon works at every station. Read the terms, confirm the vehicle eligibility, and ask whether the discount applies to the inspection or only to a particular service.
Choose the correct station
A standard licensed station, a STAR station, and a test-only station don't serve exactly the same purpose.
| Station Type | Can Perform Repairs? | Use When |
|---|---|---|
| Regular licensed station | Often, depending on the business | You want inspection and possible repair support in one place |
| STAR-certified station | Varies by station | Your renewal notice directs you to STAR or you need a recognized follow-up inspection |
| Test-only station | No repair work | You want an independent inspection without repair sales |
Check your renewal notice before choosing. Some vehicles are directed to STAR-certified stations, and a retest path may have specific station requirements. A test-only location can inspect and report, but it won't repair the problem if the vehicle fails.
The technician needs clear access to the dashboard, engine compartment, gas cap, and diagnostic port. Wear shoes you can safely drive in and remove clutter from the cabin. At Speedy Smog, a STAR Certified smog check station in San Leandro handles emissions testing for many cars, older vehicles, diesels, and hybrids, with the exact inspection determined by the vehicle and California requirements.
If You Do Not Pass on the First Try
A failed result gives you information. Don't approve a catalytic converter or oxygen sensor just because the word “emissions” appears on the report. Start with the Vehicle Inspection Report, or VIR, and identify exactly what failed.
The VIR should tell you whether the issue involved readiness, a diagnostic code, visible equipment, or measured emissions. If the tailpipe portion failed, the pollutant readings and limits guide the diagnosis. If the computer portion failed, find out which monitor remains incomplete or which code prevents certification.
Follow the evidence
Ask for a scan-data diagnosis before authorizing parts. A technician can check fuel-trim behavior, oxygen-sensor response, misfire data, EVAP operation, and catalyst performance instead of guessing. A loose gas cap, EVAP leak, oxygen-sensor problem, misfire, or weak catalyst can produce very different repair paths.
Keep every estimate, invoice, receipt, and parts record. California assistance and waiver programs use documentation and eligibility requirements, so paperwork can matter as much as the repair itself. Ask the station whether the appropriate next step is a repair and retest or a state Referee appointment.
The cheapest repair is the one supported by test data, not the one that sounds most familiar.
A STAR station may handle a qualifying retest after repairs. A Referee can address unusual cases, disputed results, emissions equipment questions, or vehicles that need state-level review. The Referee process has its own appointment and documentation requirements, so contact the program rather than showing up at a regular station expecting the same service.
For a straightforward follow-up, ask about the station's free smog retest policy before authorizing work. Retest rules vary, and the renewal deadline doesn't pause while you search for a part.
Repair in stages. Fix obvious maintenance and sealing problems first, then retest or rescan before moving to expensive components. If the report points to a serious emissions failure, schedule diagnosis immediately rather than waiting until the registration deadline is close.
Quick Checklist and Common Questions
Use this checklist on your phone before you leave. A smog check has two separate failure points: the computer must show completed readiness monitors, and the vehicle must meet the tailpipe emissions limits. A warm engine only handles the second part.
One week out
- Check the warning light: Confirm the check engine light appears during the bulb check, then turns off after startup.
- Inspect the gas cap: Tighten it until it clicks. Replace a cracked or missing cap.
- Review vehicle history: Note recent battery work, code clearing, repairs, or electrical changes. Any of these can leave monitors incomplete.
- Plan the route: Build in mixed city and freeway driving before the appointment.
Since California's October 2025 rule change, an incomplete required monitor can disqualify the vehicle. Check monitor status before you pay for the inspection.
The day before
- Drive normally: Recently repaired systems need time and the right conditions to complete their self-tests.
- Check fuel level: Keep the tank in a moderate range, not extremely low or completely full.
- Check fluids and tires: Confirm the oil level and tire pressure are suitable for the drive.
- Gather documents: Put the renewal notice, registration, payment, and coupon together.
The morning of the appointment
- Avoid a cold arrival: Drive for 15–20 minutes before the inspection, using mixed driving so the engine and catalyst are fully warm (California smog check preparation guidance).
- Skip last-minute resets: Do not disconnect the battery or clear codes.
- Remove distractions: Leave unnecessary roof racks and accessories off the vehicle.
- Bring useful information: Tell the technician about recent repairs, battery replacement, or warning-light history.
Common questions
Does a new battery reset readiness monitors?
It can. Battery replacement or disconnection may return monitors to “Not Ready.” Drive normally and verify their status before testing.
How long does a drive cycle take?
The warm-up drive commonly takes 15–20 minutes, but monitors reset after repairs may need substantially more mixed driving. A short warm-up does not complete every self-test.
Does premium fuel help?
Use the fuel grade listed in your owner's manual. Premium fuel cannot repair an emissions fault, seal an EVAP leak, or complete readiness monitors.
What counts as a gross polluter?
The vehicle produces emissions far above the applicable limit. The test report and measured results determine that status, not how the car sounds or feels.
Can the check engine light clear itself?
It may turn off after the computer confirms that a fault is no longer present. The issue still needs diagnosis, and a dark warning light does not prove that monitors are complete.
How long does the certificate stay valid?
Validity depends on the transaction and California DMV requirements. Follow the paperwork and renewal instructions tied to your vehicle.
The practical target is simple: complete readiness monitors and a properly warm emissions system. If either part is uncertain, have the monitor status checked before paying for the inspection.
Speedy Smog provides STAR Certified smog inspections in San Leandro for many cars, diesels, older vehicles, and hybrids. Bring your renewal notice, ask about current coupons, and visit Speedy Smog to schedule or confirm your inspection.

You're already at the point where the smog appointment is on the calendar, the renewal deadline is creeping closer, and you're trying to figure out whether one more drive around the block will save the day. Most failures I see don't start at the station, they start in the driveway, with a cold engine, a hidden warning light, or a monitor that never finished setting. The good news is that passing an emissions test in California is usually about preparation, not luck.
California's rules are strict for a reason. The EPA says today's vehicles are up to 99% cleaner than those on the road in the early 1970s, which shows how far emissions control has come, but it also means modern inspections are built around whether the vehicle's systems are doing their job. For many drivers, the difference between a pass and a fail comes down to OBD-II readiness, a clean visual inspection, and showing up with the car in the right condition for the test.
Table of Contents
- Pre-Test Checklist Before You Arrive at the Station
- Completing the Drive Cycle and OBD Readiness Monitors
- Visual and Mechanical Items Inspectors Check
- What to Expect on Test Day at a STAR Station
- Common Failure Causes and Realistic Fixes
- What to Do If Your Vehicle Fails the Smog Check
Pre-Test Checklist Before You Arrive at the Station
The most common bad appointment I see is the one where the driver rolls in with the engine still cold, the check engine light glowing, and a look that says, “Maybe they won't notice.” They will notice. A lit check engine light is not a detail you can talk your way around, and if the engine computer hasn't finished its emissions checks, the vehicle may not be ready to pass even if it drives fine.
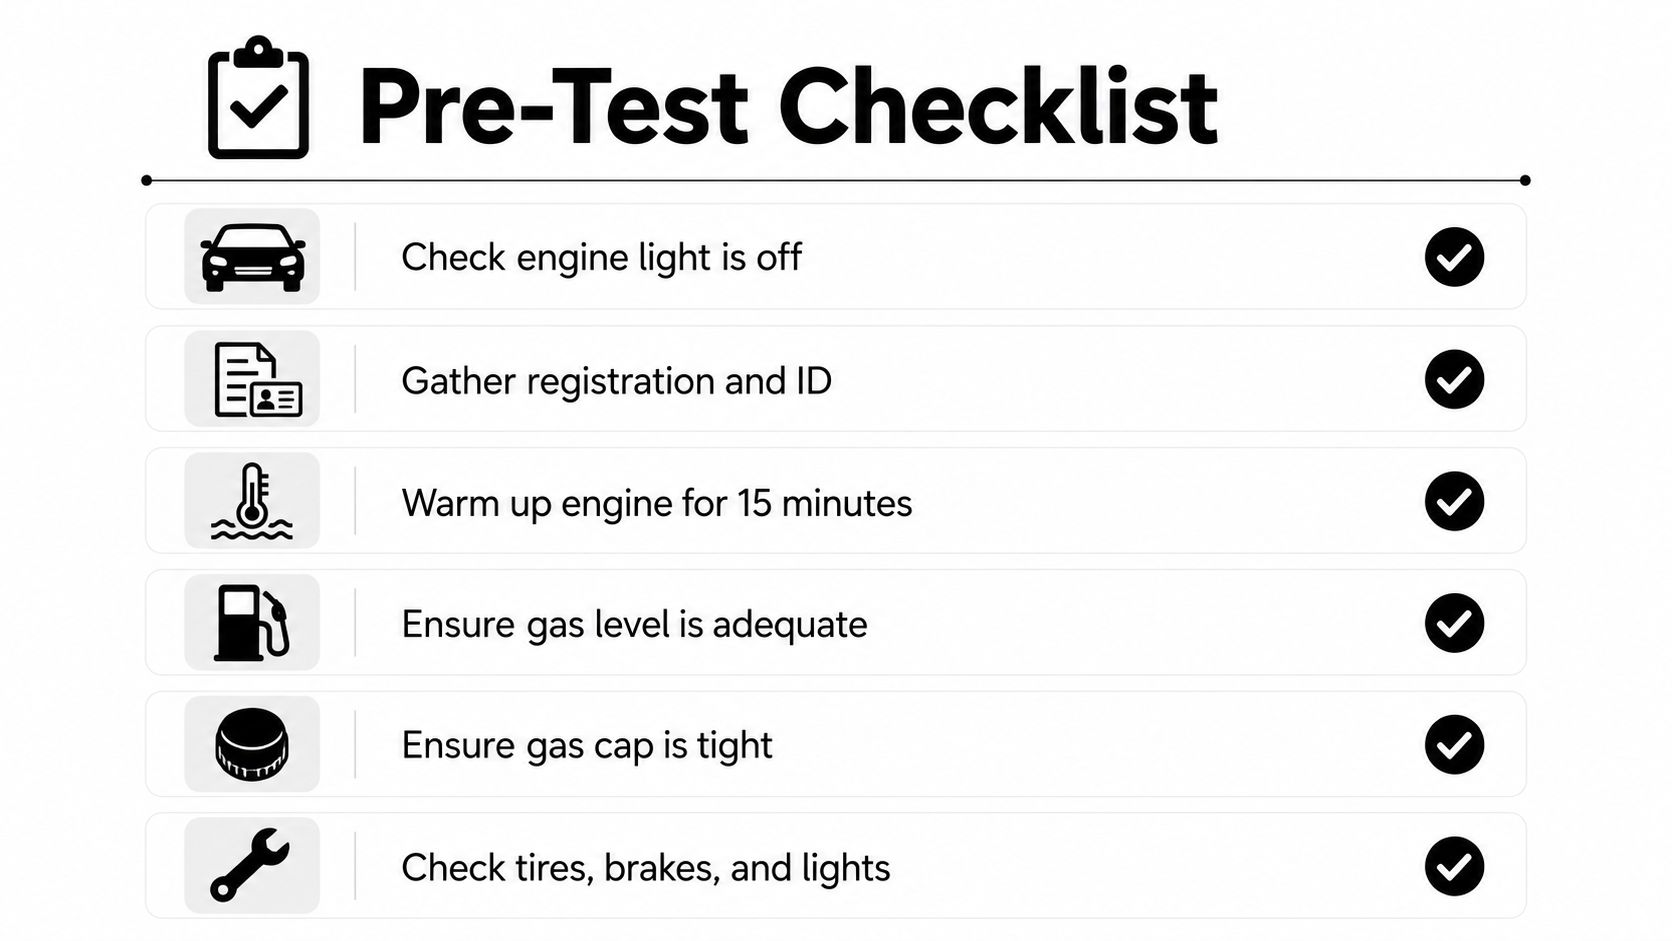
Start with the obvious things
Before you leave home, look at the dashboard with the key on and the engine running. If the check engine light is on, don't assume it'll magically disappear on the way to the station. In OBD-era vehicles, a car can still pass when the light is operating normally but off and all but one monitor is completed under most conditions, but that only helps if the rest of the system is in good shape too.
Practical rule: if the car is alerting you on the dash, treat that as a repair problem first, not a testing problem.
Then check the simple visual items that cause wasted trips. Open the hood and look for loose hoses, wet spots, obvious leaks, or anything that looks disconnected. On California inspections, a car can fail for visual issues even when it runs normally, especially under the state's more detailed Smog Check process, which looks beyond just tailpipe behavior and routine drivability, as the California Smog Check Manual makes clear.
Don't skip paperwork and basic condition checks
Bring what the station needs for DMV processing, and make sure the car is reasonably presentable. A loose gas cap, missing under-hood label, or obvious mechanical issue can slow the inspection or end it early. If the car recently had service, keep a mental note of what changed, because a fresh repair sometimes explains a pending code or a monitor that hasn't reset yet.
If you're the type who likes to prep everything in one shot, it helps to review an oil-change and service checklist before the smog visit, since neglected maintenance often shows up as emissions trouble later. One useful reference is this guide on oil change timing before a smog check.
The short version is simple. No warning lights, no obvious leaks, no missing parts, and a warm, healthy car gives you the best shot at a clean first visit. If any of those pieces are off, fix them before you burn time in the waiting room.
Completing the Drive Cycle and OBD Readiness Monitors
Modern California smog checks lean heavily on what your car's computer says about itself. That's the whole point of OBD-II readiness, the system's way of confirming that emissions monitors have run and passed. For many 2000-and-newer vehicles, the inspection is less about a dramatic tailpipe reading and more about whether the vehicle has completed the checks that prove the emissions system is functioning under real driving conditions.
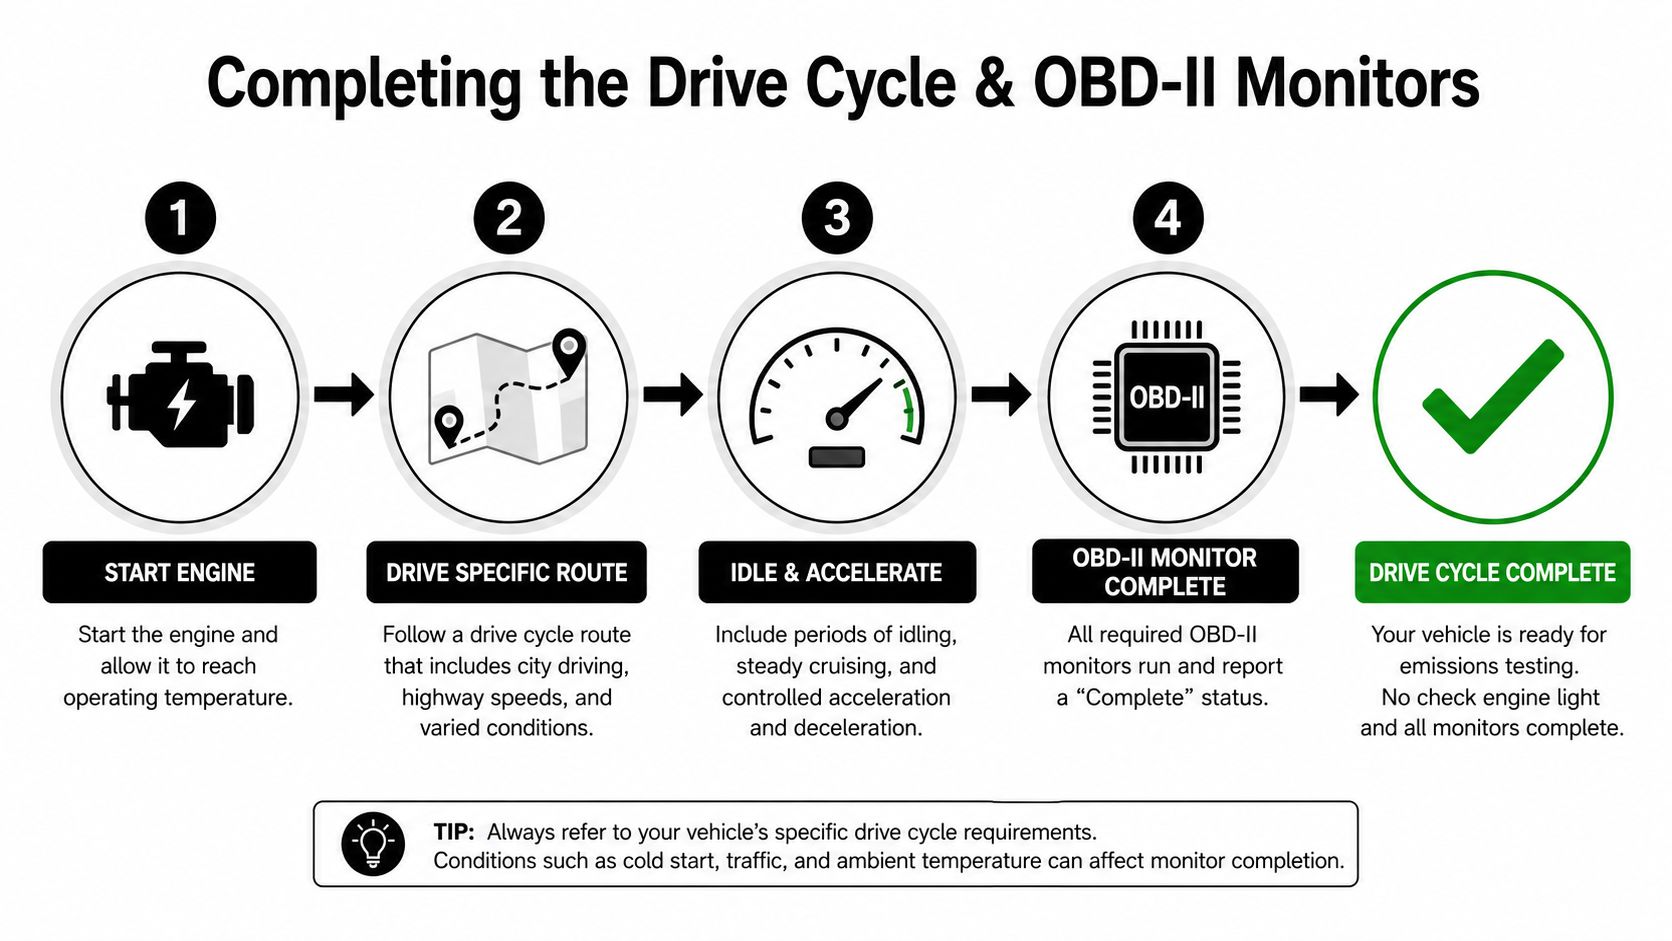
What the drive cycle is really doing
The typical advice is to complete a full drive cycle of about 30–60 miles (50–100 km) with mixed conditions, because the computer needs enough varied driving to run its emissions monitors. That means some city-style stops, some steady cruising, and enough time for the car to settle into normal operating behavior. Current guidance also points to warming the engine to about 70–105°C (160–220°F), since colder engines can produce more pollutants and may keep monitors from setting. See the practical drive-cycle guidance in the OBD readiness preparation guide.
That's why a short hop to the gas station doesn't count. A monitor that hasn't completed isn't the same thing as a broken car, but it can still stop you from passing.
Fuel level matters more than most drivers think
Keep the fuel tank roughly 25% to 75% full before the test. That range matters because evaporative-emissions checks are sensitive to fuel level, and showing up near empty or completely full can interfere with readiness. The car can be mechanically fine and still fail to set the right monitor if the tank level is off.
Drive it like a real trip, not like a test lap. The computer wants varied conditions, normal temperature, and enough time to finish its checks.
If you've had codes cleared recently, especially after a battery disconnect or repair, give the car time to relearn everything before the appointment. That reset wipes the readiness status, which is one of the fastest ways to turn a potentially easy pass into an automatic delay.
For drivers who want to understand the codes themselves before heading in, a solid starting point is a guide on reading OBD codes. The value there isn't in guessing a fix, it's in knowing whether you're dealing with a simple readiness issue or an actual fault that needs repair.
The practical move is to schedule your drive cycle a few days before the appointment, not the morning of. If the monitors don't finish, you'll know in time to correct course instead of discovering it at the counter.
Visual and Mechanical Items Inspectors Check
A clean dashboard doesn't guarantee a clean result. California inspectors also look at visual and mechanical condition, and that's where a lot of “but the car drives fine” stories fall apart. A vehicle can run smoothly and still fail if the inspector sees missing equipment, leaks, overheating signs, or a modified setup that doesn't match what the car is supposed to have.
The stuff that gets missed in the driveway
One of the first things an inspector pays attention to is whether the emissions hardware is all there. That includes the catalytic converter, related hoses, and any parts that look tampered with, missing, or out of place. If a previous repair shop used a shortcut, or an owner removed something during a modification, the station may flag it even if the car seems happy on the road.
California's inspection manual also makes it clear that inspectors look for obvious safety hazards and visual issues like leaks or overheating. That means a fresh oil film, coolant seepage, or a hose that's hanging by a thread can become a failure point even before anyone digs into the computer data.
Gas caps, exhaust, and aftermarket parts
The gas cap still matters because it affects the evaporative system. A bad seal, missing cap, or cap that doesn't tighten properly can trigger trouble during the inspection process. Exhaust leaks, loose clamps, and cracked hoses are just as annoying, because they can point to a deeper problem or make the emissions system behave unpredictably.
Aftermarket modifications are another trap. A part that looks cleaner or newer isn't automatically compliant. If the car has been altered in a way that changes the emissions equipment layout, the inspector may treat it as a missing-component issue rather than a cosmetic upgrade.
If you hear a rattle, smell fuel, or see a fluid trail, don't gamble on the test. Fix the mechanical issue first, then come back ready.
Older vehicles and modified cars deserve extra attention here because the visual portion matters more when the car has a longer history of repairs, swaps, or nonstandard parts. What fails people most often is not a dramatic breakdown. It's a small oversight, like a cracked hose, a loose clamp, or an evaporative component that never got reinstalled after service.
What to Expect on Test Day at a STAR Station
At a well-run station, test day should feel organized, not mysterious. You bring the documents, hand over the keys, and the technician starts with the required checks for your vehicle type. If your car is one of the vehicles required to use a STAR-certified location, that matters because STAR stations meet higher performance standards set by the Bureau of Automotive Repair.
What the station actually does
For a 2000-and-newer car, the process usually centers on the OBD system, readiness monitors, and visual confirmation that the emissions equipment is in order. Older models, diesels, and hybrids can follow different testing paths, which is why assuming every smog appointment is the same is a mistake. The vehicle may be inspected, plugged in, and checked for compliance items that don't show up on a generic “my car runs fine” readout.
A clean station should also tell you what it needs up front, so you aren't guessing about paperwork or waiting around with an unprepared car. If you're trying to understand why one station is required over another, the basics of what a STAR station is matter more than most drivers realize, especially if registration renewal is on the line.
Time, waiting, and choosing the right place
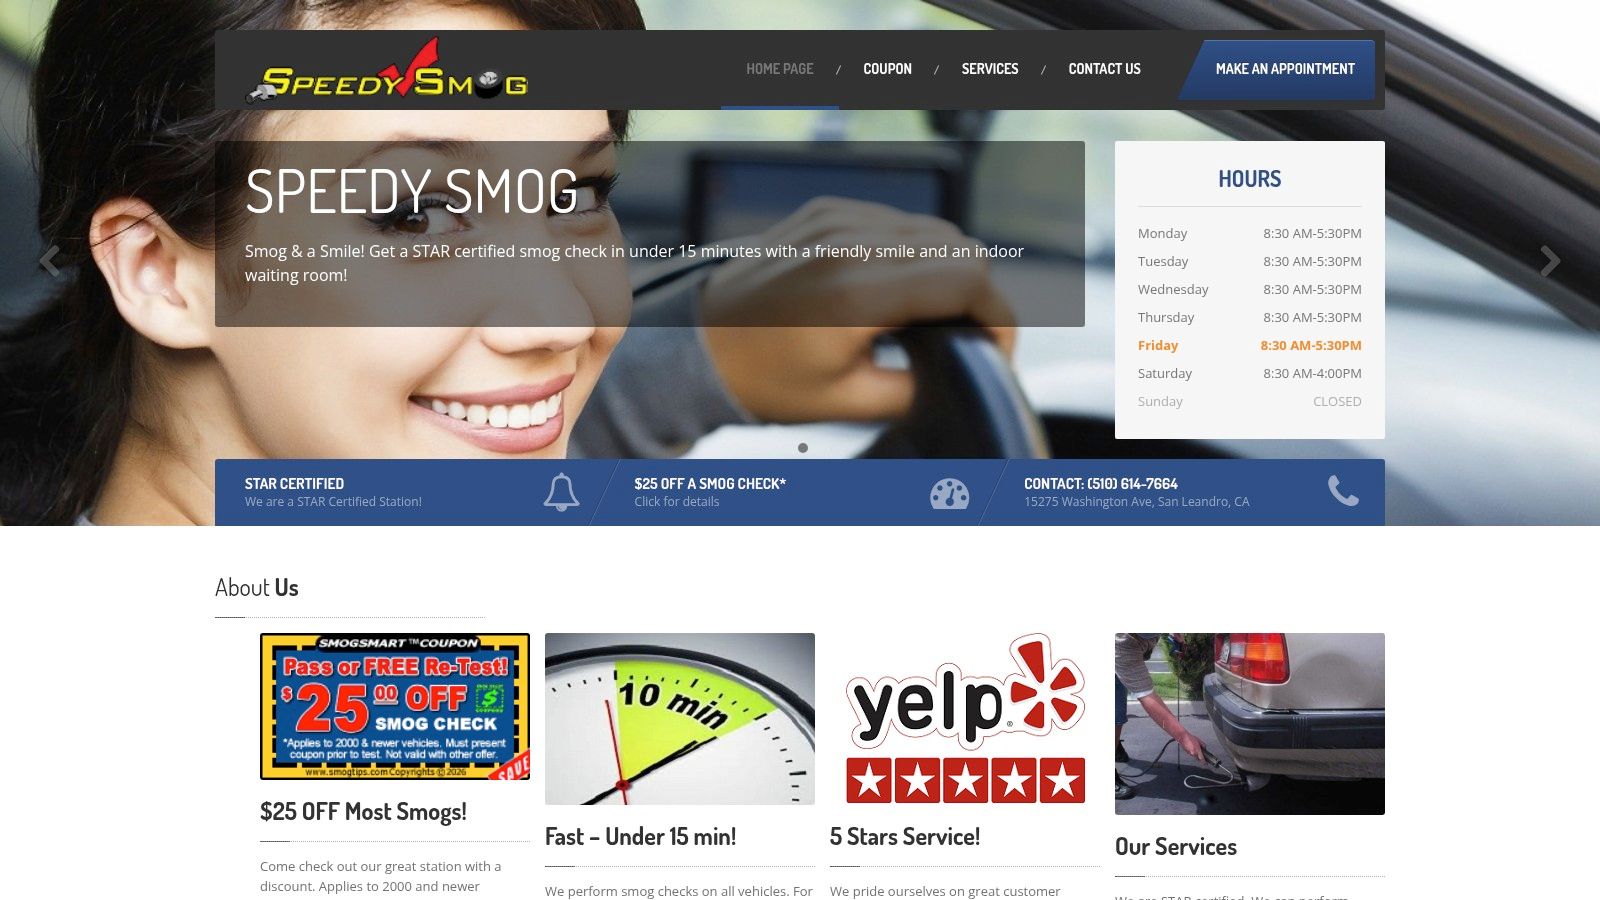
A good smog shop respects your time. Speedy Smog in San Leandro, for example, completes most tests for 2000-and-newer vehicles in about 10 to 15 minutes, and that kind of turnaround is exactly what you want when the goal is to get in, get certified, and get back on the road. The indoor waiting area also matters more than people admit, especially when you're dealing with a second visit or a busy weekday schedule.
One thing I tell drivers is to treat the station choice as part of the test preparation. A place that knows California compliance, handles different vehicle types correctly, and doesn't waste your time makes the whole process easier. You don't need a sales pitch, you need accurate testing and clean paperwork.
If your vehicle is one of the newer models, the practical advantage is speed. If it's older, diesel, or a hybrid, the advantage is finding a station that already knows how to handle those protocols without improvising.
Common Failure Causes and Realistic Fixes
Most failed smog checks come from a handful of repeat offenders. The frustrating part is that many of them look small from the driver's seat, but they're enough to stop the test cold. I see a lot of people hoping for a shortcut, then learning the hard way that emissions systems don't care about last-minute additives, battery tricks, or a dash of optimism.
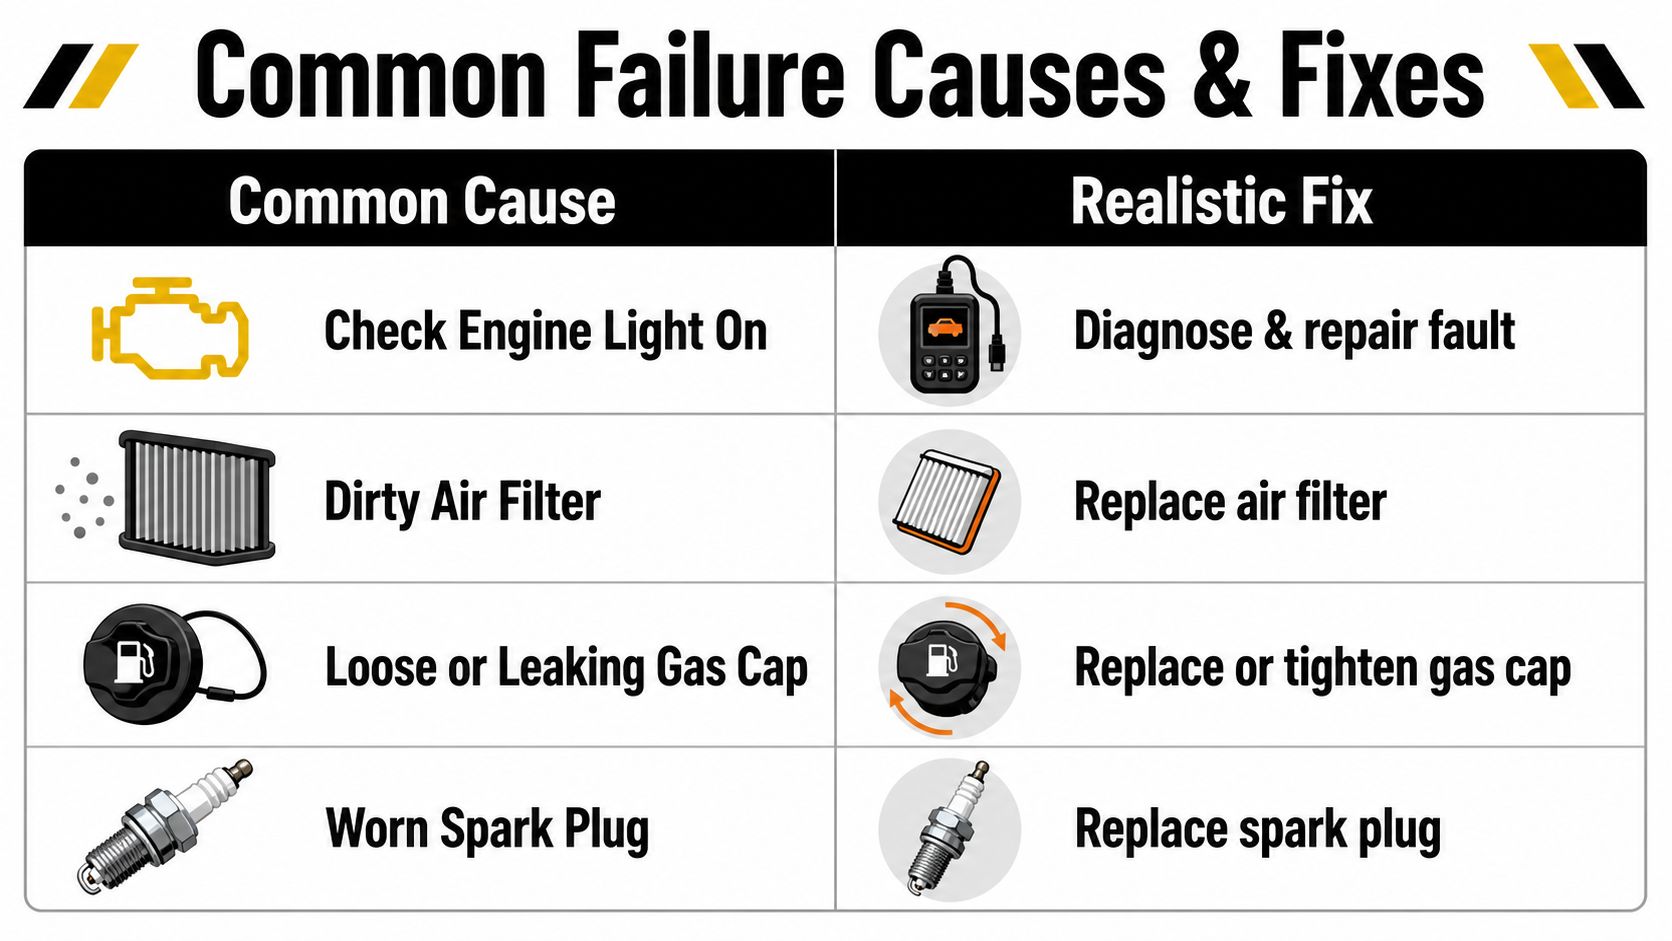
What usually breaks the pass
A loose or failing gas cap is an easy one to miss, and it's often one of the first things worth checking because it affects the evaporative system. Worn oxygen sensors and degrading catalytic converters are more serious, because they point to actual emissions-control problems that need diagnosis and repair rather than a quick reset. Vacuum leaks are another classic issue, especially on older vehicles or cars that have had recent work.
Pending diagnostic trouble codes are the sneaky ones. The check engine light might still be off, but the car has already logged a problem that can keep it from passing. That's why a scan tool matters more than a guess.
Disconnecting the battery is not a fix. It clears memory, resets readiness, and often sets you back instead of moving you forward.
What actually works
The honest answer is to repair the fault that triggered the code, then drive the car long enough for the monitors to reset. If the gas cap is bad, replace it. If a sensor is lazy, diagnose it properly instead of throwing parts at the problem. If the catalytic converter is degraded, don't expect a fuel additive to rescue it.
For some drivers, a trusted smog station that also understands the repair path can save a round trip. Speedy Smog is one option that offers smog checks and free retests, which can help when you're working through a repair and need to come back after the vehicle is ready.
The trade-off is time versus guessing. Guessing is cheap for about five minutes, then it becomes expensive.
What to Do If Your Vehicle Fails the Smog Check
A failed result isn't the end of the road, it's a repair roadmap. Start with the Vehicle Inspection Report, because that's the document that tells you whether the problem is readiness, a code, a visual issue, or something deeper. Fixing the wrong item first is how people waste money and miss registration deadlines.
Prioritize the failure, not the noise
If the report points to one clear fault, handle that first. A weak gas cap, a sensor issue, or a vacuum leak should be addressed before you think about anything else. If there are multiple items, a good mechanic will sort them in order of what blocks the pass fastest and what might be secondary damage from the main fault.
California also has a repair cost waiver program for some situations, and the state's rules are the place to look if repairs start to spiral. The key is not to assume a waiver applies automatically. You need to check eligibility against the official requirements and follow the process carefully.
Know your retest and timing options
Many stations offer a free retest policy, which matters if you've already fixed the underlying issue and just need the car checked again. That saves you from starting over at a random shop when the same station can verify the repair. It also helps to retest before the registration deadline gets tight, because waiting too long turns one fix into a paperwork problem.
Get the repair done, drive the car enough to restore readiness, and go back before you start cutting it close on registration.
Special protocols still apply for diesel vehicles, hybrids, and 1999-and-older models, so don't assume the same repair strategy fits every car. Some vehicles need a different inspection path, and some need more patience before they're ready to pass again.
If you want the cleanest route, schedule the repair, confirm the readiness status, and return with a car that's prepared, not just recently reset. That's how you turn a failure into a pass without chasing your tail.
If you want a station that understands California smog rules, handles different vehicle types, and keeps the process moving, visit Speedy Smog in San Leandro. They offer smog checks, free retests, and DMV submission after a passing result, which makes them a practical stop when you need the car certified and the paperwork handled the right way.