In California, gasoline and hybrid vehicles from model year 1976 and newer generally need a smog check, while 1975 and older vehicles are generally exempt. The DMV renewal notice controls what's required for your vehicle in any given year.
You're holding the renewal notice at the kitchen counter, or you've just bought a used car and the seller says, “It probably doesn't need smog.” That's where confusion starts. The model year gives you the starting point, but the transaction determines the test requirement.
For East Bay drivers, the three situations that matter are registration renewal, ownership transfer, and first California registration. A newer vehicle may skip a routine renewal inspection but still need a test when it comes from another state. An older vehicle may fall inside the program but be treated differently depending on whether you're renewing, selling, or registering it for the first time in California.
Table of Contents
- The Quick Answer Every East Bay Driver Wants
- The 1976 Cutoff and the Big Exceptions
- How the Eight-Year Renewal Exemption Works
- OBD-II Versus the Older Tailpipe Test
- Real Situations That Change the Answer
- What to Do Before You Head to a Smog Shop
- Putting It All Together for Your Next Renewal
The Quick Answer Every East Bay Driver Wants
If you're asking what year cars need smog in California, start with model year 1976. Gasoline, flex-fuel, hybrid, and other qualifying alternative-fuel vehicles from 1976 and newer generally fall under California's Smog Check program. Vehicles from 1975 and older are generally exempt, according to the California Bureau of Automotive Repair's vehicle coverage guidance.
That answer is useful, but it isn't the final answer for your DMV paperwork. Your DMV renewal notice is the authority for what you must do now. It will tell you whether the state wants a smog certificate, a fee during the newer-vehicle exemption period, or another form of compliance.
A 2020 hybrid, for example, is inside the general program because it's newer than the 1976 cutoff. That doesn't mean it needs a smog inspection every time the owner renews registration. Newer vehicles receive an age-based exemption for routine renewal, and the relevant transaction can change the result.
Use this three-question check at the counter:
- Is this a registration renewal? The vehicle's model year and age-based exemption determine when recurring inspections begin.
- Is ownership changing? The change-of-ownership exemption is shorter than the renewal exemption.
- Is this the vehicle's first California registration? An out-of-state vehicle from model year 1976 or newer generally needs a Smog Check for that initial California registration event.
Practical rule: Don't schedule a test based only on the year printed on the title. Read the DMV notice first, then match the test to the transaction.
The rest of the rules make sense once you separate those three situations. The 1976 cutoff tells you whether the vehicle is generally in the program. The renewal and transfer exemptions tell you when a test starts. The registration history tells you whether an exception applies.
The 1976 Cutoff and the Big Exceptions
California's foundational line is simple: 1976 and newer generally means Smog Check territory, while 1975 and older generally means exemption. BAR specifically identifies gasoline and flex-fuel vehicles from model years 1976 through 1999 as generally requiring a Smog Check, with 1975 and older gasoline and flex-fuel vehicles generally exempt. Hybrids and other qualifying fuel types can also fall within the program, so “hybrid” doesn't automatically mean “no smog.”
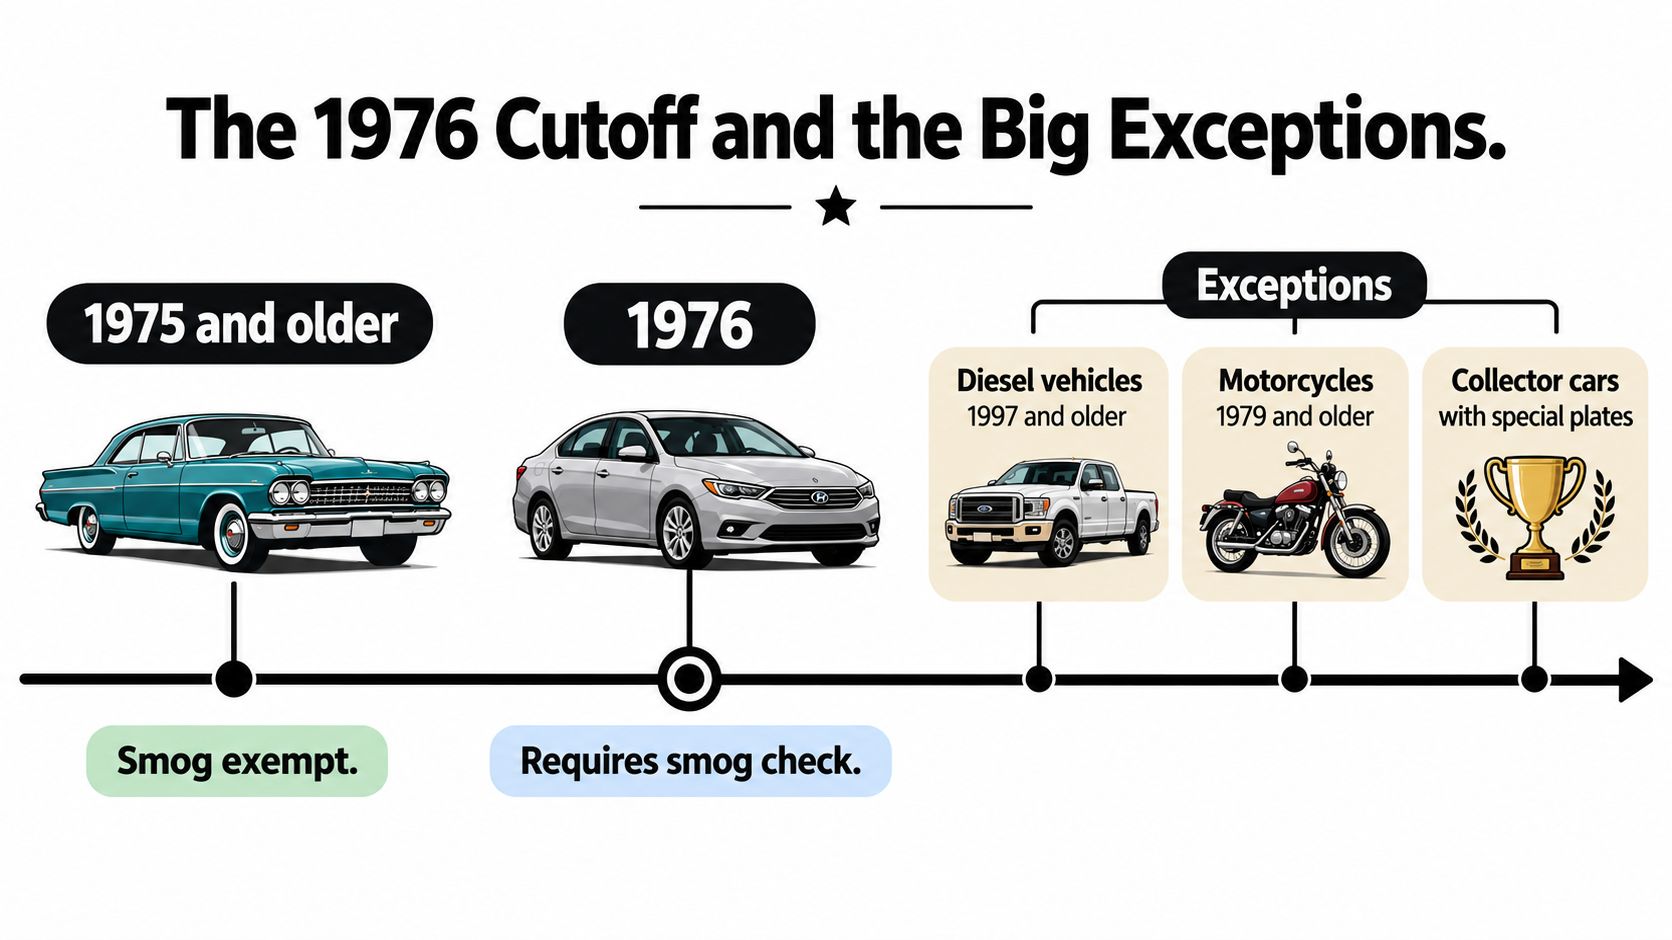
A 1972 Mustang is generally outside the program because it predates the cutoff. An 1985 gasoline sedan is generally inside it, even if it's well maintained and driven only occasionally. The age of the car doesn't move the legal line. Its model year does.
Weight and inspection equipment matter
The standard answer changes when the vehicle falls outside the usual passenger-vehicle category. For 2000-and-newer vehicles with a gross vehicle weight rating of 14,000 pounds or less, California generally uses an OBD-II-based inspection. Vehicles above that weight, or vehicles without the applicable onboard diagnostic system, may follow a different testing path.
That's why I don't give a blanket answer based on the year alone. A heavy vehicle, unusual fuel type, missing diagnostic system, or special registration status can change how the inspection is performed.
The out-of-state exception catches people
BAR states that all out-of-state 1976-and-newer vehicles need a Smog Check for first-time California registration. That requirement can apply even when the vehicle is still within the normal exemption period for a recurring California renewal.
If you've brought a vehicle to San Leandro from Nevada, Oregon, Arizona, or anywhere else, don't assume its previous state inspection carries over. California's first-registration event is its own trigger. For older vehicles, the guidance for smog checks on older cars can help you identify which inspection path may apply.
How the Eight-Year Renewal Exemption Works
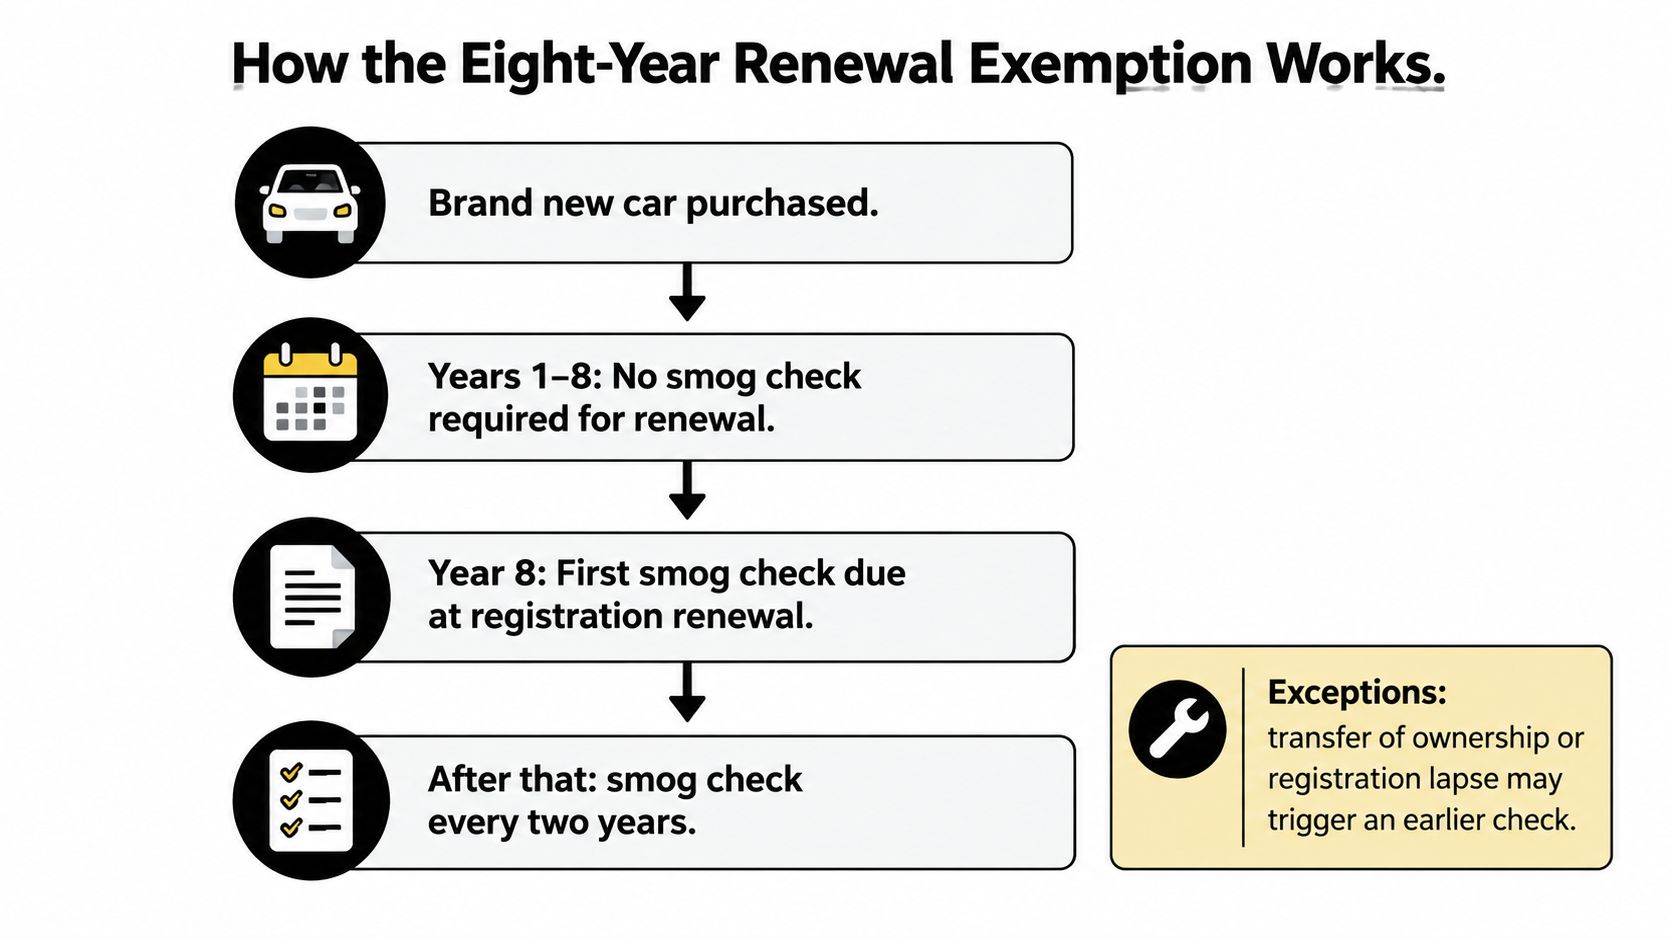
A newer car can be inside California's Smog Check program without needing an inspection at every renewal. For regular registration renewal, BAR says gasoline vehicles eight or fewer model years old are generally exempt from the biennial inspection. During that period, the owner generally pays a smog-abatement fee instead. The BAR renewal exemption guidance explains the practical calculation, add eight to the model year to find the first year a renewal inspection is generally required.
Take a 2020 model-year vehicle. Add eight to the model year, and the first recurring renewal inspection generally arrives in 2028. That's a model-year calculation, not a calculation based on the day you bought the car. The DMV notice still decides what you must complete for the specific renewal.
A 2018 model-year vehicle is already beyond that eight-model-year window. If its registration renewal calls for certification, the owner should plan for a smog inspection rather than assuming the car is still covered by the newer-vehicle exemption.
Renewal and ownership transfer use different clocks
The ownership-transfer rule is shorter. Vehicles four or fewer model years old are generally exempt from the change-of-ownership Smog Check, but the buyer pays a smog-transfer fee instead. BAR's practical method is to add four to the vehicle's model year to identify when that transfer exemption ends.
| Transaction | General age rule | What usually happens |
|---|---|---|
| Registration renewal | Eight or fewer model years old | Smog-abatement fee instead of the routine inspection |
| Ownership transfer | Four or fewer model years old | Smog-transfer fee instead of the transfer inspection |
| Older qualifying vehicle | Beyond the applicable exemption | Certification is generally required for the transaction |
A 2022 vehicle reaches the change-of-ownership threshold in 2026, while a 2018 vehicle is already beyond the four-model-year exemption. Those examples show why a car can avoid a renewal inspection yet still face a different requirement when sold.
For a practical explanation of the newer-car rule, see this guide to a California smog check for new cars. Then look at the paperwork, not just the calendar. An out-of-state vehicle, a registration event, or a transfer can override the assumption that the car is too new to test.
OBD-II Versus the Older Tailpipe Test
The inspection your car receives depends largely on its model year and equipment. California generally uses an OBD-II-based inspection for 2000-and-newer vehicles with a gross vehicle weight rating of 14,000 pounds or less. A technician connects to the vehicle's diagnostic port and checks the emissions computer rather than measuring the exhaust at the tailpipe.
A 1976–1999 gasoline vehicle generally receives the older BAR-97-style tailpipe inspection. That process evaluates emissions coming out of the exhaust, so it measures a different part of the vehicle's emissions system than an OBD-II inspection.
| Model year | Typical test type | What it measures |
|---|---|---|
| 1976–1999 gasoline | BAR-97-style tailpipe test | Exhaust emissions at the tailpipe |
| 2000 and newer, up to 14,000 pounds GVWR | OBD-II-based test | Diagnostic data and emissions-system status |
| Outside the standard category | Different test path may apply | Vehicle-specific emissions requirements |
The failure patterns aren't the same. With an OBD-II test, a lit check-engine light, stored emissions fault, or incomplete readiness information can stop the vehicle from passing. Clearing the battery or a trouble code immediately before testing can also leave the computer without the information it needs to show that its self-checks are complete.
The older test focuses more directly on measured exhaust output. A clean dashboard doesn't guarantee a 1985 vehicle will pass if its actual emissions exceed the applicable limits.
The connector tells the technician what the computer sees. The tailpipe test tells the technician what the engine is actually producing.
Hybrids, diesels, vehicles above 14,000 pounds GVWR, and vehicles without the applicable onboard system can follow different testing rules. Don't choose a shop based only on the assumption that every car receives the same inspection. If you want the technical distinction in one place, review the explanation of OBD versus tailpipe testing.
Real Situations That Change the Answer
An Oakland resident moves back to California with a 2019 SUV purchased and registered in another state. The vehicle may still be within the regular renewal exemption period, but this isn't a routine California renewal. It's the vehicle's first California registration, and an out-of-state 1976-and-newer vehicle generally needs a Smog Check for that event.
That driver should read the DMV registration instructions and schedule the appropriate inspection before assuming the newer vehicle can skip testing. The previous state's inspection history doesn't erase California's first-registration requirement.
A San Leandro driver sells a 2016 sedan to a private buyer. The car is beyond the four-model-year ownership-transfer exemption, so the seller should expect a smog certification requirement for the transfer unless the paperwork or transaction falls under a separate rule. The fact that the vehicle may have passed a previous renewal test doesn't settle the transfer requirement.
That's the distinction people miss at the DMV. The model year sets the default, but the transaction type decides which rule applies.
Three quick counter examples
- A 1972 Mustang: Generally exempt because it's 1975 or older. The owner should still follow the DMV instructions for registration and title paperwork.
- A 2019 out-of-state SUV: Generally requires a Smog Check for first California registration, despite being a newer vehicle.
- A 2016 private-party sedan: Generally beyond the transfer exemption, so certification is generally needed for the ownership change.
The same vehicle can have different requirements at different points in its life. Ask whether you're renewing, transferring, or registering from out of state before asking only what year the vehicle is.
What to Do Before You Head to a Smog Shop
Run through this checklist before driving across the East Bay. It prevents wasted trips and helps the technician identify the right inspection quickly.
- Read the DMV notice. Confirm whether the state wants a renewal inspection, transfer certification, or first-registration test.
- Check the dashboard. A lit check-engine light is a warning sign for an OBD-II vehicle. Have the cause diagnosed before you pay for an inspection.
- Bring the paperwork. Take the renewal notice, registration, title or transfer documents, and any instructions from the DMV.
- Confirm the station type. Some DMV-directed vehicles must use a STAR Certified station. If your notice or vehicle record directs you to STAR, don't use a non-STAR location.
- Ask about preparation. The technician can tell you whether the vehicle needs a particular warm-up or readiness procedure before testing.
Speedy Smog is one San Leandro option for drivers who need a STAR Certified station and inspections for newer vehicles, older vehicles, diesels, or hybrids. Its site also publishes periodic $25-off coupons for most smogs on newer vehicles, so check the current offer before scheduling if your vehicle qualifies.
The practical point is simple: bring the notice and let the paperwork drive the appointment. A shop can inspect the vehicle, but the DMV decides which compliance event you're completing.
Putting It All Together for Your Next Renewal
Remember three anchors. 1976 generally defines which gasoline and qualifying alternative-fuel vehicles are in the Smog Check program. The eight-year renewal exemption and four-model-year transfer exemption determine when newer vehicles generally start needing certification. The transaction, renewal, transfer, or first California registration, determines which rule applies.
Before you book anything, read the DMV renewal notice. That one habit prevents most confusion and keeps you from paying for the wrong type of appointment.
For an East Bay inspection, visit a STAR Certified station such as Speedy Smog in San Leandro, where staff can check the requirement against your paperwork and handle many 2000-and-newer tests efficiently.
Bring your DMV notice to Speedy Smog in San Leandro for a STAR Certified inspection matched to your renewal, transfer, or California registration requirement. The shop handles newer vehicles, older cars, diesels, and hybrids, so you can confirm the correct test before getting back on the road.
A California smog check usually looks at four layers, an OBD II scan, a visual equipment check, a functional inspection, and, where applicable, a tailpipe or opacity measurement. In plain English, the technician is checking the car's computer, its emissions parts, how those parts behave, and, on some vehicles, what comes out of the exhaust.
You're probably here because the registration notice showed up, the check engine light came on and went off again, or a friend told you to “just clear the code” before you go. That advice can backfire, because the inspection is built to catch more than one kind of problem, and California's numbers show those layers matter. In calendar years 2024–2025, about 19 million model year 2000-and-newer vehicles were tested, and about 1.3 million, roughly 7%, failed, which tells you the system is catching real issues, not just paperwork mistakes (California Smog Check Performance Report).
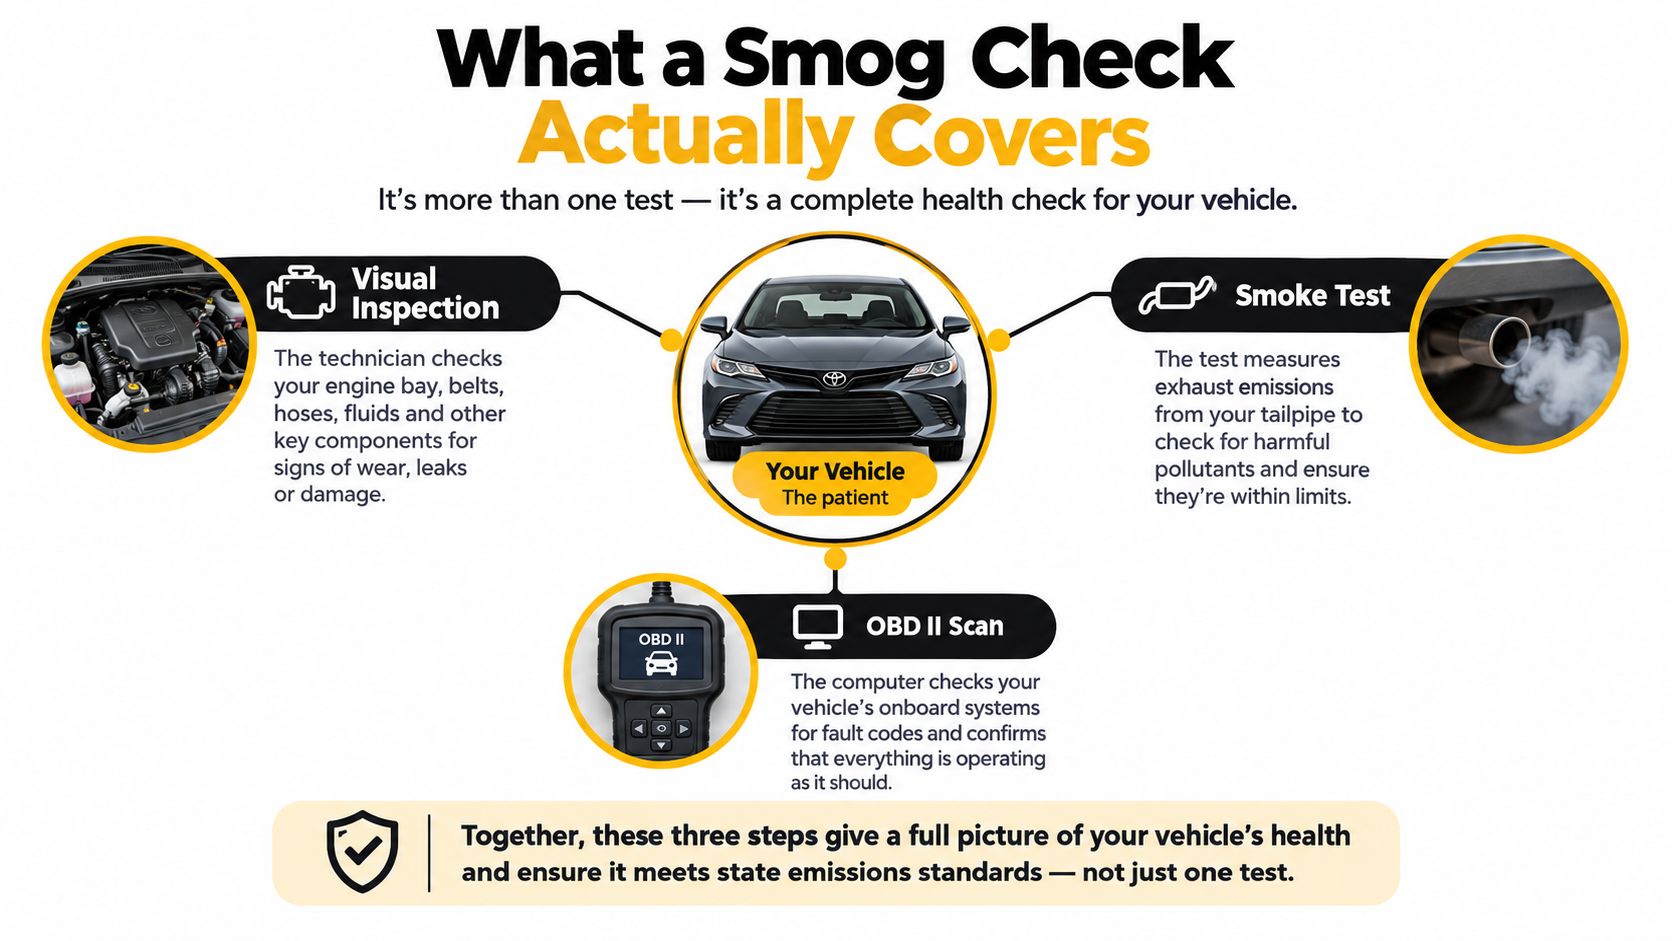
Table of Contents
- What a Smog Check Actually Covers
- The Four Layers of a Modern Smog Inspection
- OBD II Scans Readiness Monitors and the Check Engine Light
- Tailpipe Tests Opacity Checks and Older Vehicles
- What Causes Cars to Fail the Inspection
- Clearing Codes Before a Smog Check and Other Myths
- How to Prepare Your Car Before the Appointment
What a Smog Check Actually Covers
A smog check is more like a layered health check than a single measurement. When you pull into the bay, the technician isn't just looking for one bad number at the tailpipe, they're checking whether the vehicle's emissions system is functioning as a whole, the same way a doctor checks blood pressure, pulse, and breathing instead of one vital sign alone.
The first pass is about the vehicle's own evidence
For many California vehicles, the inspection starts with the car's onboard diagnostics. The computer reports whether emissions-related systems have run their self-tests, whether any faults are stored, and whether the warning lamp is behaving properly. At the same time, the technician looks under the hood and around the vehicle for required emissions parts and signs that something has been removed, damaged, or tampered with (BAR smog overview).
That's why the answer to “smog check what do they check” is broader than most drivers expect. The inspector is not only asking, “Does the car look clean?” They're also asking, “Does the car prove it can control emissions the way it should?”
Why the state uses more than one test
Different vehicles need different checks. Newer gasoline vehicles are usually handled through the computer-based inspection, while older vehicles may be measured at the tailpipe, and diesel vehicles can be tested with opacity equipment that looks at exhaust smoke density (BAR executive summary). California uses those layers because a car can look fine, sound fine, and still fail once the inspection reaches the part the driver can't see.
Practical rule: if a test looks at the computer, the hardware, and the exhaust itself, a car has three different chances to show a problem.
That matters in California because registration often depends on passing the smog check, and the state's testing program is overseen by the Bureau of Automotive Repair. Some stations are also STAR Certified, which means they meet higher performance standards set by the state, so the inspection result carries extra confidence for DMV use.
The Four Layers of a Modern Smog Inspection
A modern inspection moves in layers, and each one can surface a different problem. A car may pass the computer scan and still fail if a required emissions part is missing, damaged, or if the exhaust reading does not meet the standard.
The computer scan checks the car's memory
For a newer vehicle, the technician connects to the OBD II system, the car's self-monitoring network. The scan shows stored trouble codes, monitor status, and warning-lamp behavior, so the inspector can see whether the emissions system has been doing its job (BAR smog). This is closer to reading the vehicle's report card than a quick glance.
The visual inspection checks what's physically present
The next layer is the under-hood and under-car review. The technician confirms that required emissions equipment is present and appears correctly installed, including parts such as the catalytic converter, evaporative-emissions components, and exhaust-gas recirculation equipment when applicable (BAR executive summary report). If a part has been removed, bypassed, or clearly tampered with, the car can fail even if the engine sounds fine.
The functional and measured-emissions checks catch what the eye can't
Some inspections also include a functional review, which checks whether the emissions controls respond properly, not just whether they are installed. On older vehicles, there may also be a measured exhaust test or opacity test, depending on fuel type and model year (BAR-97 manual). That separates a part that is merely there from one that still does its job.
The three layers work together. The computer shows the system's history, the visual check confirms the hardware, and the tailpipe or smoke measurement checks the result. A car can clear one layer and still fail another.
Model year decides the path
California's rules split vehicles by age and engine type. Vehicles with 2013-and-newer model-year engines are required to undergo OBD testing, while vehicles with 2012-and-older model-year engines may need an opacity test and emissions-control-equipment inspection (BAR executive summary report). That is why two cars that look similar on the street can face different inspection lanes at the station.
OBD II Scans Readiness Monitors and the Check Engine Light
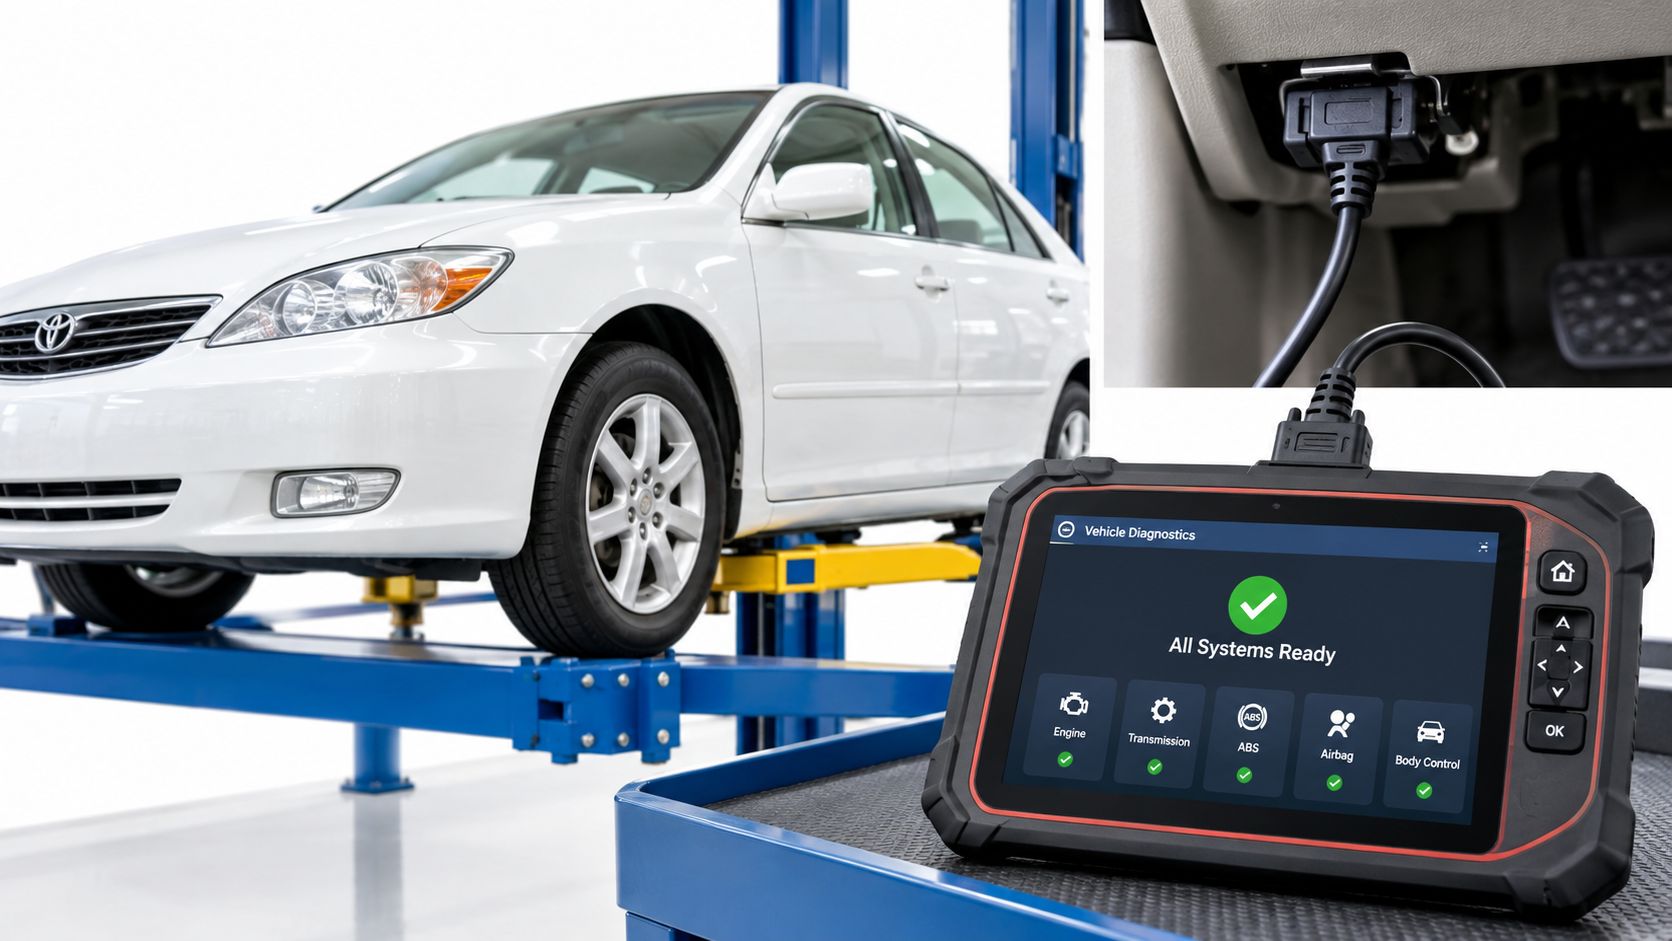
For a 2000-and-newer California vehicle, the OBD II scan is often the heart of the inspection. Think of it as the car's own self-diagnostic report card, it tells the inspector whether the emissions systems have checked themselves, whether faults are stored, and whether the warning lamp is behaving the way it should (BAR smog).
Ready is not the same as no light
Many drivers get tripped up here. A dashboard with no active check engine light does not automatically mean the car is ready to pass. The car also has to finish its readiness monitors, which are self-tests for systems such as oxygen sensors, the catalytic converter, evaporative-emissions controls, and misfire detection (BAR readiness guidance). If the monitors are still “not ready,” the vehicle may fail even though the light is off.
That's why disconnecting the battery, clearing codes, or doing a repair right before the appointment can cause trouble. Those actions can reset the monitors, and the car may need normal driving before the self-tests complete. In plain terms, you can make the warning go dark faster than you can make the car prove it's healthy.
Practical rule: a smog station cares about both the absence of an active fault and the presence of completed self-tests.
What the inspector actually looks for
The technician verifies that the malfunction indicator lamp comes on with the ignition and turns off after startup, then checks for diagnostic trouble codes and monitor status through certified equipment (BAR smog). CARB describes the inspection as both a visual and functional OBD II check, so the computer side is never just a “plug it in and hope” process.
How OBD codes help you understand a smog result
A simple example helps. If someone disconnects the battery to replace a stereo, the clock resets, the monitor history clears, and the car may look fine on the dash but still be unready for inspection. That's why the week before the test matters more than the hour before it.
The OBD side is also why code clearing can be a trap. The problem doesn't disappear just because the light disappears. The inspector is checking whether the emissions system has completed its own checks and can demonstrate normal operation.
Tailpipe Tests Opacity Checks and Older Vehicles
Older cars follow a different path because they don't all speak the same diagnostic language. California's BAR-97 procedure measures exhaust pollutants from 1999-and-older vehicles at the tailpipe, while applicable 1996–1999 gasoline vehicles receive both OBD inspection and tailpipe testing (BAR-97 manual).
Gasoline vehicles get measured, not guessed
A tailpipe test asks a direct question, what is the vehicle putting out under test conditions? If the readings are high, the issue may be an inefficient catalytic converter, an air-fuel imbalance, ignition misfire, or worn oxygen-control hardware. That's different from a computer fault, because the exhaust numbers show the result of the engine's behavior, not just the stored record of it.
Visual compliance still matters on these cars. Inspectors check that emissions equipment is present, that visible smoke isn't excessive, and that there aren't obvious liquid fuel leaks or fuel-cap problems where the test applies (BAR-97 manual). A loose or damaged cap can surprise drivers because it looks small, but it affects whether the system seals properly.
Diesels are judged by smoke opacity
Diesel vehicles may face an opacity test, which measures how much light is blocked by exhaust smoke. That gives the inspector a practical way to see whether the vehicle is producing too much visible soot, even when there isn't a gasoline-style tailpipe measurement in play (BAR executive summary).
A 1999 Civic and a 2018 Civic can therefore live in different worlds at inspection time. The older car may face a more physical emissions test, while the newer one is mainly judged by its onboard diagnostics and emissions-system behavior. Same brand, different rulebook.
What Causes Cars to Fail the Inspection
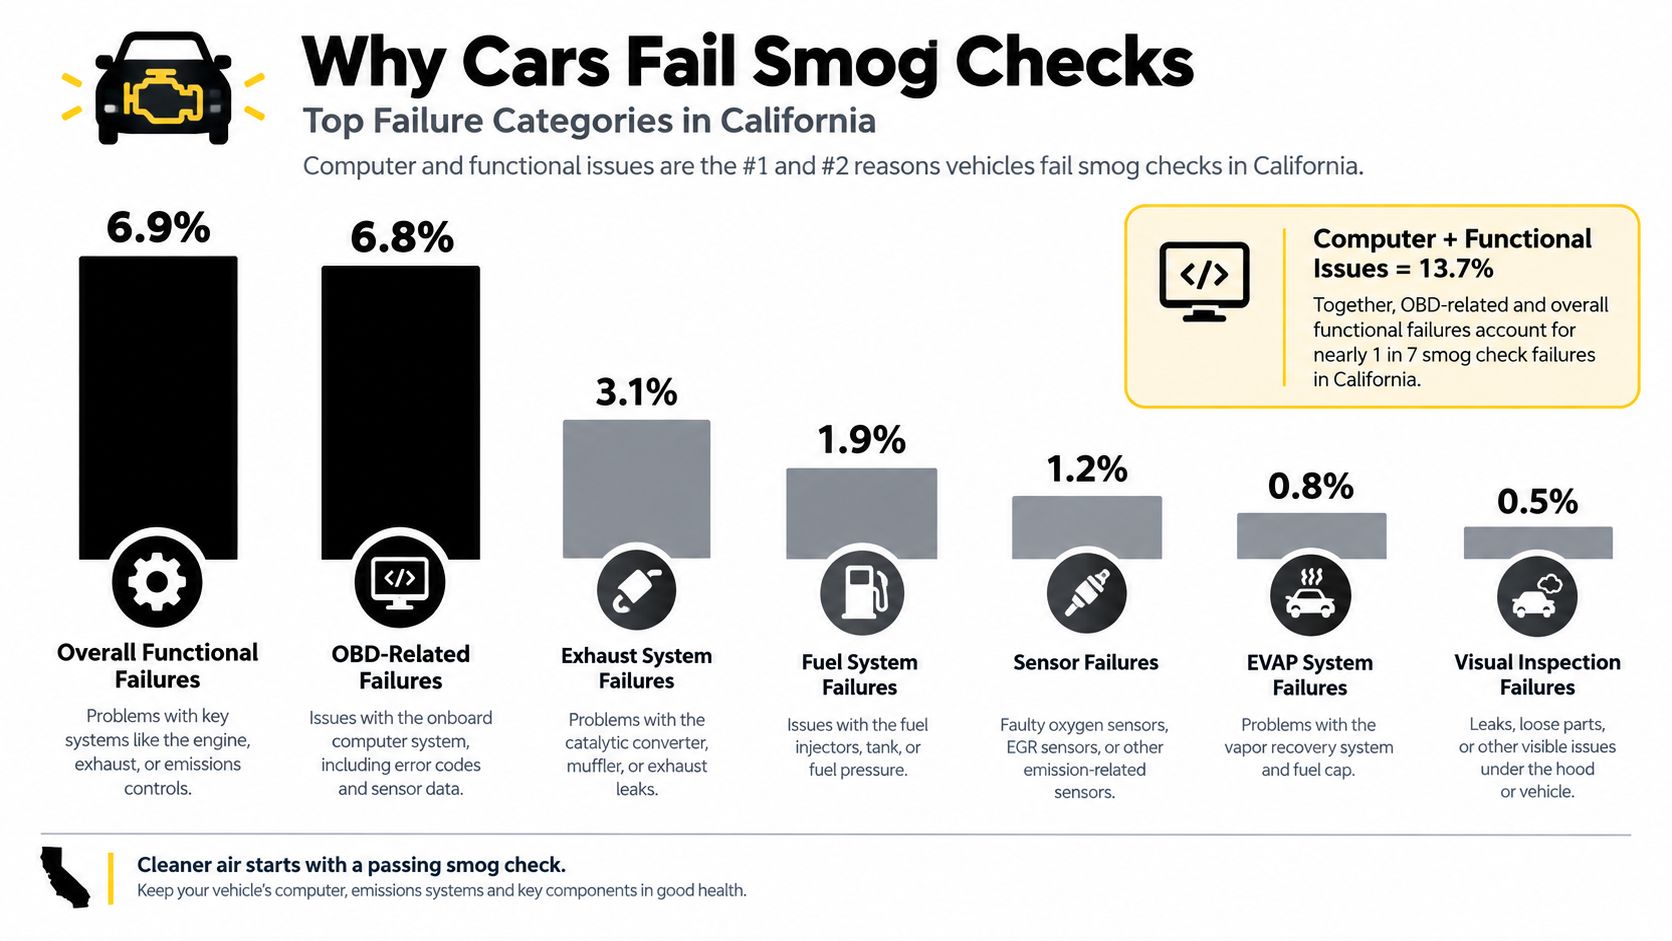
A smog check failure usually comes from one of three places. The car's onboard computer is unhappy, the required equipment does not function the way it should, or something visible is missing or tampered with. The California Smog Check Performance Report shows that OBD-related failures accounted for 6.84% of initial tests, while overall functional failures were 6.92%. Visual failures were lower, at 1.28%.
The table that matches what inspectors see
| Failure Category | Initial Failures | Share of Initial Tests |
|---|---|---|
| OBD-related failures | 714,956 | 6.84% |
| Overall functional failures | 724,477 | 6.92% |
| Visual failures | 134,222 | 1.28% |
The numbers are not separate boxes on every car. A single vehicle can trigger more than one problem during the same visit. The useful takeaway is simpler. If the check engine light is on, if a readiness monitor has not finished, or if a code is stored, that is usually the first thing to fix before the appointment.
A car that feels fine on the road may still have monitor issues that the inspection will catch.
Most failures fall into familiar patterns. A check engine light, a catalytic converter-related code, an evaporative emissions leak, a missing gas cap, or tampered emissions equipment can stop a pass. Those are the parts worth checking before you start guessing at more complicated causes.
Common smog failure reasons explained simply
The smartest pre-test question is not whether the car runs well. It is whether the emissions system can show, right now, that it is working as required. A loose cap can fail like a bad seal on a water bottle, small on the outside, but enough to break the system's pressure check. A missing monitor works the same way. The car may drive normally, but the inspection still sees the gap.
Clearing Codes Before a Smog Check and Other Myths
The most expensive myth is simple, clear the code, the light goes off, and the car should pass. The problem is that clearing codes can reset readiness monitors, which puts the car back into “not ready” status until the self-tests complete. That can turn a temporary dashboard fix into a failed appointment.
Three common myths that waste time
“Idling it for a few minutes warms it up enough.” Not always. Warm engine oil helps, but the car still needs the right drive conditions for monitors to finish their checks. A short idle can't replace a proper drive cycle.
“Disconnecting the battery resets everything in a good way.” It resets the memory, yes, but that includes stored codes and monitor history. If the inspection depends on ready monitors, you've just created more work for the car.
“Aftermarket parts automatically fail the test.” Not by themselves. What matters is whether the required emissions controls are present, correctly installed, and functioning the way the inspection requires.
What to do instead
If the check engine light is on, fix the cause rather than hiding it. If the light was recently cleared, drive the car normally until the readiness monitors have had a chance to complete. If the gas cap looks old or damaged, replace it before the appointment because a simple seal problem can become a simple failure.
A lot of drivers want a shortcut. Smog testing usually rewards the opposite, steady repairs and a normal drive pattern.
How to Prepare Your Car Before the Appointment
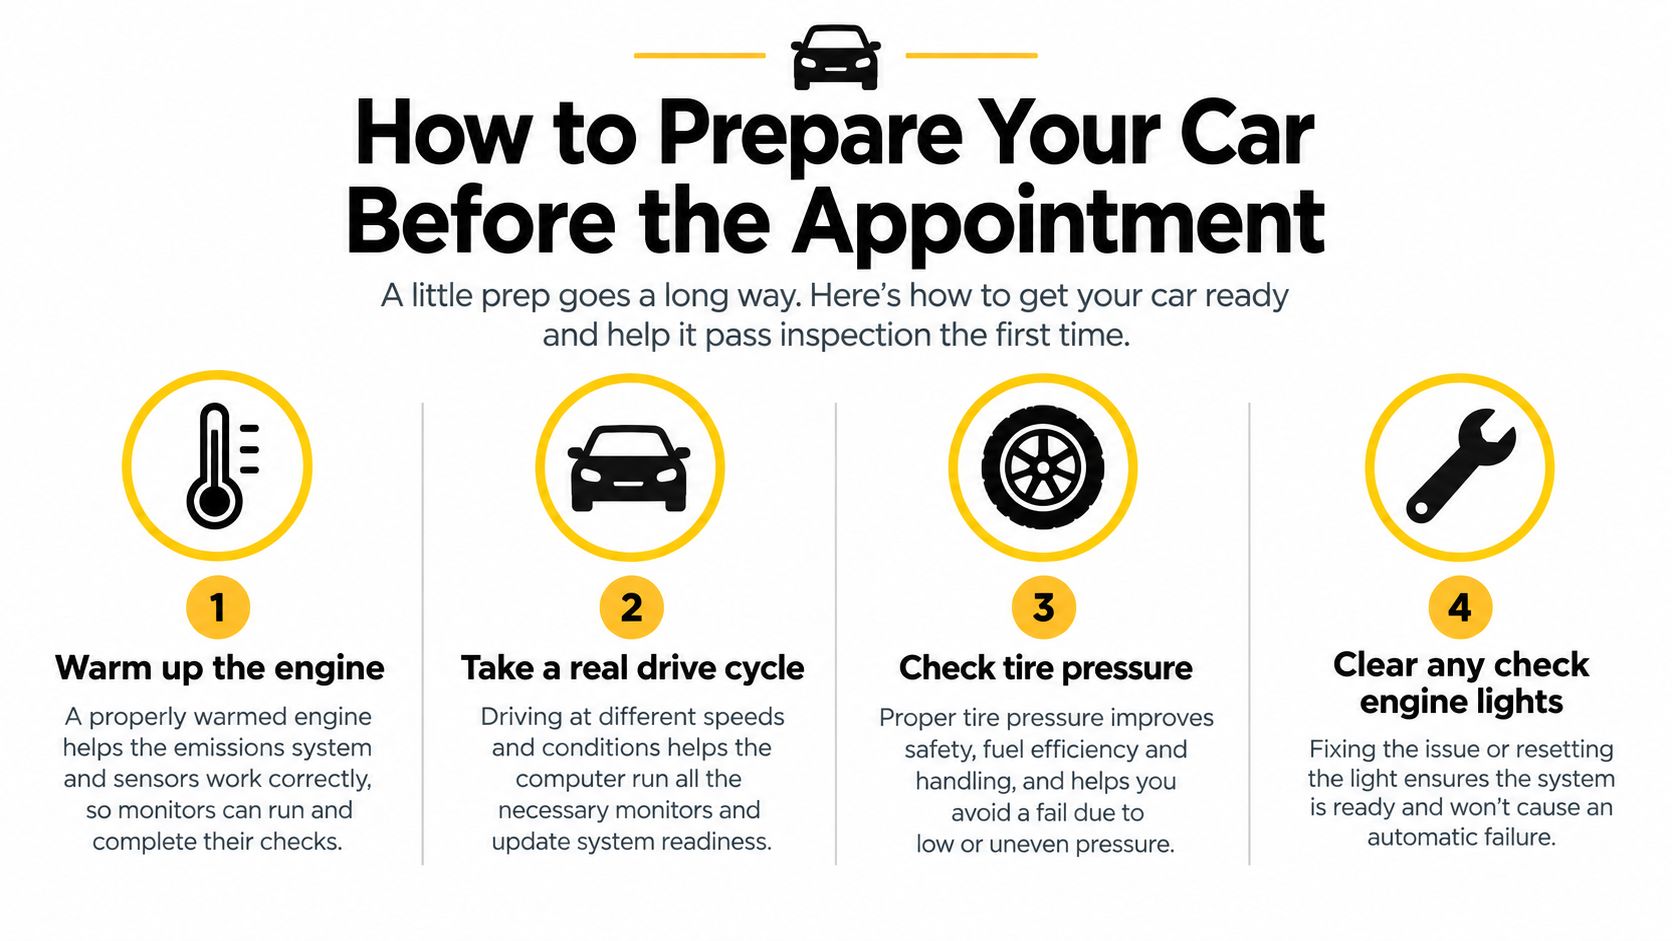
Start with a real drive, not a quick shuffle around the block. A properly warmed engine and catalytic converter give the emissions system a fair chance to operate the way it does in normal use, and that matters before any inspection that depends on operating temperature. If you've recently repaired something or disconnected the battery, give the car enough normal driving to finish its self-checks.
Check the light, then check the cause
If the check engine light is on, don't erase it and hope. Have the fault diagnosed and repaired, because the inspection is built to look past the dashboard glow and into the stored data. If the light recently turned off on its own, make sure the underlying issue is fully resolved before you head in.
Replace obvious wear items
A tired gas cap is cheap to fix and easy to overlook. If the seal is cracked, loose, or missing its grip, replace it before the appointment. That one part can save you a retest, especially on vehicles where the evap system is part of the evaluation.
Give the car a normal mix of driving
A commute with stops and highway speeds is better than a mile of idling in the driveway. Mixed driving helps the monitors run through the tests they need, and it gives the engine a chance to settle into the same conditions the inspection assumes. If you've only driven the car short distances lately, don't assume it's ready just because the dash looks calm.
Bring the paperwork with you
Have your registration or renewal notice ready so the station can process the inspection without delay. If you want a station that handles California-required testing for many vehicle types, including newer models and older or diesel vehicles, a STAR Certified shop like Speedy Smog is one option to consider alongside other licensed stations.
What to do before a smog check
Most vehicles pass on the first try. The prep above isn't about fear, it's about protecting the small share of drivers whose car is hiding a monitor issue, a seal problem, or a fault the dash didn't make obvious.
If you want a straightforward smog check with clear guidance on what the inspector is looking for, Speedy Smog handles California emissions testing for a wide range of vehicles in San Leandro. Visit Speedy Smog to schedule a visit and get your inspection done by a STAR Certified station that understands the layers behind a passing result.
You're staring at the renewal notice on the kitchen counter, wondering whether you need a smog test, which station to use, and whether the whole thing will clear DMV before the tags expire. That's the core task here. DMV smog check registration isn't just a tailpipe test, it's a paperwork gate that decides whether your renewal moves or sits stuck.
In California, the smart move is to treat smog as part of the registration transaction from the start. Bring the notice, read the station instructions, and test at the right place the first time. Miss that, and you can end up with a passing inspection that still doesn't clear the hold.
Table of Contents
- What DMV Smog Check Registration Means in California
- Reading Your DMV Renewal Notice Before You Book
- Booking the Test and What to Bring on the Day
- STAR Stations Test Only Versus Test and Repair Explained
- Readiness Monitors and Pre-Test Preparation
- What to Do When the Test Fails
- Closing the DMV Registration Once the Certificate Posts
What DMV Smog Check Registration Means in California
A driver pulls up for a smog test and thinks the job is done once the tailpipe numbers look good. In California, the key job is getting the result attached to vehicle registration so DMV can clear the renewal. The state cares about the test, the station, and the record that gets transmitted.
What triggers the requirement
For most gasoline-powered, hybrid, and alternative-fuel vehicles, California requires a Smog Check for model year 1976 and newer. For diesels, the general cutoff starts with the 1998 model year. Vehicles eight model years old or newer generally pay a smog abatement fee instead of getting inspected for renewal since January 1, 2019. The DMV also excludes several categories, including electric vehicles, motorcycles, trailers, gasoline vehicles from 1975 and older, diesel vehicles from 1997 and older, and certain heavy natural-gas or diesel vehicles. The question is always the same, what vehicle is on the record, and what registration event is happening? California DMV smog inspection rules
Practical rule: if the registration event needs a smog certification, the DMV uses the exact vehicle record, not your memory of the car's last test.
Why the registration frame matters
In California, smog is tied to vehicle registration and renewal, so the DMV and the Bureau of Automotive Repair care about the result and the station that produced it.
Bring a vehicle into California for the first time, and the state usually wants a smog certification before registration goes through. The same holds on renewal when the notice calls for a test. The inspection is the checkpoint that clears the DMV hold and lets the renewal move.
For East Bay drivers, the cleanest way to handle it is simple. Read the renewal notice as the controlling document. If it calls for a test, a fee, or a specific station type, follow that instruction and get the transaction lined up correctly the first time.
Reading Your DMV Renewal Notice Before You Book
The renewal notice is the piece of paper many drivers skim and regret later. Don't skim it. Read it like a bill with instructions, because that's exactly what it is.
The lines that matter
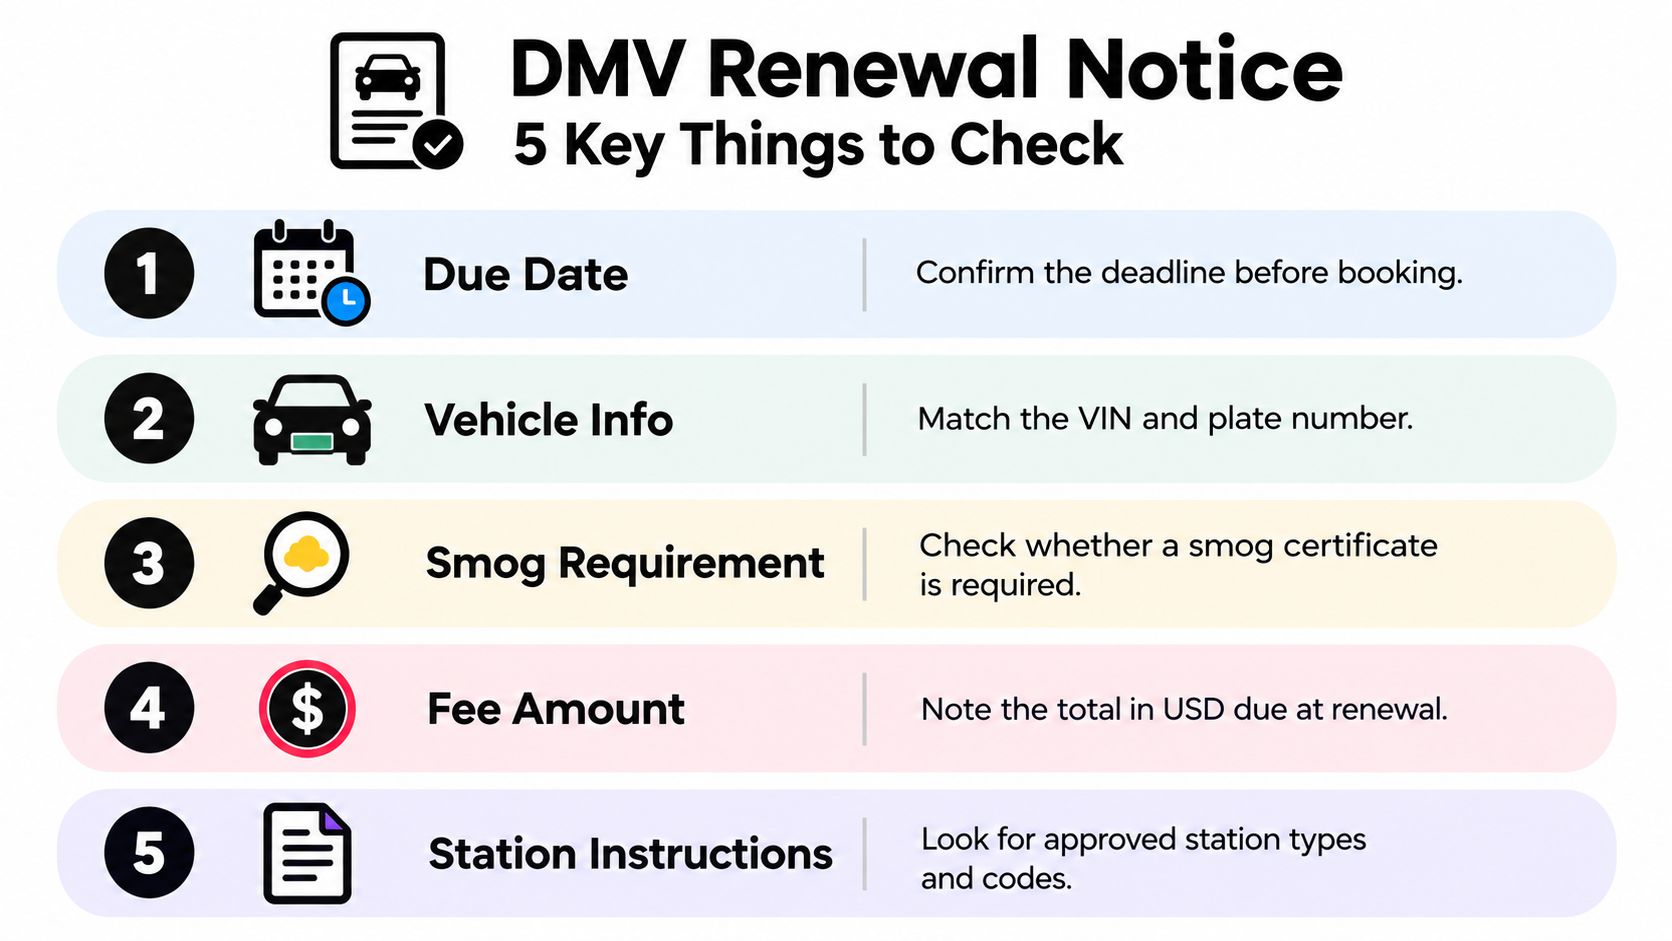
Look for whether the notice says Smog Check Required or shows that the smog certificate is already submitted. Then check the station instruction line. Some notices point you to any authorized Smog Check station, while others require a STAR station or another specific category. If you ignore that line, you can get a perfectly good test at the wrong shop and still have a registration problem. California DMV renewal workflow
The barcode matters too. The station scans it and transmits the certification electronically to DMV, so bring the notice in person. If you leave it in the glovebox at home, the station may be able to test the car, but you've made the actual registration step harder than it needs to be.
Transaction type changes the answer
Change-of-ownership cases work differently from renewals. Out-of-state vehicles coming into California usually need inspection for first-time registration, while family transfers are usually exempt from the transfer smog check. Vehicles four model years old or newer generally use a smog-transfer fee, not a standard transfer test. That's why you don't want a generic answer, you want the answer that matches your exact transaction.
Keep the notice with your registration paperwork until the certificate posts. If the DMV record and the car record don't line up, you're the one who has to sort it out.
If you want a local walk-through of the renewal flow, use this guide on the registration renewal process as a companion while you check your notice.
Booking the Test and What to Bring on the Day
Book the test like a grown-up, not like someone gambling on luck. A quick call ahead saves a dead trip, especially if your notice calls for a station category you don't use every day. Most shops can tell you right away whether they can handle the job.
The bare minimum to bring is the renewal notice, your payment method, and the vehicle itself. I'd also bring the registration card if you have it, because matching the car to the record is what keeps the DMV side clean. If you're in a hurry, don't make the shop guess which vehicle is yours.
What the visit actually looks like
For modern cars, the process is usually straightforward. The technician plugs into the OBD-II port on 2000-and-newer vehicles, checks the vehicle's emissions readiness, and verifies the system status. Older vehicles may need a different inspection path, and diesels and hybrids can bring their own visual and functional checks depending on the vehicle. The point is the same either way, the station verifies that the car meets the state's requirement and sends that result forward.
Here's the part drivers care about most, the inspection should end with a Vehicle Inspection Report and an electronic certificate transmission to DMV if the vehicle passes. Keep the report. If anything looks off later, that paper trail helps.
The station doesn't have to be a mystery. If the process is set up right, you hand over the notice, the tech scans the barcode, the car gets checked, and the result moves into the DMV system. That's the job.
Later, when you're waiting for the car, this embedded walkthrough is useful:
What to expect from the paperwork side
Once the station submits the result, DMV can finalize the renewal after the certificate posts. Until then, the test alone isn't the finish line. You're not done when the exhaust probe comes out, you're done when the registration side is clear.
STAR Stations Test Only Versus Test and Repair Explained
Not every station can solve every registration problem. That's where people waste time. The station categories exist for a reason, and the renewal notice tells you which lane you're supposed to be in.
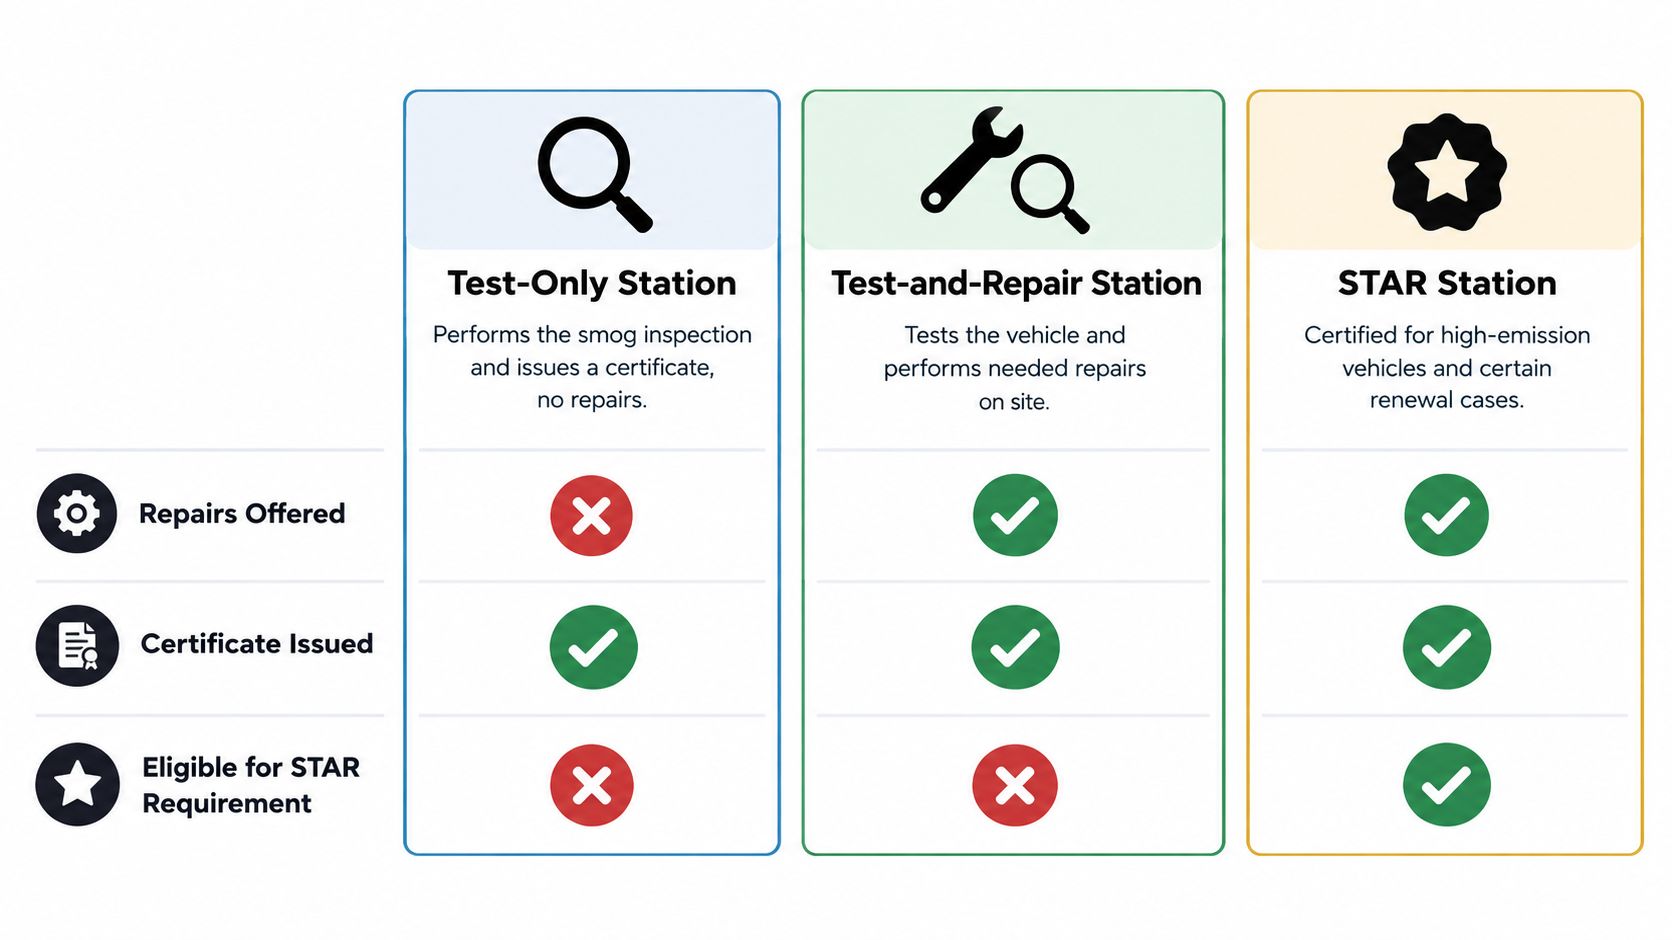
The three categories
A test-only station inspects the vehicle and issues the certificate if it passes. A test-and-repair station can inspect and fix the vehicle on site. A STAR station is a state-certified station used for certain renewal cases, especially where DMV wants a higher-compliance path. If your notice says STAR, you go to STAR. Don't freelance this part.
California's station system is broad enough that different drivers end up in different lanes. In the Bureau of Automotive Repair's April 2026 executive summary, 223,221 certificates came from test-and-repair stations and 488,032 certificates came from test-only stations in the reported categories. That's a good reminder that the DMV routes a lot of vehicles to specific station types, not just “any place with a smog sign.” BAR April 2026 executive summary
Why STAR status matters
STAR certification isn't just branding. It's part of California's compliance structure. If your renewal notice calls for STAR, a passing test somewhere else may not remove the hold. That's the mistake people make when they think any certificate is enough.
If you want a local explainer on why some vehicles get routed to STAR, this STAR station guide helps keep the categories straight. Use that when you're choosing where to go, not after you've already burned a trip.
Bottom line: the wrong station type can waste a day and still leave your registration incomplete.
Readiness Monitors and Pre-Test Preparation
A car can run fine and still get turned away because the computer is not ready. That is the trap. An off check-engine light does not mean the vehicle is ready for a smog test.
A common mistake is clearing codes right before the appointment, disconnecting the battery, or rushing in after emissions work. Any of those can reset the readiness monitors to incomplete, which can trigger a rejection or failure even if the car drives normally. BAR inspector performance data puts the statewide average for inspections involving the maximum permitted incomplete readiness monitors at roughly 2.1% to 2.2%, so this comes up often enough to matter. BAR readiness monitor benchmark
The night-before checklist
- Do not clear codes: Erasing a stored issue can create a bigger problem at the test lane.
- Confirm the light is off: A lit check-engine lamp means stop and fix it first.
- Drive normally: Give the car time to finish its monitors under ordinary driving.
- Check status with a scan tool: If you have one, look before you leave.
- Use a pre-scan if needed: A quick check beats a wasted trip.
If you want a full pre-test walkthrough, see this guide on what to do before a smog check.
I'd rather see a driver wait an extra day than roll in with incomplete monitors and start over. The DMV deadline does not change how the car's readiness logic works, and the station cannot override it.
If the monitors are still incomplete, follow the manufacturer drive cycle under safe conditions and return only after they are ready. That is the cleanest move, and it saves time at the counter.
What to Do When the Test Fails
Failure isn't the end of the process. It's a fork. You either repair it, dispute it, or use the state programs that exist for exactly this situation.
California recorded 1,019,416 initial tests and 85,135 initial failures in July 2025, an 8.35% initial failure rate. BAR July 2025 executive summary That's not a fringe event. Plenty of drivers run into this, which is why you need a plan before you leave the house.
Your four moves after a failure
- Get the repair conversation started. Ask the shop what failed and what they'd fix first. Don't assume the whole car needs to be torn apart.
- Use the BAR Referee if the result looks wrong. If the vehicle has unusual emissions equipment or the result doesn't make sense, a referee can help sort out the dispute.
- Check Consumer Assistance Program eligibility. BAR identifies this program for consumers who may qualify for repair or retirement help.
- Protect the registration deadline. If you're running out of time, DMV allows a 60-day Temporary Operating Permit when you submit the failed inspection report, proof of insurance, registration fees, and the $50 nonrefundable fee. Only one such permit may be issued in a two-year period.
A failure should push you into action, not panic. The wrong move is to keep paying fees and hoping the certificate magically shows up. Get the cause, pick the right path, and move.
If the car failed for something obvious, fix that first. If the result doesn't fit the vehicle, stop guessing and get a referee involved.
Closing the DMV Registration Once the Certificate Posts
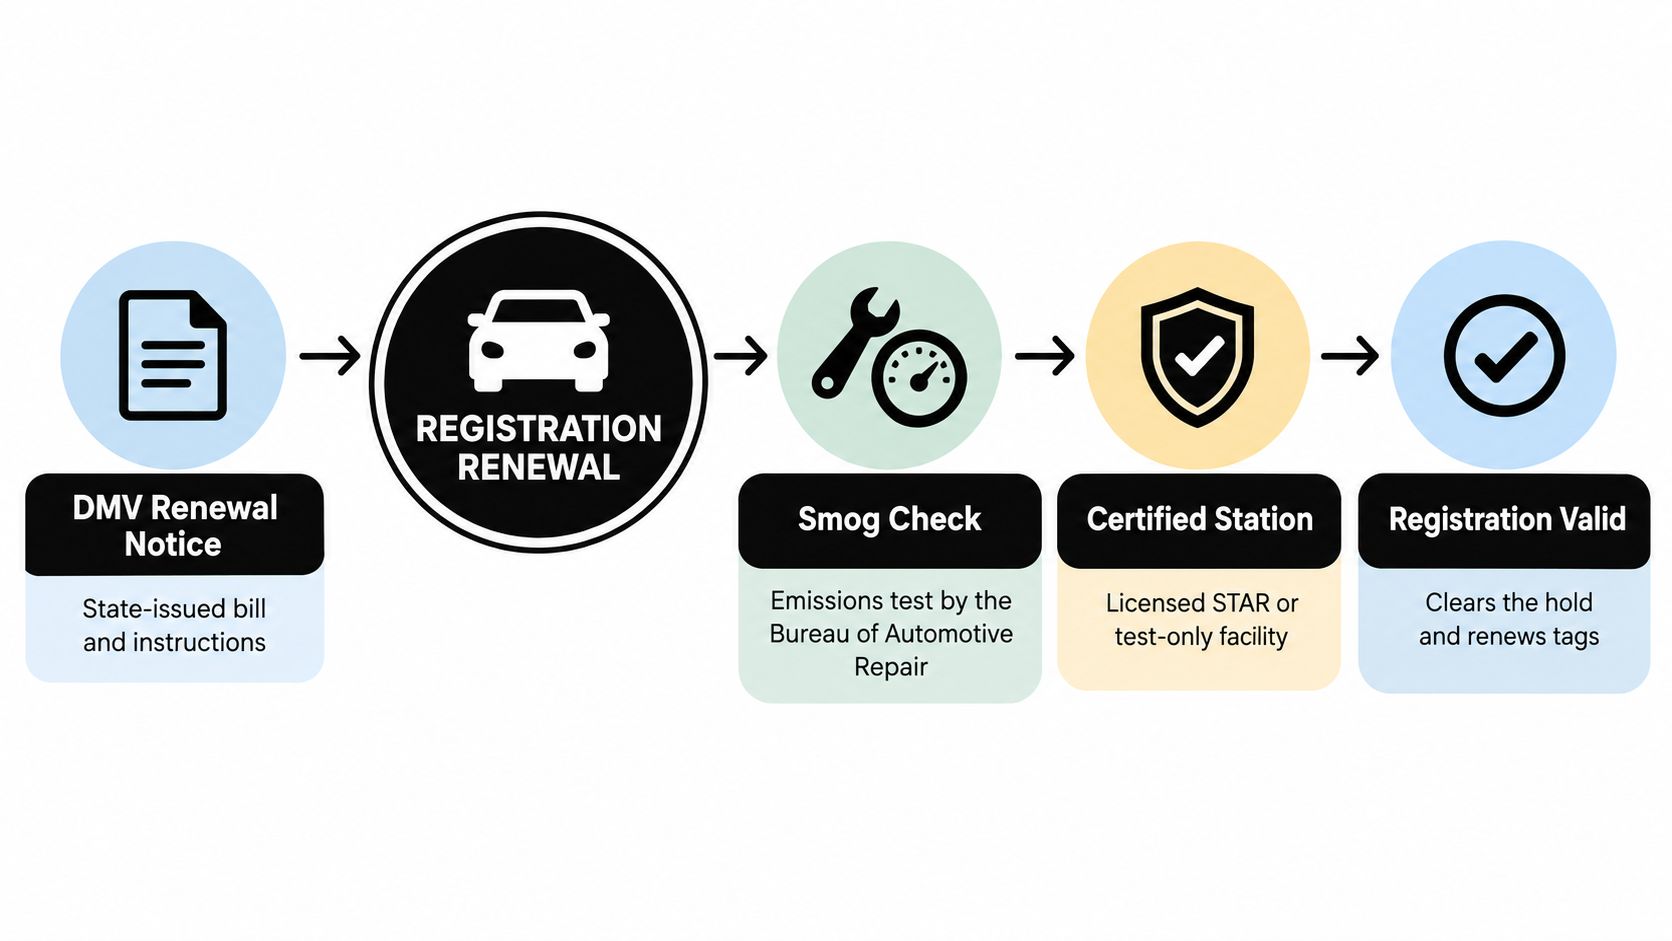
Once the smog certificate posts, the job is to close the DMV transaction cleanly. The station sends the result electronically, DMV picks it up, and you finish the renewal online if your record is clear. That is the part people miss when they assume a paid fee means everything is done.
The fee helps, but it does not finish registration if DMV still shows a missing smog record. Check your renewal status and wait for the certificate to appear before you call it closed. Read how the DMV finalizes renewal after the smog certificate posts.
Use this order:
- Notice in hand
- Correct station chosen
- Inspection completed
- Certificate posted electronically
- Fees paid
- Online renewal finished
- Sticker arrives in the mail
That is the dmv smog check registration workflow. It works when you read the notice, match the station to the job, and keep the paperwork straight.
If you want a local station that handles the registration side the way California expects, Speedy Smog can take your renewal notice, complete the inspection, and electronically send the result so your DMV transaction can move forward. Visit Speedy Smog to book your smog check in San Leandro and get the registration piece handled without extra back-and-forth.
Your DMV renewal notice is on the kitchen counter, the deadline is getting close, and the obvious plan seems simple: drive to a smog station, pass the test, and renew your registration. That plan can fail before the technician even checks the exhaust, especially if your car recently had a battery replaced, diagnostic codes cleared, or repairs completed.
California vehicle inspection rules depend on why you're dealing with the DMV, not just how old your vehicle is. Renewal, a private-party sale, a dealer purchase, and first registration after moving to California can trigger different requirements. Your fuel type, model year, weight rating, and onboard computer also determine what happens at the station.
Table of Contents
- Deciding If You Need a Smog Check
- Understanding the Testing Protocols
- The Readiness Monitor Trap
- Why STAR Certification Matters
- Recovering From a Failed Inspection
- What to Expect at the Station
- Your Pre-Inspection Compliance Checklist
Deciding If You Need a Smog Check
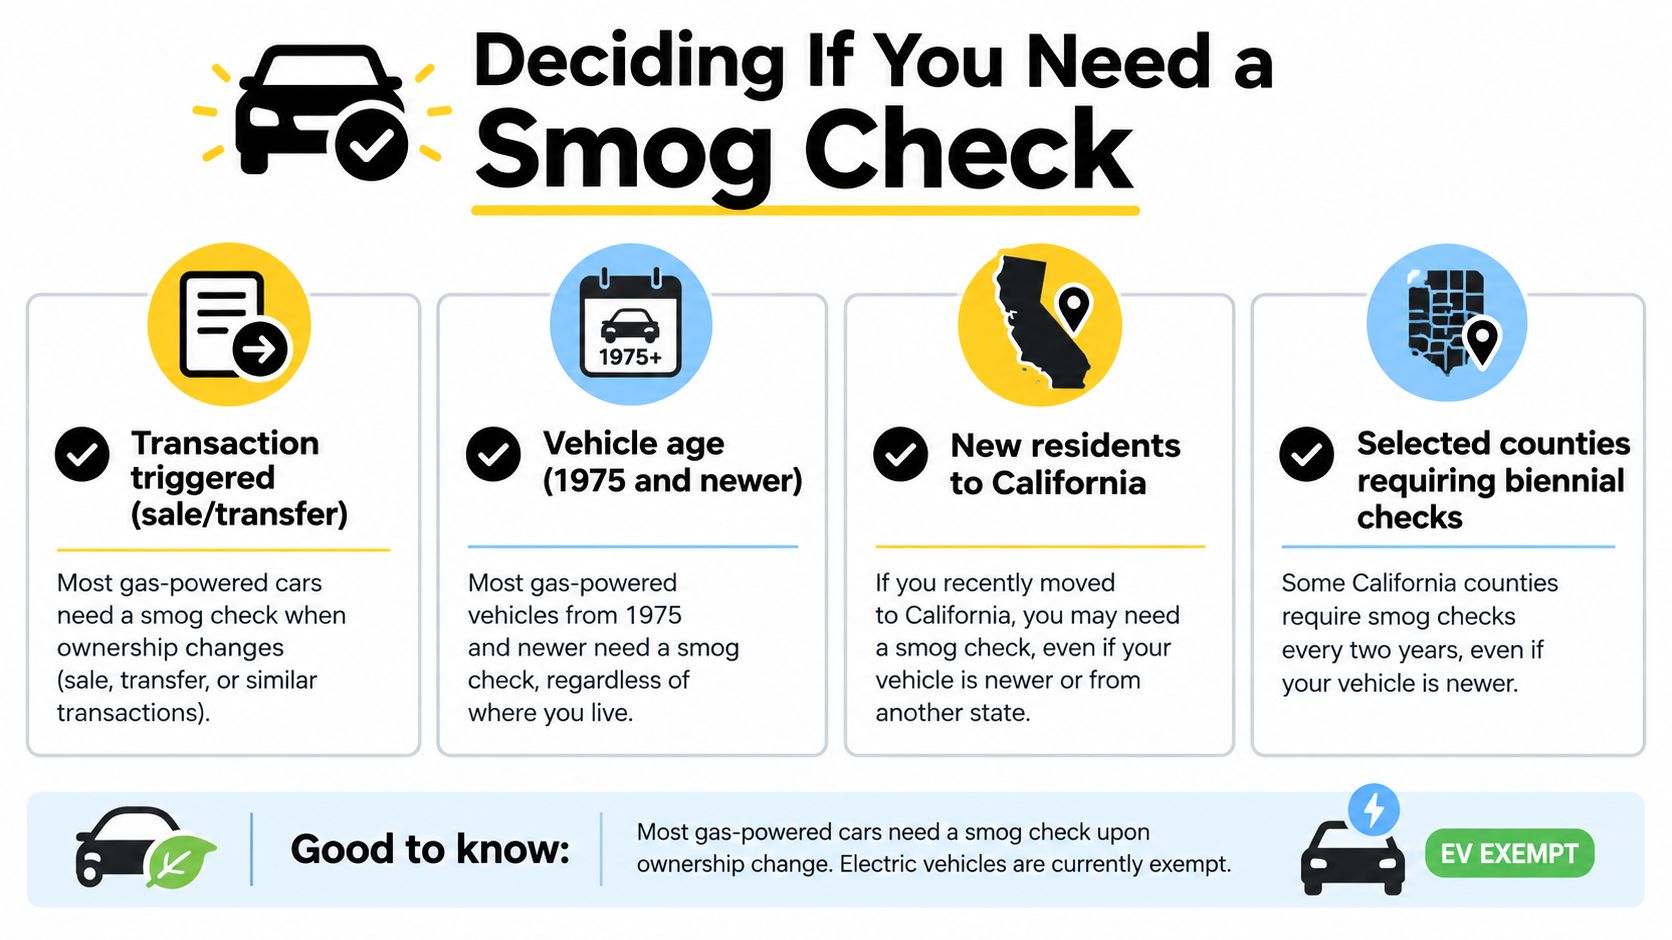
Start with the transaction. If you're renewing registration, California generally requires a smog inspection every two years, unless your vehicle qualifies for an exemption or the newer-vehicle abatement option. Owners of vehicles less than eight model-years old can generally pay a smog-abatement fee instead of obtaining an inspection, as explained by the California Bureau of Automotive Repair's smog check guidance.
Use the transaction first
For registration renewal: Read the DMV notice carefully. If it calls for certification, book the appropriate inspection. If your vehicle is within the newer-vehicle window, check whether paying the abatement fee is the available alternative.
For a private-party sale or transfer: Don't assume the buyer can handle everything later. Most gasoline-powered vehicles that are subject to California's program need current certification when ownership changes. The seller and buyer should confirm the DMV requirements for the specific transaction before signing over the title.
For a dealer purchase: Dealer transactions can follow different certification responsibilities depending on the vehicle's age and recent certification history. Ask the dealer who is responsible for the inspection and whether the certification is already recorded before you make a separate appointment.
For a first California registration: An out-of-state vehicle from model year 1976 or newer generally needs a California inspection when registered in the state for the first time. This catches many new residents off guard because an inspection from another state usually doesn't answer California's certification requirement.
Check the vehicle before booking
Electric vehicles are exempt from the standard smog check because they don't produce tailpipe emissions from an internal combustion engine. Other exemptions include gasoline vehicles from model year 1975 or earlier, diesel vehicles from model year 1997 or earlier, diesel vehicles above 14,000 pounds GVWR, and some natural-gas vehicles.
A gasoline car, hybrid, diesel, or imported vehicle may fall into a less obvious category. If you're unsure, use the vehicle identification information on your registration and confirm the requirement with the DMV or BAR before paying for a test.
Practical rule: Decide whether the transaction requires certification before you decide which station to visit. A renewal appointment and a first California registration aren't interchangeable situations.
Understanding the Testing Protocols
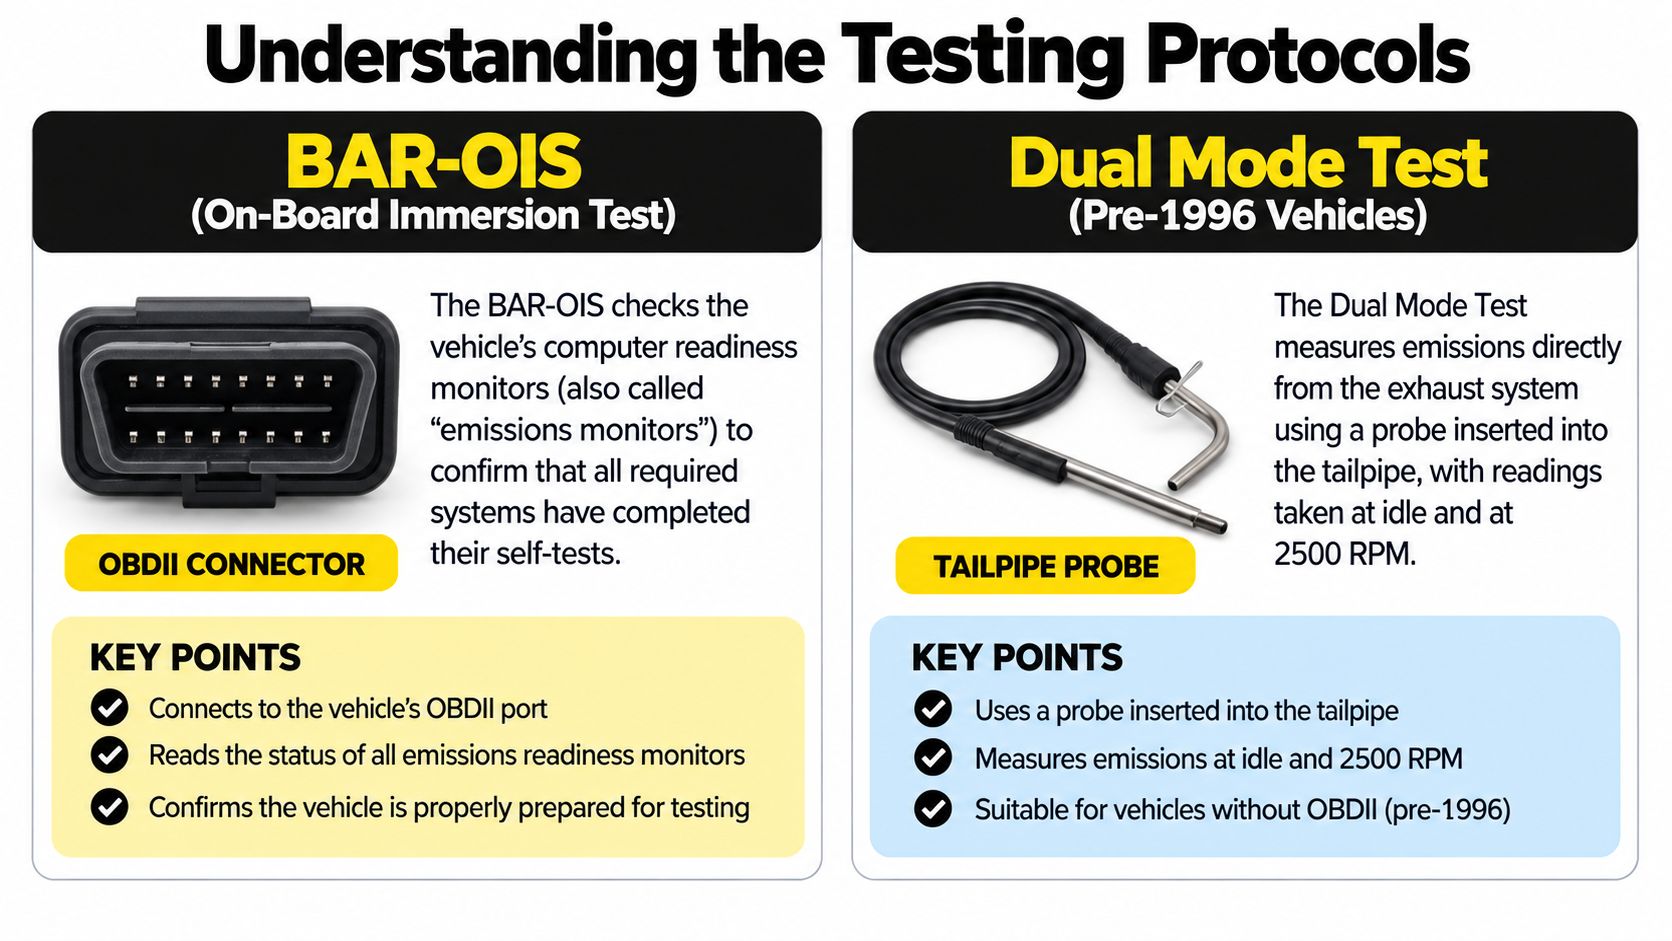
The inspection machine depends on the vehicle's technology. Most gasoline-powered vehicles from model year 2000 onward and hybrids with a GVWR of 14,000 pounds or less are tested through the BAR-OIS, which reads the vehicle's OBD-II system. Vehicles without a compatible OBD-II system, vehicles above 14,000 pounds GVWR, and certain vehicles identified by the Bureau of Automotive Repair require a BAR-97 inspection that can include tailpipe emissions measurement, according to the California Smog Check manual.
BAR-OIS reads the vehicle's computer
Think of BAR-OIS as an electronic health check. The technician connects to the diagnostic port and verifies that the malfunction-indicator lamp behaves correctly, then checks whether the computer reports emissions faults that disqualify the vehicle.
The inspection isn't just asking whether the check-engine light is currently illuminated. The computer also tracks whether its emissions self-tests have completed and whether stored fault information points to a problem. That's why a vehicle can look and drive normally yet still fail.
A newer vehicle isn't automatically an OBD-only case. The station must confirm the vehicle's certification configuration, model year, fuel type, and identifying information before selecting the protocol. A wrong entry or wrong test path can create unnecessary trouble, particularly with hybrids, imported vehicles, specialty configurations, and heavier trucks.
BAR-97 measures the exhaust
BAR-97 works more like taking a sample directly from the tailpipe. Depending on the vehicle, the equipment measures exhaust emissions while the engine operates under the required testing conditions.
This protocol matters to owners of older vehicles and vehicles without compatible OBD-II systems. It also matters to owners of heavy-duty vehicles because gross vehicle weight can change the inspection path even when the vehicle uses modern engine controls.
| Vehicle situation | Likely inspection approach |
|---|---|
| Gasoline vehicle from model year 2000 onward | BAR-OIS using OBD-II |
| Hybrid within the applicable weight limit | BAR-OIS using OBD-II |
| No compatible OBD-II system | BAR-97 |
| Above 14,000 pounds GVWR | BAR-97 |
| Certain vehicles designated by BAR | Confirm the required protocol with the station |
Bring accurate registration and vehicle information. If the car has an aftermarket exhaust, engine swap, or other modification, mention it before testing. The technician needs to know what vehicle configuration is being presented, not guess from appearance.
The Readiness Monitor Trap
A cleared check-engine light doesn't mean the vehicle is ready for inspection. In fact, clearing codes immediately before a test can create a predictable failure because the vehicle's emissions monitors reset to incomplete.
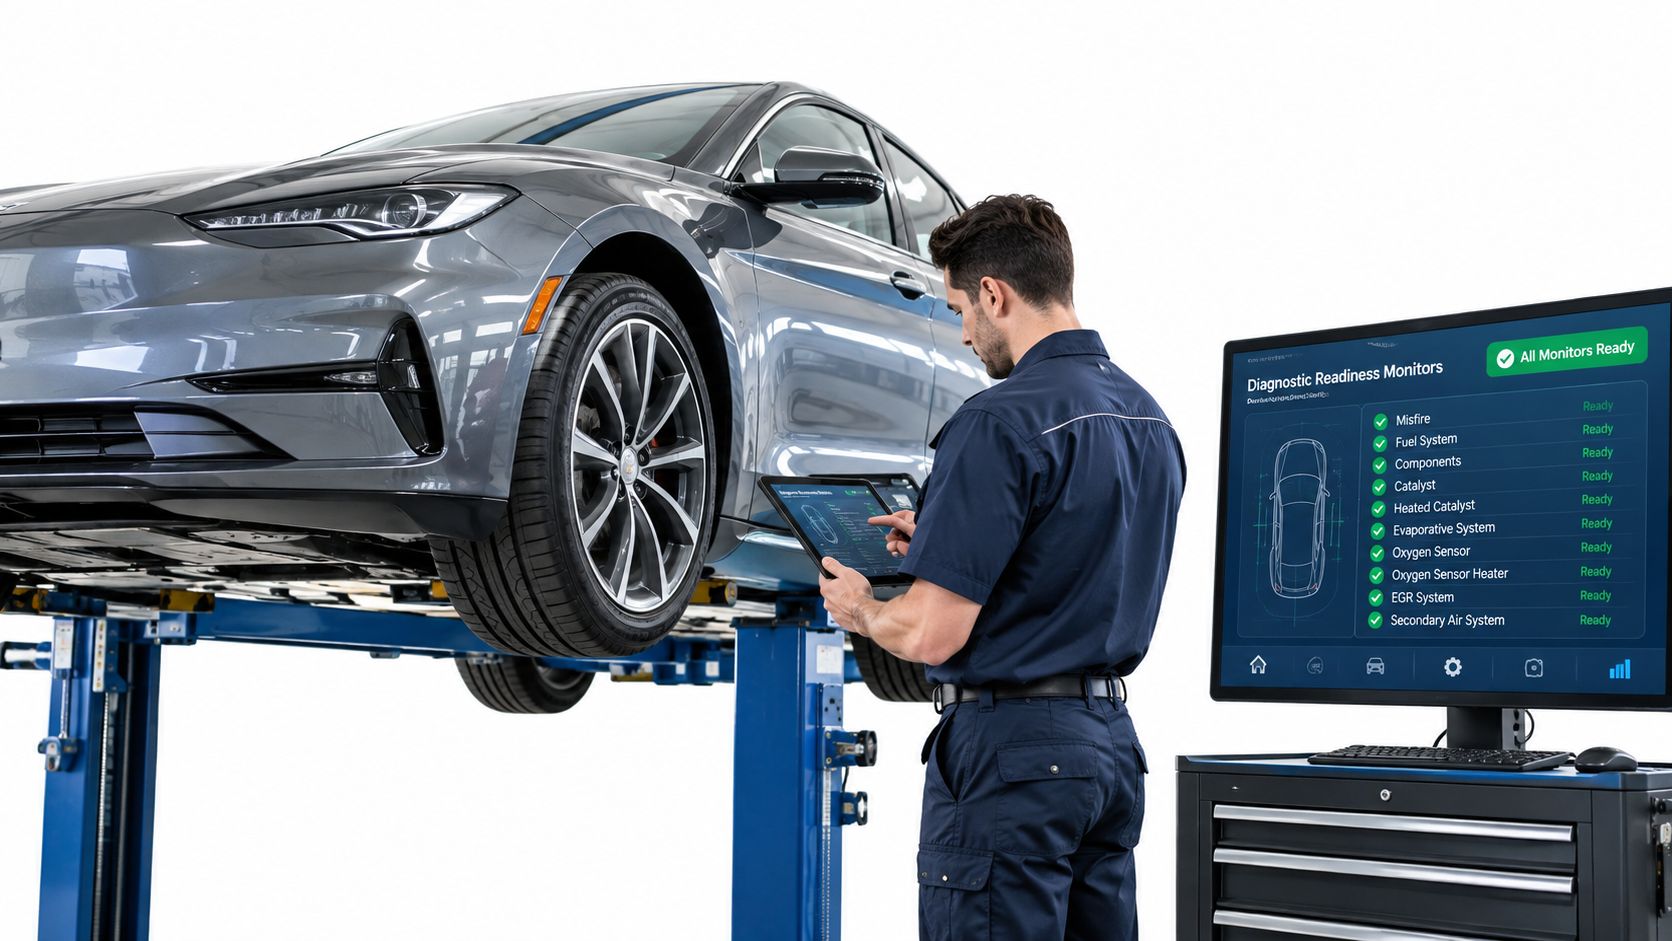
Readiness monitors are self-tests inside the OBD-II system. They evaluate systems such as the catalyst, oxygen sensors, evaporative emissions controls, and EGR-related components. The computer marks each monitor complete only after the car experiences the right operating conditions, which can include cold starts, steady cruising, acceleration, deceleration, and normal stop-and-go driving.
Disconnecting the battery or using a scan tool to erase diagnostic trouble codes wipes out that completion history. The dashboard may show no active warning light, but the inspection computer can still see that required tests haven't finished.
Why the timing matters
Beginning October 1, 2025, California rules require all applicable readiness monitors to be set for a vehicle to pass, according to BAR's explanation of the new OBD readiness monitor regulations. That makes a pre-test scan a smart move after battery work, code clearing, engine repairs, or emissions-system service.
Don't erase a code just to make the dashboard look clean. Diagnose the cause, repair it properly, and then drive the vehicle through an appropriate mixed-use cycle so the monitors can complete. Depending on the repair and the vehicle, allow roughly a week or two when necessary for the monitors to set.
Clearing the light is not a repair. It only removes information, and it can leave the vehicle unready for testing.
A better pre-test sequence
- Scan before the appointment. Check active codes, stored codes, and monitor status with a suitable diagnostic scanner.
- Repair the cause. A warning light connected to an EVAP leak, oxygen-sensor problem, catalyst fault, or another emissions issue needs diagnosis rather than cosmetic code clearing.
- Drive normally after repair. Use a mixed-use cycle that gives the vehicle's monitors the conditions they need.
- Scan again. Confirm the applicable monitors are ready before paying for the inspection.
- Test only when the vehicle is prepared. This avoids wasting an appointment on a car that was never eligible to pass.
For drivers who want help understanding what the test measures, an OBD-II car emissions test can provide useful context before the appointment.
Why STAR Certification Matters
A STAR requirement on your DMV notice isn't a suggestion to shop around casually. It means you need a station authorized to perform the required STAR inspection for that vehicle and transaction.
STAR stations operate under Bureau of Automotive Repair performance requirements that address equipment, testing procedures, and station performance. The practical benefit is straightforward: the station uses approved equipment and follows a monitored process when testing vehicles that need that level of certification.
Older vehicles deserve careful testing
California's statewide program records substantial inspection activity. The 2025 BAR executive summary recorded 11,275,981 initial tests and 12,200,718 total tests, including retests. Initial failures totaled 959,667, an 8.51% initial failure rate, while all-test failures totaled 1,102,337, a 9.04% overall failure rate.
Age changes the risk. In the cited reporting, model-year 1998 vehicles had a 20.42% failure rate, while model-year 2024 vehicles had a 4.39% failure rate, as reported in the BAR inspection summary. Older cars bring more accumulated wear, more repair history, and a greater chance of emissions-system faults. Accurate equipment and correct data entry matter more when the vehicle is already close to the line.
Choose the station based on the notice
A STAR station can be the right choice when:
- The DMV directs you to STAR: Follow the notice instead of booking a standard station.
- The vehicle has failed before: Accurate retesting helps separate a real repair issue from a process or data-entry problem.
- The vehicle is older or unusual: Confirm that the station handles older vehicles, hybrids, diesels, or the relevant inspection protocol.
- The transaction has special requirements: Ask whether the station can electronically transmit the result for the DMV purpose you need.
Read the notice first, then ask the station a direct question: “Is this vehicle and transaction eligible for the STAR test I need?” For a plain-language explanation of the program, review what a STAR smog station is.
Don't select a station only because it advertises a low price. The correct certification and protocol are more important than saving a small amount on a test that won't satisfy the DMV.
Recovering From a Failed Inspection
A failed inspection gives you information. It doesn't authorize random parts replacement, and it doesn't mean the vehicle is permanently barred from registration. Start by keeping every document from the appointment, including the failed inspection report and any diagnostic information the station provides.
Follow the repair sequence
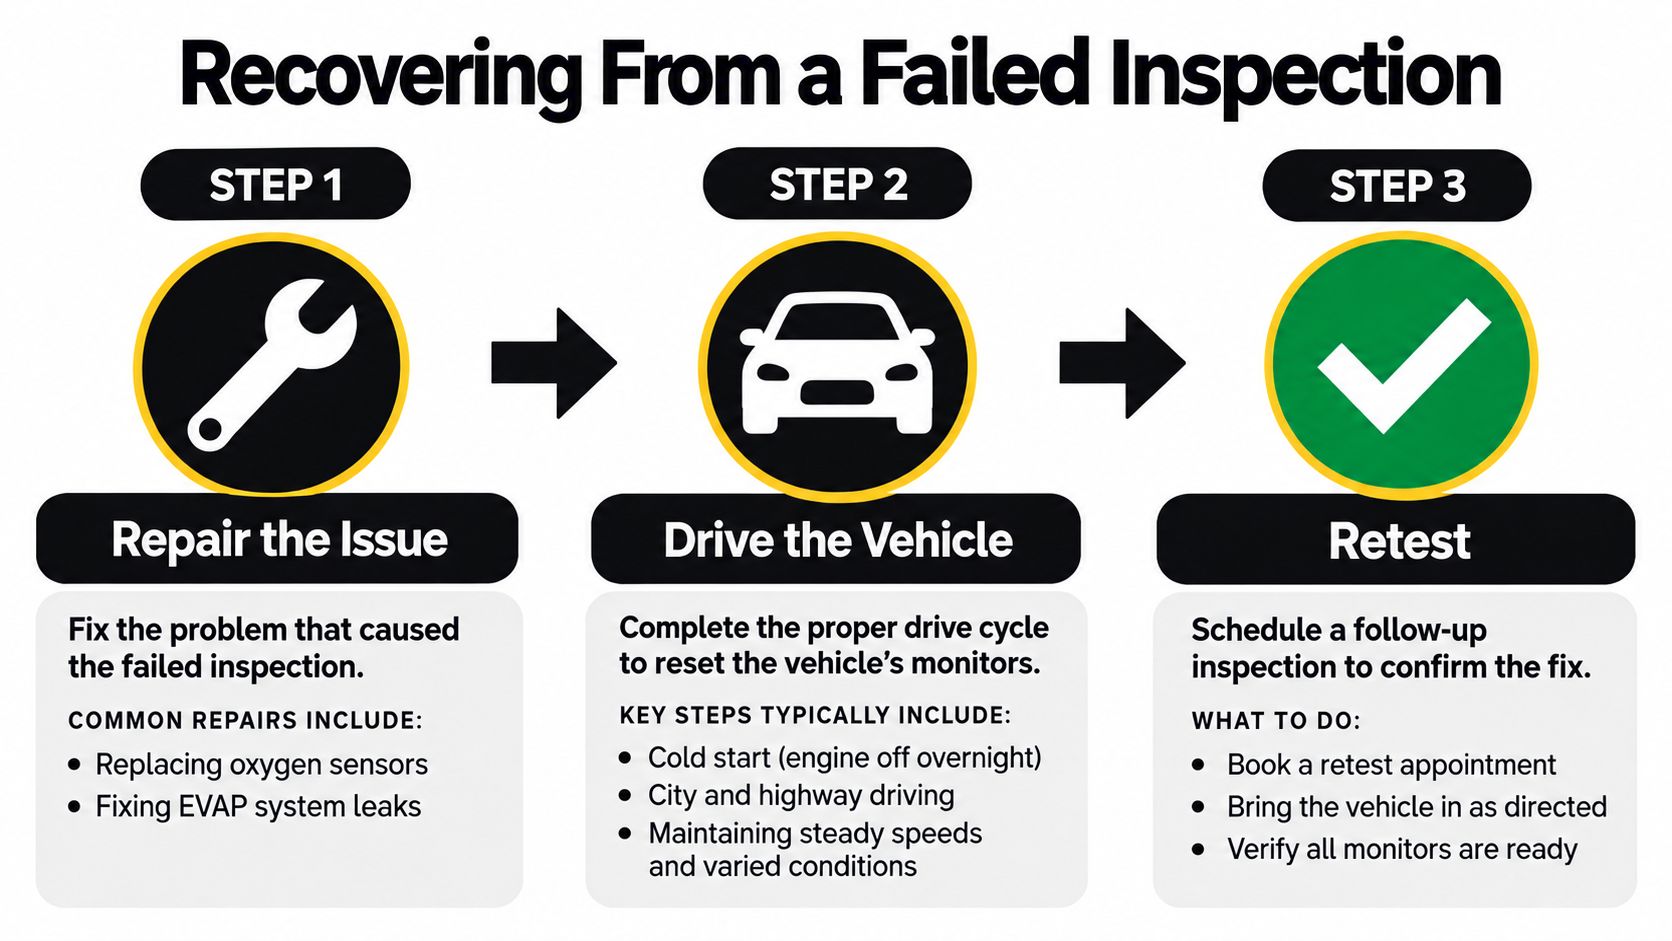
First, identify the failure category. The report should show whether the problem involved a malfunction indicator, emissions readings, readiness monitors, missing equipment, or another compliance issue. Don't approve repairs based only on a vague statement that the car “needs a tune-up.”
Second, diagnose before replacing parts. A check-engine code identifies a monitored fault, not automatically the failed component. A technician should test the wiring, vacuum system, fuel control, exhaust system, and related components before installing expensive parts.
Third, complete the drive cycle. If repairs or battery disconnection reset monitors, the vehicle may need mixed-use driving before retesting. Returning immediately can produce another failure even after the mechanical issue has been fixed.
Protect your legal driving options
California DMV guidance allows owners whose vehicles fail a biennial smog inspection to seek a Temporary Operating Permit, or TOP. The permit is valid for 60 days and requires registration renewal fees, the failed inspection report, proof of insurance, and a nonrefundable $50 fee, according to the California vehicle inspection information published by BAR.
The TOP matters because a failed inspection can block renewal while you still need to drive to a repair shop, retest location, or referee appointment. Confirm the permit's terms with the DMV and carry the required paperwork rather than assuming the failed report alone gives you unrestricted driving authority.
Keep the failed report, receipts, repair orders, scan results, and retest paperwork together. The paper trail makes the next conversation with a station, DMV office, or referee much easier.
Escalate when the result doesn't make sense
If you believe the inspection process was incorrect, or the vehicle has unusual equipment or modification issues, contact the Bureau of Automotive Repair Referee Program for direction. Don't pay for repeated tests without understanding the failure.
For a practical explanation of repair, permit, and retest steps, review this guide to a failed smog check in California. The right response is controlled diagnosis, not repeated guessing.
What to Expect at the Station
You pull into the bay, hand over the registration information, and answer a few basic questions about the vehicle. The technician confirms the identifying details, checks which inspection protocol applies, and connects the approved equipment if the vehicle uses OBD-II.
At a local East Bay station such as Speedy Smog, the experience is built around a short, focused inspection rather than a general mechanical service appointment. Speedy Smog is located at 15275 Washington Ave in San Leandro and handles newer vehicles, older vehicles, diesels, hybrids, and DMV-directed inspections. The shop also electronically transmits results to the DMV for registration purposes.
Bring the information that prevents delays
Have your DMV renewal notice available if you're renewing registration. Bring the vehicle, its current registration information, and any paperwork connected to a prior failure or special DMV direction.
Tell the technician about recent battery replacement, diagnostic-code clearing, emissions repairs, engine changes, or unusual fuel and weight classifications. Hiding recent work doesn't help. It can lead to a failed readiness check or an incorrect assumption about the test the vehicle needs.
The visit is an inspection, not a repair estimate
For most 2000 and newer vehicles, Speedy Smog states that typical testing is completed in about 10 to 15 minutes, though the actual time depends on the vehicle and inspection requirements. A station may need more time for an older vehicle, a diesel, a heavy vehicle, a DMV-directed test, or a problem with the vehicle's identification or computer connection.
Ask for the total price before the test begins. Transparent stations should explain whether the appointment is a standard inspection, STAR inspection, diesel inspection, or another required service. A clean waiting area and clear communication matter, but the central question remains whether the test is valid for your DMV transaction.
Don't confuse a smog inspection with a complete vehicle safety inspection. The smog test focuses on emissions compliance. If you also need brake, tire, suspension, or general reliability work, arrange that separately so you know exactly what you're paying for.
Your Pre-Inspection Compliance Checklist
The best time to prevent a failed test is before you arrive. Use this checklist based on the transaction, vehicle, and computer status.
Confirm the administrative requirement
- Read the DMV notice: Determine whether you need renewal certification, STAR certification, a transfer-related inspection, or first-registration certification.
- Confirm the vehicle category: Check model year, fuel type, hybrid status, and GVWR.
- Check exemptions and fee options: Electric vehicles and other qualifying vehicles may be exempt, while newer vehicles may qualify for the smog-abatement fee instead of testing.
- Bring supporting paperwork: Keep the renewal notice, registration information, prior failed report, repair records, and proof of insurance available when relevant.
Check the vehicle's readiness
- Look at the dashboard: A check-engine light that stays on needs diagnosis before testing.
- Avoid recent code clearing: Clearing codes can reset readiness monitors and leave the vehicle unable to pass.
- Scan monitor status: Confirm applicable monitors are complete after repairs or battery work.
- Complete normal mixed-use driving: Give the computer enough time and operating conditions to finish its self-tests.
- Check visible basics: Make sure the gas cap is secure and report obvious exhaust or emissions-system damage before the test.
Choose the correct station
- Follow STAR instructions: If the DMV requires STAR, use a station authorized for that requirement.
- Confirm capability: Ask whether the station handles your vehicle's age, fuel type, inspection protocol, and transaction.
- Explain recent work: Battery replacement, code clearing, emissions repairs, and modifications can change the advice you need.
- Plan for failure intelligently: If the vehicle fails, retain the report, diagnose the cause, complete repairs, reset monitors correctly, and retest.
California vehicle inspection is easier when you treat it as a compliance process instead of a quick lottery ticket. Identify the transaction first, verify the inspection path second, and check readiness before you spend money on the test.
Speedy Smog provides STAR Certified smog checks in San Leandro for newer and older vehicles, including hybrids and eligible diesel vehicles, with DMV electronic result transmission. If you're preparing for renewal, a transfer, or first California registration, visit Speedy Smog and confirm the correct inspection before you arrive.
You're probably reading this because your DMV renewal notice is sitting on the counter, your registration deadline is getting close, and you're not sure whether you need a regular smog station or a STAR station. Maybe you already paid the renewal fees and expected the process to be finished, only to see that DMV still shows a smog requirement.
That confusion is common in the East Bay because the inspection and registration systems are connected, but they aren't the same step. The station performs the inspection and sends the result electronically. DMV then uses that result to clear the registration requirement. If either side has the wrong vehicle record, missing information, or an unresolved hold, your renewal can remain incomplete.
Table of Contents
- What Car Registration Inspection Actually Covers
- Decide Whether Your Vehicle Needs a Test
- Prepare Your Documents and Pick the Right Station
- What Happens During the Inspection Itself
- Move From Certificate to Completed Renewal
- Handle a Failed Inspection the Right Way
- Quick Checklist Before You Book and After You Pass
What Car Registration Inspection Actually Covers
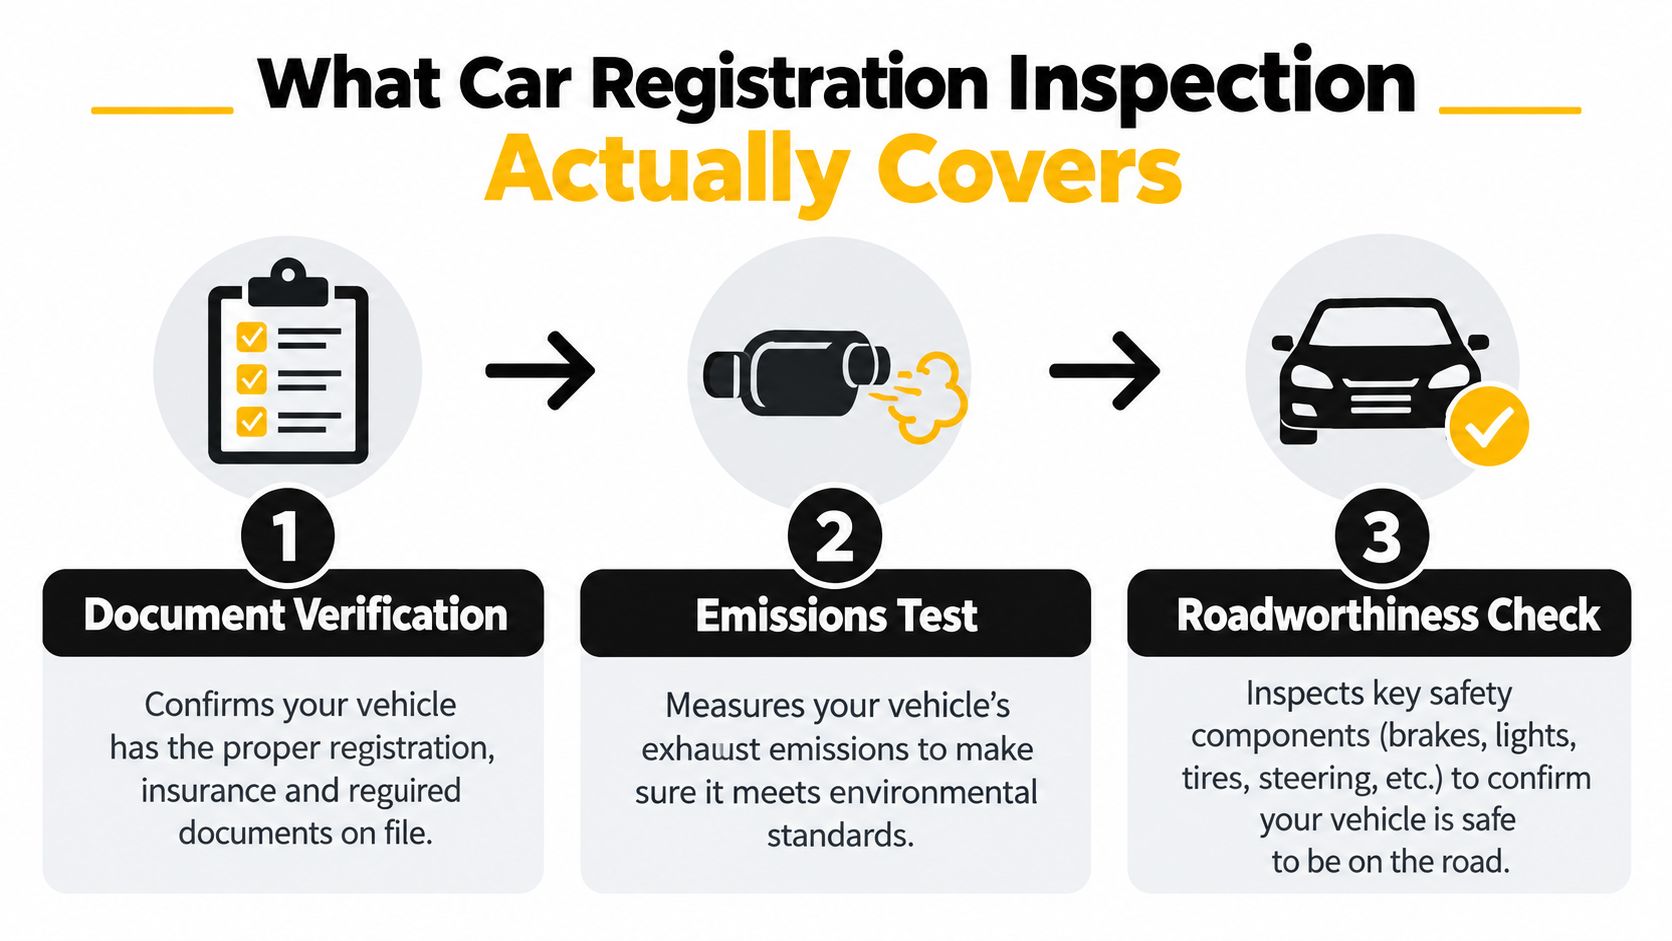
A car registration inspection is more than a tailpipe check. It's a compliance workflow that connects your vehicle identity, the applicable emissions inspection, and the electronic record DMV needs before it can finalize registration.
Start with the paperwork. The technician needs to identify the correct vehicle and match the inspection to the record on your renewal notice. In California, the station scans the notice barcode so the vehicle information can be transmitted accurately to DMV. That step matters because a passed test attached to the wrong record won't clear the right registration hold.
The inspection itself depends on the vehicle's profile. Fuel type, model year, weight, and registration situation determine which requirements apply. Routine testing generally occurs every two years for covered vehicles, but a first California registration, an out-of-state vehicle, or a change of ownership can create a testing requirement even when the vehicle doesn't need a routine renewal inspection. The California Bureau of Automotive Repair performance report describes the program as one of the largest inspection-and-maintenance networks in the country, with more than 8,000 active stations during calendar years 2024 and 2025.
The three parts that matter
- Vehicle and document verification: The station confirms the notice, VIN, and vehicle record before submitting the result.
- Applicable emissions inspection: The technician performs the test required for that vehicle and registration context.
- Electronic certification: The station issues a Vehicle Inspection Report and transmits the result to DMV.
Practical rule: Treat the inspection report as proof of the station visit, not as proof that your registration is already renewed.
The program has a clear environmental purpose as well. A Lawrence Berkeley National Laboratory analysis of California's Enhanced Smog Check program estimated that inspections in 1999 reduced daily tailpipe emissions by approximately 97 tons of hydrocarbons, 1,690 tons of carbon monoxide, and 81 tons of nitrogen oxides. The analysis found that vehicles more than 10 years old produced most of the program's emissions benefits, even though they represented about half of inspected vehicles.
For you, the takeaway is simple. First identify the requirement, then choose the correct station, confirm the vehicle record, and verify that DMV received the certification. That sequence prevents most registration delays.
Decide Whether Your Vehicle Needs a Test
Don't book an appointment based only on the vehicle's age or the fact that your neighbor needed a smog check. California uses several filters, and the registration context can override a routine exemption.
The first filter is propulsion. Electric vehicles are exempt from Smog Check. Gasoline vehicles from model year 1975 or older are also exempt, while gasoline vehicles from model year 1976 onward generally fall within the program. Diesel vehicles from model year 1997 or older generally qualify for an exemption, and diesel vehicles over 14,000 pounds are also listed among the exemptions. The California DMV smog inspection guidance provides the official category rules.
Gasoline vehicles that are eight model years old or newer are generally exempt from the routine biennial inspection. That doesn't mean they're exempt from every smog requirement. A newer vehicle may still need testing during its first California registration or a change-of-ownership transaction. Some newer gasoline vehicles may instead be subject to a smog-abatement fee.
Use the notice, not guesswork
Pull out the DMV renewal notice before calling a station. Look for language that says “Smog Certification Required at a STAR station.” If the notice directs you to STAR, a regular station won't satisfy that requirement.
Hybrids deserve special attention. California generally treats gasoline, hybrid, and alternative-fuel vehicles from model year 1976 onward as vehicles that can fall within the Smog Check program. An electric vehicle is different because it has no gasoline engine emissions system to inspect. Diesel rules also differ from gasoline rules, so don't use a gasoline exemption to decide what applies to a diesel truck.
| Vehicle type | Model year or age | Inspection required? |
|---|---|---|
| Gasoline vehicle | Model year 1975 or older | Generally exempt |
| Gasoline vehicle | Model year 1976 onward | Generally within the program, subject to exemptions |
| Gasoline vehicle | Eight model years old or newer | Generally exempt from routine biennial testing, but registration or ownership events can still trigger testing |
| Hybrid vehicle | Model year 1976 onward | Generally within the program |
| Diesel vehicle | Model year 1997 or older | Generally exempt |
| Diesel vehicle | Over 14,000 pounds | Generally exempt under the listed DMV category |
| Electric vehicle | Any model year | Exempt |
The Bureau of Automotive Repair's Smog Check overview reports that about 19 million model-year-2000-and-newer vehicles were tested during calendar years 2024 and 2025, with approximately 1.3 million failures, an overall failure rate of about 7%. That's why classification matters. A test requirement isn't determined by one simple age rule.
Prepare Your Documents and Pick the Right Station
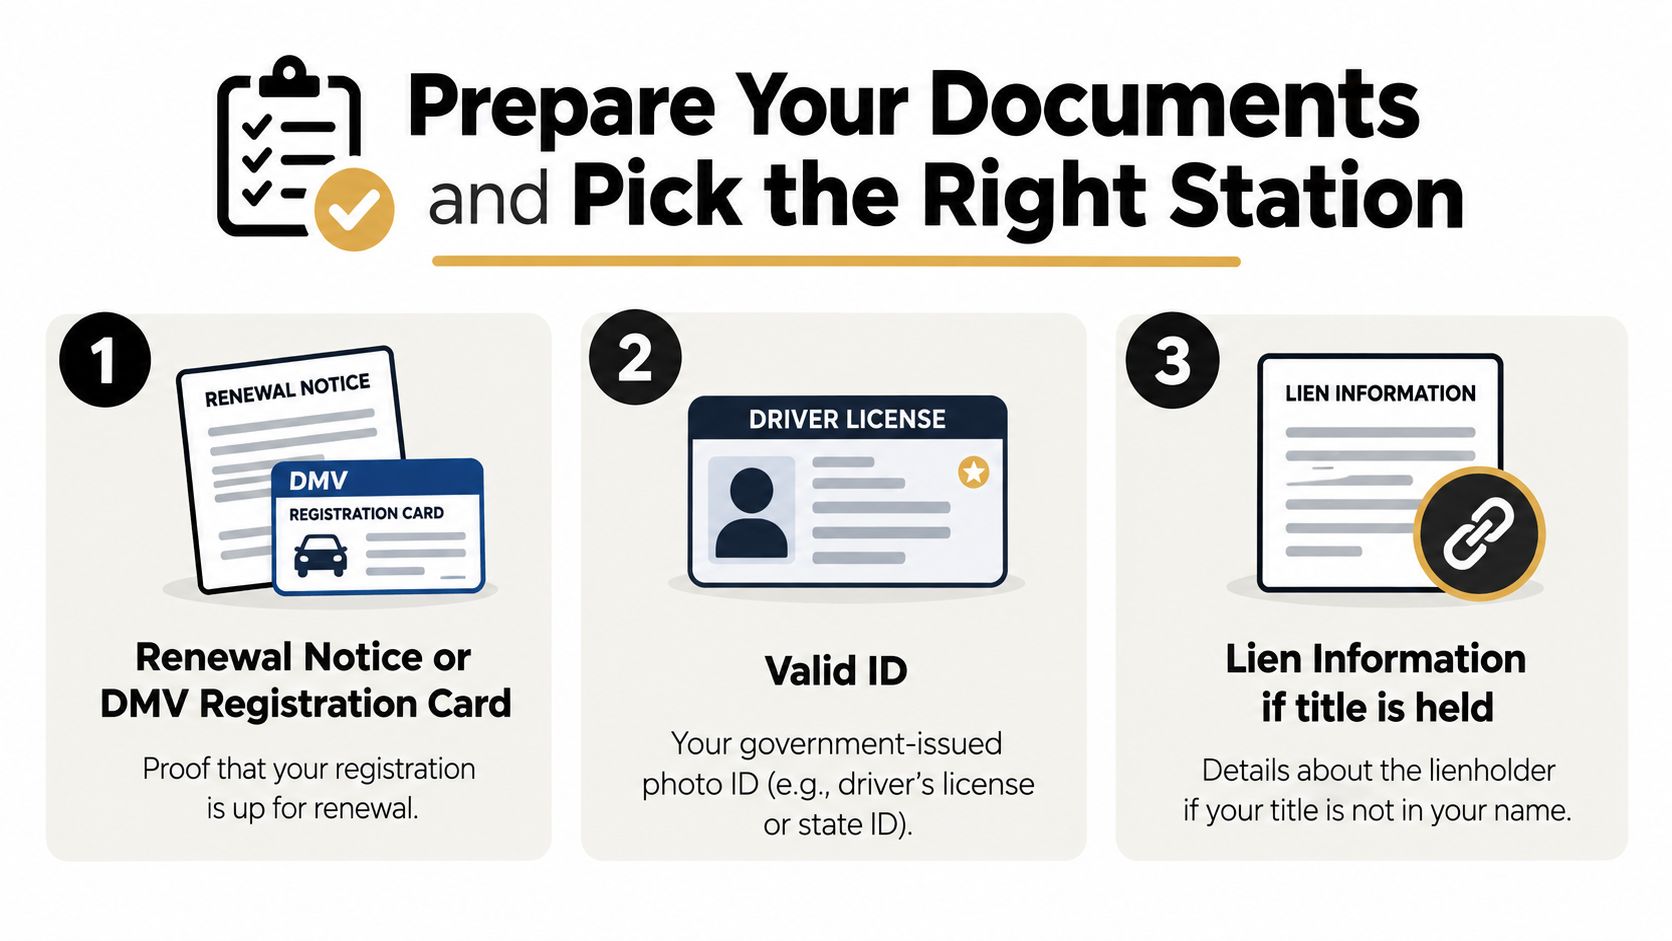
Bring the DMV renewal notice whenever you can. Its barcode helps the technician send the inspection to the correct vehicle record. Check the plate number and VIN on the notice before leaving home, especially if you have more than one vehicle or recently changed ownership.
Your preparation should answer two questions before the car enters the bay:
- What does DMV require? Read the renewal notice and identify whether it calls for any authorized station or a STAR station.
- Does the vehicle match the notice? Confirm the plate, VIN, fuel type, and registration situation.
- Is the car ready to test? Resolve a check engine light or known emissions problem instead of hoping the inspection won't detect it.
- Can the station handle this vehicle? Confirm that the station works with your vehicle's fuel type, model year, and inspection category.
STAR or regular station
A regular authorized station may be appropriate when the notice doesn't specify STAR. A STAR station is required when DMV directs you there. That direction can apply to certain renewal records, vehicles sent there after a previous failure, and other categories established by the state program.
Don't make the station choice based on the shortest drive alone. A cheap or convenient appointment becomes expensive if the station can't submit the result your renewal requires. Read the notice first, then call if the wording is unclear.
For East Bay drivers, California smog check station information can help you confirm the type of service offered before you arrive. The important point isn't the shop name. It's whether the location is authorized for the exact inspection your DMV record requires.
The renewal notice is the key document. Keep it available on your phone or bring the paper copy, but don't rely on a plate number alone if the station needs the barcode to transmit the correct record.
What Happens During the Inspection Itself
At the station, hand over the renewal notice and let the technician establish the vehicle record before the test begins. The technician scans the barcode, confirms the vehicle information, performs the applicable inspection, and creates the Vehicle Inspection Report. That electronic handoff is what connects the station visit to DMV.
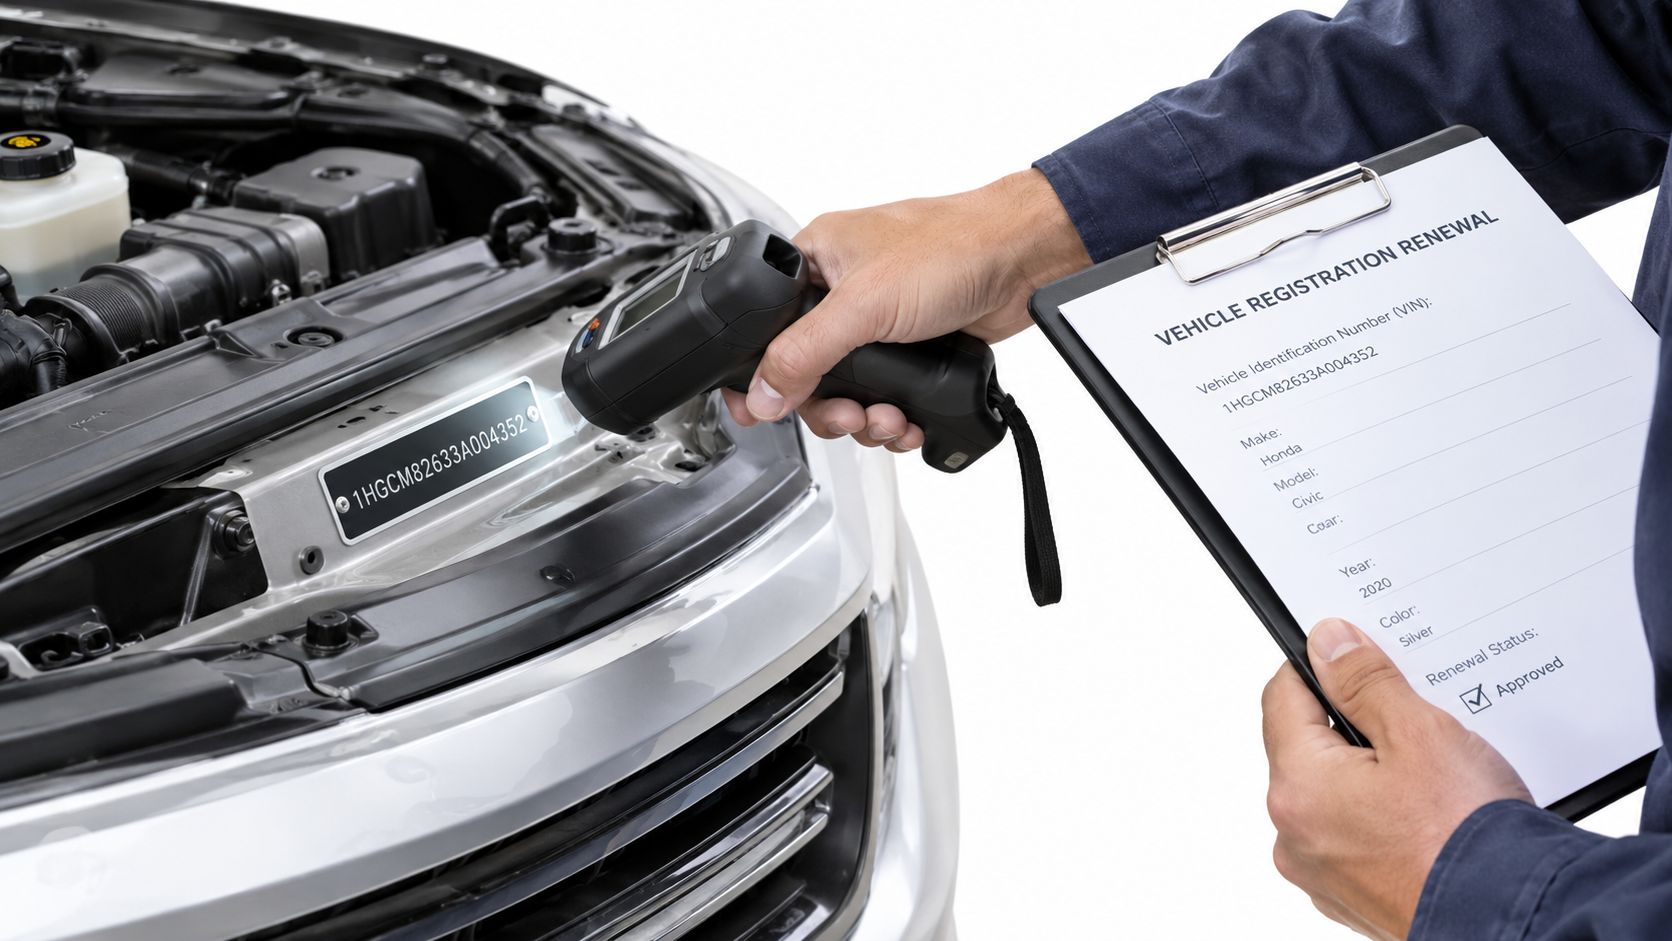
Don't treat the printed report as a form you must personally mail to DMV. The station submits the certification electronically. You should still check every identifying detail before leaving. A wrong plate, VIN, or vehicle record can create a problem even when the vehicle itself passed.
The technician may ask you to leave the car while the inspection is performed. That's normal. What you should expect at the end is a clear result, a Vehicle Inspection Report, and an explanation of anything that prevented a pass. Ask for an itemized receipt and keep the report in the vehicle records.
What STAR changes
STAR doesn't mean your vehicle receives a completely different registration process. It means you must use a station authorized for a STAR-directed inspection. The station still verifies the record, performs the applicable inspection, and submits the result electronically.
If the vehicle fails, don't approve repairs based on a vague statement such as “it needs emissions work.” Read the report and ask which test element failed. You need that information before deciding whether to use the same shop, another repair facility, or the BAR Referee pathway.
This short video shows the general relationship between an inspection visit and vehicle emissions compliance:
The station visit ends when the result is recorded and the report is in your hands. Registration renewal is a separate task. Passing is necessary, but it doesn't replace the DMV transaction.
Move From Certificate to Completed Renewal
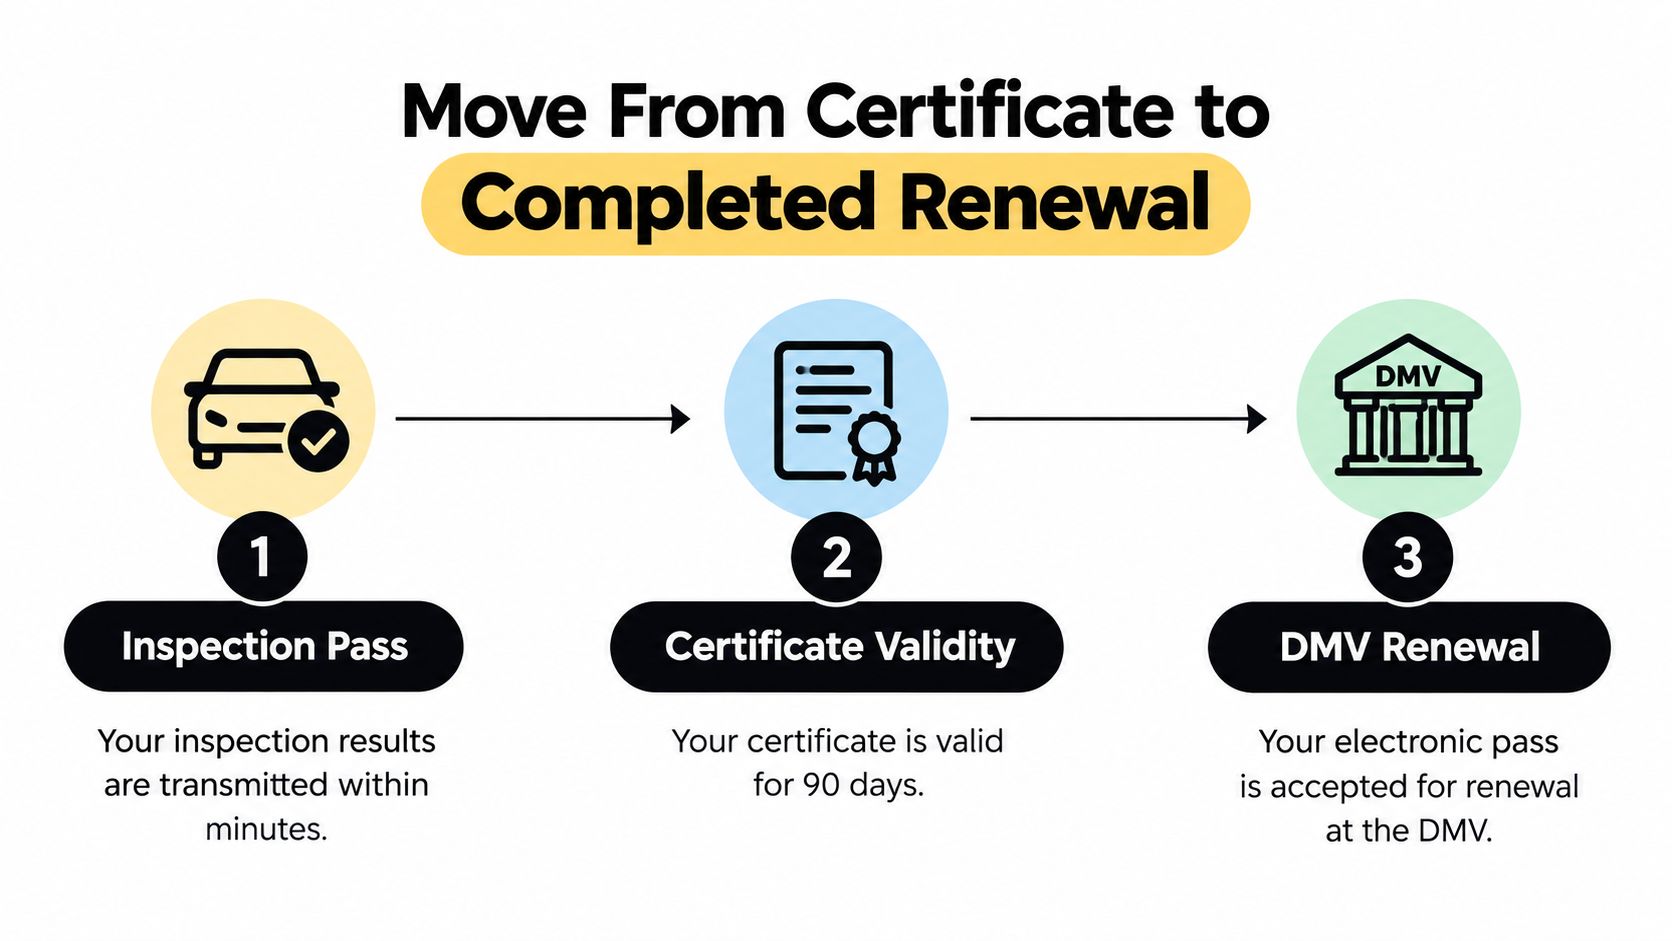
A passing result clears the smog requirement electronically, but DMV still has to process the registration renewal. California DMV says online renewal requires the electronic smog certification to be on file. Paying registration fees alone doesn't finalize the renewal if the certification or another requirement is still outstanding, as explained in the DMV vehicle registration renewal guidance.
The certificate remains valid for 90 days, according to the Bureau of Automotive Repair. Use that period to complete the renewal instead of assuming the pass will remain available indefinitely.
Check the electronic handoff
Before you pay again, verify the status of the vehicle in the DMV system. If the portal still shows a smog requirement, compare the plate and VIN on your report with the vehicle information in the renewal record. Call the station first if the information doesn't match. The station can confirm what it submitted and whether the record was accepted.
Don't assume a delay means you need another inspection. DMV guidance says some assisted processing can take up to 30 days, so allow time for the record to update when the submission is correct. If another hold appears, such as an unpaid parking matter, the smog certification won't resolve that separate issue.
The pass removes one obstacle. It doesn't complete the transaction.
Complete the renewal through the method DMV offers for your record, whether online, by mail, in person, or through another authorized channel. Save the receipt, the Vehicle Inspection Report, and the confirmation that registration was completed. If DMV asks for proof later, you'll have the station document and the renewal record together.
For a practical overview of the station-to-DMV process, smog check registration renewal information can help you identify the steps that remain after the test.
Handle a Failed Inspection the Right Way
A failed inspection gives you a diagnostic starting point. It doesn't tell you to replace every part associated with the emissions system, and it doesn't automatically mean the vehicle can't be driven home. Read the Vehicle Inspection Report and identify the exact reason for the failure before authorizing repairs.
Ask a repair shop for a written estimate. A qualified technician should explain whether the problem involves a gas cap, emissions-control component, readiness issue, sensor, exhaust system, or another test element. Don't accept a large repair recommendation without seeing how it connects to the failed result.
| Failure cause shown on the report | Likely next step | Typical cost range |
|---|---|---|
| Gas cap or evaporative-emissions issue | Inspect, diagnose, and repair the leak or cap problem | Varies by diagnosis |
| Sensor or emissions-control fault | Confirm the code and test the related system before replacement | Varies by diagnosis |
| Catalytic-converter or exhaust-related failure | Obtain a written diagnosis and verify the required component | Varies substantially |
| Readiness or testing issue | Ask the technician what condition prevented certification | Varies by cause |
| Unresolved failure after repairs | Keep reports and receipts, then ask about the next official step | Determined by the case |
California DMV says an owner whose vehicle failed the biennial inspection may qualify for a Temporary Operating Permit valid for 60 days. The owner must provide the failed report, registration fees, proof of insurance, and the required fee, and DMV generally allows only one such permit for the same vehicle within a two-year period. Review the DMV vehicle information guidance before applying because the permit doesn't erase the failed result or guarantee a later pass.
Know when to use the BAR Referee
The BAR Referee Program is the state's next-step resource for difficult inspection situations. DMV directs owners toward the Referee Program when a vehicle fails and needs additional assistance. Use that route when the failure involves an unusual configuration, disputed emissions equipment, special circumstances, or a problem that ordinary repairs haven't resolved.
Keep the failed report, repair orders, parts information, and receipts. Those records establish what the station found and what the repair facility attempted. They also give the Referee a clear history instead of forcing you to explain the entire case from memory.
The right response to a failure is controlled diagnosis. Don't clear the warning light and immediately return unless the technician confirms the vehicle is ready for a valid retest. A reset can erase useful information and leave the underlying problem untouched.
For drivers who want a retest after an eligible repair, smog check free retest information explains the station's available process. Confirm the terms directly before scheduling.
Quick Checklist Before You Book and After You Pass
Use the DMV notice as your control document. It tells you more than a generic online checklist because it reflects the registration record attached to your vehicle.
Before booking
- Find the renewal notice: Keep the notice available so the station can scan the barcode and match the inspection to the right vehicle.
- Confirm the plate and VIN: Compare the notice with the vehicle before you schedule.
- Identify the fuel type: Gasoline, diesel, hybrid, alternative-fuel, and electric vehicles can follow different rules.
- Check the model year and weight: These details can determine whether an exemption or special category applies.
- Choose the station type: Use a STAR station if the notice specifically requires STAR. Otherwise, confirm that the selected station is authorized for your vehicle.
Before arriving
- Resolve warning lights: A check engine light or known emissions fault deserves diagnosis before testing.
- Bring the vehicle record: Take the renewal notice or the relevant DMV document.
- Ask about special circumstances: Mention an out-of-state transfer, ownership change, diesel configuration, or other unusual registration situation.
- Plan for the report: Leave with the Vehicle Inspection Report and a receipt, whether the result is a pass or failure.
At the station
- Verify the vehicle identity: Check the plate and VIN before the technician submits the inspection.
- Confirm the result: Ask what the report says, not just whether someone verbally says “pass.”
- Keep the paperwork: Store the printed report with your registration records.
- Ask about the electronic submission: Confirm that the result was transmitted to DMV.
After a pass
- Check DMV status: Look for the electronic certification before assuming the renewal is complete.
- Finish the payment: The certificate clears the smog requirement, but DMV still needs the registration transaction completed.
- Resolve separate holds: Parking matters or other outstanding requirements can keep renewal from processing.
- Save the record: Keep the report and renewal confirmation together for future questions.
The mistakes to avoid are straightforward. Don't use a non-STAR station when DMV directs you to STAR. Don't ignore a warning light and hope the test misses it. Don't pay registration fees and assume the vehicle is renewed before DMV confirms completion. A clean inspection result is only one part of the process.
If you need a STAR inspection in San Leandro, Speedy Smog can perform the applicable smog check, transmit the result electronically to DMV, and provide the Vehicle Inspection Report for your records. Visit Speedy Smog with your renewal notice and confirm the correct station requirement before you arrive.
Since January 1, 2013, California has required vehicles directed to STAR inspection or identified as gross polluters to use a STAR station; for ordinary renewals, either a STAR station or a regular Test-Only station can be acceptable. The important detail is that STAR is a certification tier, not a promise that the shop performs repairs.
You're standing in line at the DMV, checking your renewal notice, or searching “smog check near me” when two labels create unnecessary confusion: STAR station and Test-Only station. A driver may assume STAR means a full-service repair shop, or that Test-Only means an inferior facility. Neither assumption is reliable.
The practical question is simpler: Can this station legally certify your vehicle for the inspection your DMV notice requires? If your vehicle is directed to STAR, taking it to a regular Test-Only station is the wrong move, even if that station performs legitimate emissions inspections. If your renewal doesn't require STAR, a regular Test-Only station may be sufficient, provided it's authorized for your vehicle.
Table of Contents
- Understanding Your Smog Station Options
- The Regulatory Differences Between STAR and Test Only
- Vehicle Eligibility and Inspection Capabilities
- The High Cost of Choosing the Wrong Station
- How to Verify Your Smog Station Needs
- Why Speedy Smog is the Smart Choice for East Bay Drivers
Understanding Your Smog Station Options
An East Bay driver usually discovers the distinction at the worst possible time. The registration renewal is due, the DMV notice mentions a smog certification, and the driver wants the quickest appointment available. A search produces several nearby businesses, but the listings use different labels. One says STAR, another says Test-Only, and a third says Test-and-Repair.
The right choice depends on the vehicle's inspection status, not on which label sounds more complete.
California's STAR program began on January 1, 2013, replacing the former Gold Shield and Test Only system. The DMV says the program was created to improve Smog Check quality and support the state's emissions-reduction goals. California DMV's Smog Inspections guidance also explains that STAR stations are held to higher performance standards and are used for vehicles directed to STAR inspection.
The label that matters on your notice
Start with the DMV renewal notice. If it says your vehicle must receive a STAR certification, book a STAR station. Don't assume a non-STAR Test-Only facility can complete the requirement just because it performs emissions tests.
If the notice calls for an ordinary Smog Check and doesn't direct the vehicle to STAR, a regular Test-Only station may be appropriate. A STAR station can also handle many ordinary inspections, so choosing STAR is often the simpler way to avoid guessing, especially when you're unsure how the notice applies to your vehicle.
| Your situation | Station to choose | Why |
|---|---|---|
| DMV notice requires STAR | STAR station | The vehicle needs certification from a STAR-authorized facility |
| Vehicle is directed for inspection | STAR station | A regular Test-Only station may not certify it |
| Vehicle is a gross polluter | STAR station | STAR stations can inspect and certify this category |
| Ordinary Smog Check with no STAR direction | Regular Test-Only or STAR station | Both may be suitable, depending on the station's authorization |
| Vehicle fails and needs emissions repairs | Repair-capable shop, followed by the correct testing station | Testing authority and repair authority are separate |
STAR doesn't automatically mean repairs
This is the mistake I see most often. STAR doesn't necessarily mean Test-and-Repair. A STAR station may be licensed to perform tests only, or it may be licensed to perform both tests and repairs.
That means you need to ask two separate questions before booking:
- Is the station STAR-certified for my vehicle's required inspection?
- Can the station repair emissions problems if the vehicle fails?
If you only need a certification and the car passes, the first question is the critical one. If the vehicle has a history of emissions problems, the second question can save you a separate trip.
Practical rule: Match the station to the DMV requirement first. Treat repair capability as a separate convenience question.
The Regulatory Differences Between STAR and Test Only
The difference in STAR station vs Test Only isn't just a matter of reputation or shop quality. It comes from two different layers of California's regulatory framework.
A standard Test-Only station is licensed to perform Smog Check inspections. It can test the vehicle, record the results, and transmit the certification outcome when the vehicle passes. It can't repair the vehicle it tests under that license.
A STAR station must meet higher inspection-based performance standards established through the Bureau of Automotive Repair. STAR is therefore a compliance and quality tier attached to the station's testing operation. It doesn't, by itself, tell you whether the business has technicians and licensing for repairs.
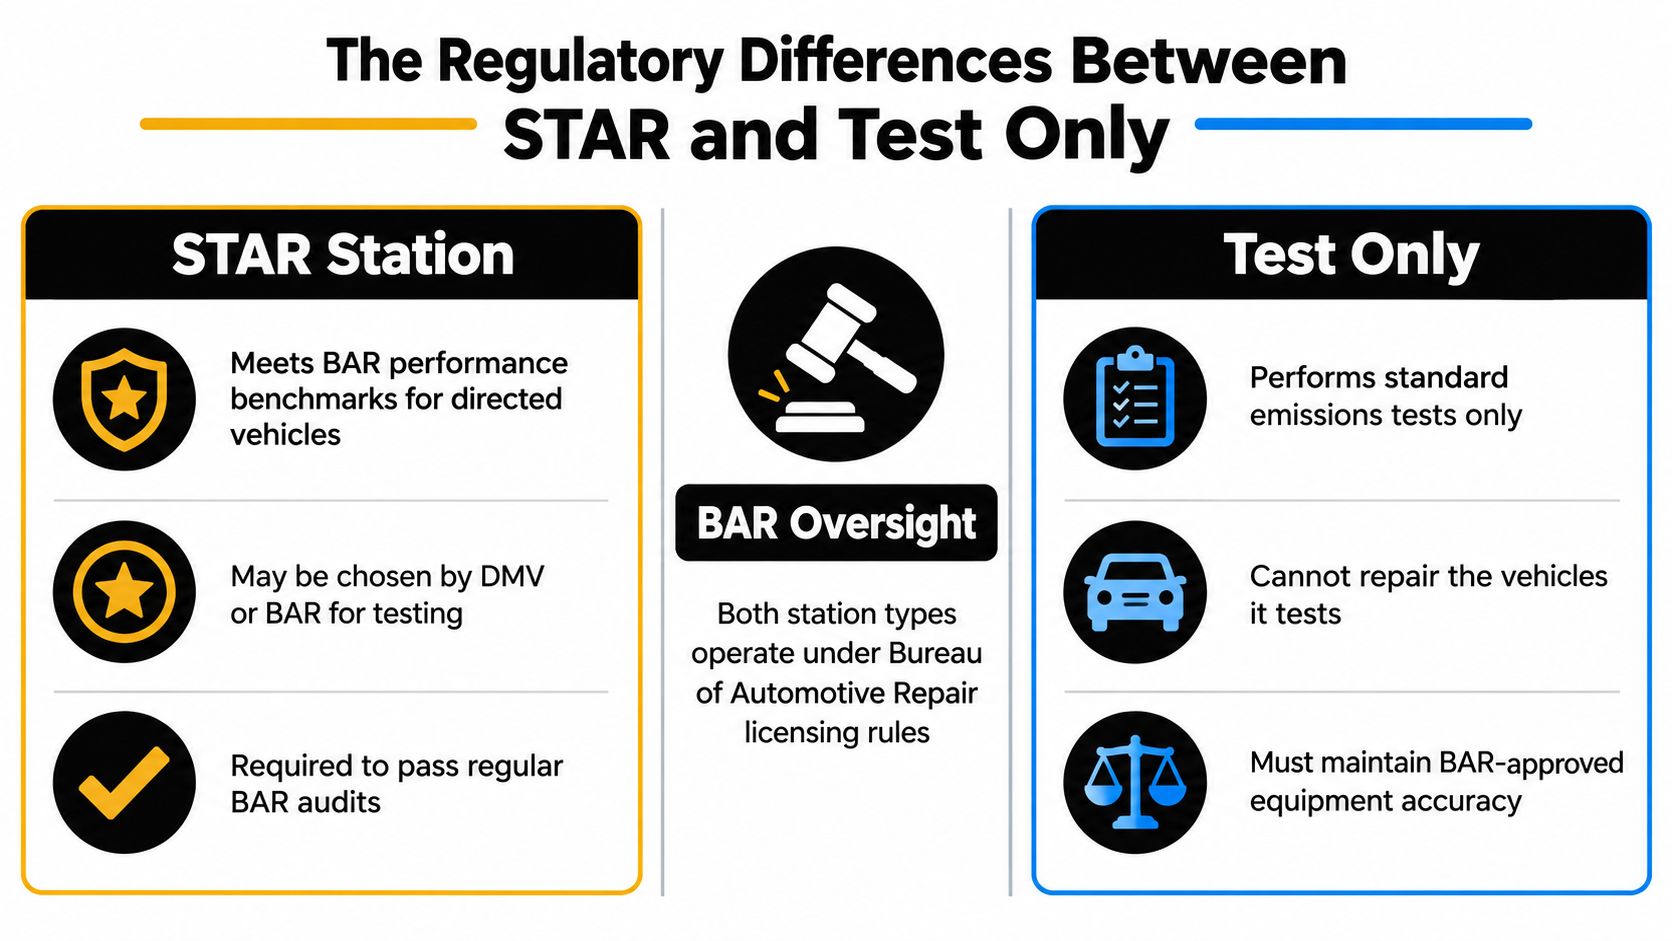
Licensing scope and performance standards
The Bureau of Automotive Repair's Smog Check explanation distinguishes between stations that test vehicles and stations that also perform repairs. BAR states that STAR stations can be either Test-Only or Test-and-Repair, while meeting the higher standards associated with STAR participation.
That creates an overlap that many quick online explainers miss:
- A regular Test-Only station can inspect vehicles but can't perform emissions repairs.
- A STAR Test-Only station can inspect vehicles under STAR standards but still can't perform repairs.
- A STAR Test-and-Repair station can inspect vehicles under STAR standards and repair emissions-related problems within its licensed scope.
- A regular Test-and-Repair station may perform repairs, but it isn't automatically authorized for every STAR-directed inspection.
The words “STAR” and “Test-Only” aren't opposites. One identifies a performance certification tier. The other identifies whether the station's license permits testing without repairs.
Why the distinction affects your appointment
BAR's STAR certification information explains that STAR stations must meet higher inspection-based performance standards and can inspect all vehicles subject to Smog Check, including gross polluters and directed vehicles. BAR also states that directed vehicles can receive certification only from STAR Test-Only or STAR Test-and-Repair stations.
That's why a STAR Test-Only station can be exactly the right choice. If your vehicle requires STAR and you only need a test, you don't need a repair shop. You need a station that holds the correct STAR authority.
For drivers who want a deeper explanation of the overlapping labels, this guide to what a Smog STAR station is breaks down the terminology without treating STAR and Test-Only as competing categories.
Vehicle Eligibility and Inspection Capabilities
The vehicle category determines how strict your station choice needs to be. A regular vehicle undergoing an ordinary renewal may be eligible for a standard Test-Only inspection. A directed vehicle or a gross polluter needs a STAR-capable station.
The word “directed” matters because it describes a vehicle that California requires to receive its inspection at a STAR station. The direction may appear on the DMV renewal notice or arise from the vehicle's inspection history and program requirements. Don't rely on a map listing or a low advertised price to determine eligibility.
The capability comparison
| Station Type | Standard Vehicles | Directed Vehicles | Gross Polluters |
|---|---|---|---|
| Regular Test-Only | Can inspect when the vehicle's requirements allow a standard test | Cannot provide the required STAR certification | Not the correct certification path |
| STAR Test-Only | Can inspect standard vehicles and vehicles subject to STAR requirements | Can inspect and certify directed vehicles | Can inspect and certify gross polluters |
| Regular Test-and-Repair | Can test and repair within its license scope | Not automatically authorized for STAR-directed certification | Not automatically the correct certification path |
| STAR Test-and-Repair | Can test and repair within its license scope | Can inspect, repair, and certify directed vehicles | Can inspect, repair, and certify gross polluters |
The table shows why “Test-Only” doesn't always mean the same thing. Regular Test-Only and STAR Test-Only both lack repair authority, but only the STAR version can handle directed vehicles and gross polluters under the applicable STAR requirements.
Three categories drivers need to recognize
Standard vehicles are the least complicated. If the DMV notice calls for a normal Smog Check and doesn't direct the vehicle to STAR, an authorized regular Test-Only station may be enough. A STAR station can also perform the inspection, but STAR may not be mandatory for that particular vehicle.
Directed vehicles must go to a STAR station. A regular Test-Only station can conduct an inspection within its authority, but it can't provide the STAR certification required for a directed vehicle. Booking the wrong station can turn a routine renewal into an avoidable second appointment.
Gross polluters require STAR capability as well. A vehicle in this category may need more attention after a failure, but the first step remains choosing a station authorized to perform the required inspection. Don't confuse the ability to test with the ability to repair.
A station can be legitimate, licensed, and perfectly capable of ordinary inspections while still being the wrong station for a directed vehicle.
The High Cost of Choosing the Wrong Station
Most drivers compare smog stations by the advertised test price. That's understandable, but it's incomplete. The financial risk appears when the station lacks the authority or repair capability your vehicle needs.
Suppose an East Bay driver takes a directed vehicle to a regular Test-Only station. The station may perform an inspection, but it can't provide the STAR certification required for that vehicle. The driver has paid for activity that doesn't complete the DMV requirement, then has to locate a STAR station and arrange another visit.
That's not just an inconvenience. It can mean another test charge, more fuel, time away from work, and a delayed registration renewal. The initial low price stops looking low once the driver adds the cost of correcting the decision.
A failure creates a separate decision
A regular Test-Only station can document a failed emissions inspection, but it can't repair the emissions problem. The vehicle may need to go to a separate repair shop for diagnosis and corrective work.
After repairs, the driver still needs the right station for the next certification attempt:
- If the vehicle is directed, the return inspection must be handled by a STAR Test-Only or STAR Test-and-Repair station.
- If the vehicle is a gross polluter, the driver needs a STAR-capable facility for the applicable certification.
- If the vehicle has no STAR requirement, the driver may have more flexibility, but the station still needs the proper authorization for the follow-up inspection.
- If the first station is also Test-and-Repair, the driver may be able to keep diagnosis and repair in one place, depending on the problem and the shop's licensed services.
The important point is that test authority and repair authority are different. A station that can test your car may not be able to fix it. A repair shop that can fix emissions components may not be authorized to complete the STAR certification your DMV notice requires.
The cheapest test can become the expensive route
Drivers often focus on the first transaction instead of the entire path to certification. That approach is risky when the vehicle has warning lights, a previous failure, or a STAR direction.
A better calculation includes:
- The first inspection.
- Diagnosis and emissions repairs if the vehicle fails.
- The follow-up inspection.
- Travel between separate businesses.
- Time spent scheduling and waiting.
- The risk of choosing another facility that also lacks the correct certification authority.
You can't know in advance whether a vehicle will pass, but you can avoid a preventable station mismatch. If STAR is mandatory, start with STAR. If repair work may be needed, ask whether the station is Test-Only or Test-and-Repair before you arrive.
The smart budget isn't the lowest first price. It's the lowest realistic cost from inspection to valid DMV certification.
How to Verify Your Smog Station Needs
You don't need to decode California's entire emissions program before making an appointment. You need to verify three things in the right order: the DMV instruction, the vehicle's status, and the station's current authorization.
Start with the DMV renewal notice
Read the notice carefully instead of searching by vehicle age or neighborhood alone. Look for language indicating that the vehicle must go to a STAR station, or that it has been directed for a specific type of inspection.
If the notice requires STAR, treat that instruction as decisive. Don't book a regular Test-Only station and hope the result will transfer. The station must be able to issue the certification your vehicle requires.
If the notice only requests a standard Smog Check, you may have a choice between a regular Test-Only station and a STAR station. When the notice is unclear, contact the station before driving over and describe the exact wording.
Ask the station direct questions
Use this short checklist when you call or book online:
- “Is your station currently STAR-certified?”
- “Are you STAR Test-Only or STAR Test-and-Repair?”
- “Can you certify a vehicle directed to STAR?”
- “Can you inspect gross polluters?”
- “If the vehicle fails, do you perform emissions repairs here?”
The first three questions establish whether the station can complete the required certification. The last two help you plan for a failure without assuming the shop offers repairs.
Confirm before you leave home
Station listings can be incomplete or outdated. Confirm the location, appointment availability, and station type directly. Keep the DMV notice with you, along with any prior inspection information that may explain a failure or direction.
For additional preparation, use this guide on how to check your smog status before booking. The goal is simple: arrive at a facility that can legally complete the inspection, not merely one that advertises smog checks.
Why Speedy Smog is the Smart Choice for East Bay Drivers
For an East Bay driver who wants to avoid station-label confusion, a STAR-certified Test-Only station offers a straightforward path when the vehicle requires STAR certification. It can handle the inspection without pretending that STAR automatically includes repairs. If the vehicle passes, the certification process stays focused. If it fails, the driver knows that repair work may need to happen elsewhere unless the chosen station also holds Test-and-Repair authority.
Speedy Smog in San Leandro is a STAR Certified station that provides STAR-certified Test-Only smog inspections and electronically transmits results for DMV registration needs. That makes it relevant for drivers whose vehicles need STAR testing, including directed vehicles and other vehicles that fall under STAR inspection requirements.
What to confirm before your appointment
A good appointment starts with accurate information. Bring the renewal notice and ask the station to confirm that its current license and STAR status fit your vehicle's requirement.
Speedy Smog's service is designed around emissions testing rather than assuming every customer needs repairs on-site. Drivers with older vehicles, diesels, hybrids, or cars with a previous failure should still explain the vehicle's situation before the inspection so the station can clarify the correct next step.
The broader lesson is more important than any individual shop: choose certification authority first, convenience second, and price third. A nearby regular Test-Only station may be perfectly suitable for an ordinary renewal. It's the wrong choice when the DMV requires STAR.
The practical recommendation
If your notice requires STAR, book a STAR station and verify whether it's Test-Only or Test-and-Repair. If your vehicle has already failed or you expect emissions repairs, ask about the repair pathway before the test.
For an ordinary renewal with no STAR direction, either an authorized regular Test-Only station or a STAR station may work. Drivers who want to reduce uncertainty can review this guide to the best smog check options and then call the station with the exact wording from the DMV notice.
Speedy Smog offers STAR-certified Test-Only inspections in San Leandro for East Bay drivers who need a compliant DMV smog certification. Visit Speedy Smog with your renewal notice, confirm your vehicle's requirement, and book the correct inspection before you make an unnecessary trip.
You've booked a California smog check, the registration deadline is close, and someone has told you to “take the diesel on the freeway and clear the light.” That advice can help in a narrow situation, but it can also waste your time or guarantee a failure if the vehicle's OBD monitors aren't ready or a real emissions fault remains active.
Passing a diesel emissions test starts with identifying which inspection rules apply to your vehicle. From there, the priorities are straightforward: confirm eligibility, check readiness, control smoke and opacity, avoid resetting the computer before testing, and diagnose persistent faults instead of trying to drive them away.
Table of Contents
- Knowing If Your Diesel Needs a Smog Check
- Understanding Opacity Limits and OBD Readiness Rules
- Executing the Pre-Test Drive Cycle Checklist
- Avoiding the Code Clearing Trap
- Deciding Between a Long Drive and Diagnostic Repair
- Managing Test Day Logistics and STAR Certification
Knowing If Your Diesel Needs a Smog Check
The first mistake many owners make is preparing for a test their vehicle may not need, or assuming every diesel follows the same procedure. California separates diesel vehicles by model year and gross vehicle weight rating, so check those details before spending money on additives, repairs, or a pre-test inspection.
According to the California Bureau of Automotive Repair Smog Check reference, diesel vehicles built from model year 1998 onward are generally included in the program. Diesel vehicles from 1997 and earlier are exempt, and vehicles with a GVWR above 14,000 pounds are outside the standard program described for these light-duty inspections.
Check the two eligibility details
Start with the vehicle's model year. Don't rely on the year you bought it, the registration date, or the date of a major repair. The relevant detail is the vehicle's model year as identified in its records and emissions equipment documentation.
Next, check the gross vehicle weight rating, not the vehicle's current weight. GVWR is the manufacturer's rated maximum weight for the vehicle, including occupants and cargo. A diesel that looks like a normal pickup may fall under different requirements if its rating places it above the light-duty threshold.
California's diesel inspection rules also reflect a historical change that matters to owners of newer passenger vehicles and pickups. The 2010 expansion brought post-1997 diesel passenger cars and trucks up to 14,000 pounds into the Smog Check system, making modern diesel eligibility more common than many older guides suggest.
Confirm the inspection type before your appointment
Eligibility doesn't tell you every detail of the test. A qualifying diesel may be evaluated through a combination of OBD communication, visual inspection, and smoke or opacity checks, depending on its category and the applicable procedure. It isn't just the older gasoline-style tailpipe dyno test that many drivers remember.
Before you schedule, compare your vehicle's year and GVWR with the diesel Smog Check requirements. If the vehicle is subject to inspection, ask the station what information it needs and whether it handles the relevant diesel procedure.
Understanding Opacity Limits and OBD Readiness Rules
California diesel testing revolves around two different questions. How much smoke is the vehicle producing, and has the emissions computer completed the required self-tests? A diesel can look clean at idle and still fail because its monitors report “Not Ready.” It can also have a ready OBD system and fail because visible smoke or measured opacity exceeds the applicable limit.
For heavy-duty diesel fleets covered by California's Periodic Smoke Inspection Program, the BAR Smog Check Manual identifies opacity limits of 55% for pre-1991 engines and 40% for engines from 1991 onward. Those limits apply to the heavy-duty program, so don't automatically transfer them to every light-duty diesel.
For light-duty diesels, OBD readiness becomes especially important. Model year 2007 and newer light-duty diesels may have two unset readiness monitors, but the allowance is limited to the Diesel Particulate Filter and Non-Methane Hydrocarbon Catalyst monitors. If other required monitors remain incomplete, the vehicle may not qualify for a pass.
California diesel inspection thresholds
| Vehicle category | Opacity limit | OBD monitor allowance |
|---|---|---|
| Heavy-duty diesel, pre-1991 engine | 55% | Requirements vary by applicable heavy-duty procedure |
| Heavy-duty diesel, 1991 and newer engine | 40% | Requirements vary by applicable heavy-duty procedure |
| Light-duty diesel, model year 2007 and newer | Tested under the applicable diesel procedure | Two unset monitors may be allowed, limited to the Diesel Particulate Filter and Non-Methane Hydrocarbon Catalyst monitors |
The practical lesson is that smoke and readiness are separate gates. A highway drive may help a diesel complete a regeneration-related monitor, but it won't repair a failed sensor, restore damaged wiring, or correct an emissions system that has been deliberately removed or reprogrammed.
Check readiness before you pay for the test
Use a capable OBD scanner to view monitor status, not just stored trouble codes. Look for a result showing the required systems as Ready, and check whether the malfunction indicator lamp is illuminated.
The equipment used by a compliant station matters because the inspection must communicate with the vehicle and evaluate the systems required for that vehicle. If you want to understand the role of the inspection hardware, review the diesel emissions testing equipment used for this type of evaluation.
Executing the Pre-Test Drive Cycle Checklist
A drive cycle isn't the same as commuting to the inspection station. The vehicle's computer needs the right combination of cold-start conditions, warm-up, speed, load, and uninterrupted operation to complete its self-tests. The exact sequence varies by manufacturer, so the owner's service information remains the authority, but a controlled routine is more useful than random short trips.
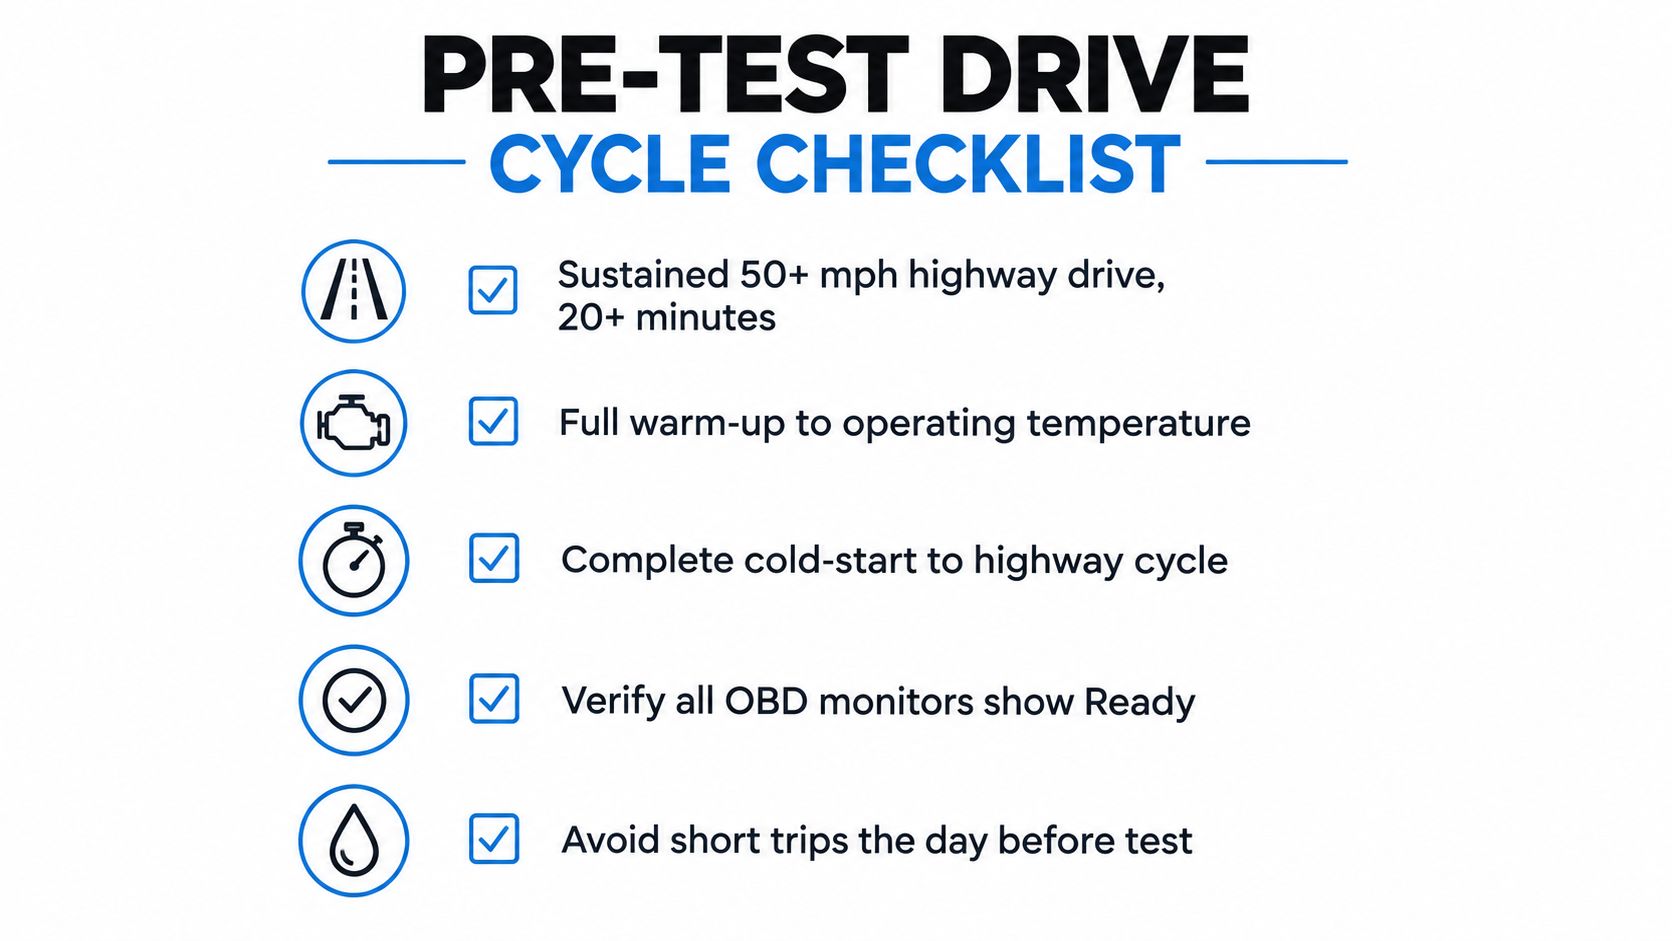
Use a deliberate sequence
Begin with a genuine cold start. Let the vehicle complete its normal startup process, then drive gently while the engine and emissions system warm up. Avoid turning the first few minutes into a hard acceleration run, because the aim is stable operating conditions, not punishment.
Once the engine reaches normal operating temperature, use a sustained highway drive. The infographic's practical checklist calls for a 50-plus-mph highway drive lasting 20-plus minutes, but treat that as a preparation pattern rather than a universal manufacturer-specific procedure. Obey the speed limit, keep a safe following distance, and don't force the engine beyond its normal operating range.
A useful preparation sequence looks like this:
- Start cold: Begin after the vehicle has been sitting long enough for the engine to cool naturally.
- Warm gradually: Drive smoothly until the engine reaches its normal operating temperature.
- Hold steady conditions: Maintain a sustained highway segment rather than repeatedly stopping and restarting.
- Avoid unnecessary short trips: Don't spend the day before the test making several brief journeys that leave the diesel cold.
- Scan afterward: Check monitor status before the appointment, especially if the vehicle recently had electrical work or codes cleared.
The goal is to let the computer perform its tests under the conditions it expects. It isn't to create smoke, force a regeneration manually, or drive aggressively.
Why the routine can change the result
EPA best-practice data shows that a less strict monitor allowance reduced the overall medium-duty diesel vehicle initial “not ready” rate from 7% to 3%, as reported in its diesel OBD inspection best-practices document. Among light-duty diesel make and model groups, initial not-ready rates ranged from 0–9% under a two-monitor criterion, compared with 0–13% under a one-monitor criterion, using the same EPA source.
Those figures don't promise that a particular vehicle will pass after one drive. They do show why monitor preparation deserves attention. A vehicle may have no obvious drivability complaint while its computer still needs the correct conditions to finish testing.
Practical rule: Drive to complete the vehicle's diagnostic routine, then verify “Ready” with a scanner. Don't assume the trip happened just because the odometer moved.
If monitors remain incomplete after a proper warm drive, stop repeating the same route blindly. Look for a stored fault, an operating-temperature problem, a battery or charging issue, or a manufacturer-specific condition that the generic routine didn't satisfy.
Avoiding the Code Clearing Trap
Clearing a check engine light immediately before a smog check is one of the fastest ways to create an inspection problem. Disconnecting the battery, using a basic scan tool to erase codes, or allowing a repair shop to reset the computer can also erase the monitor history that the inspection machine needs to see.
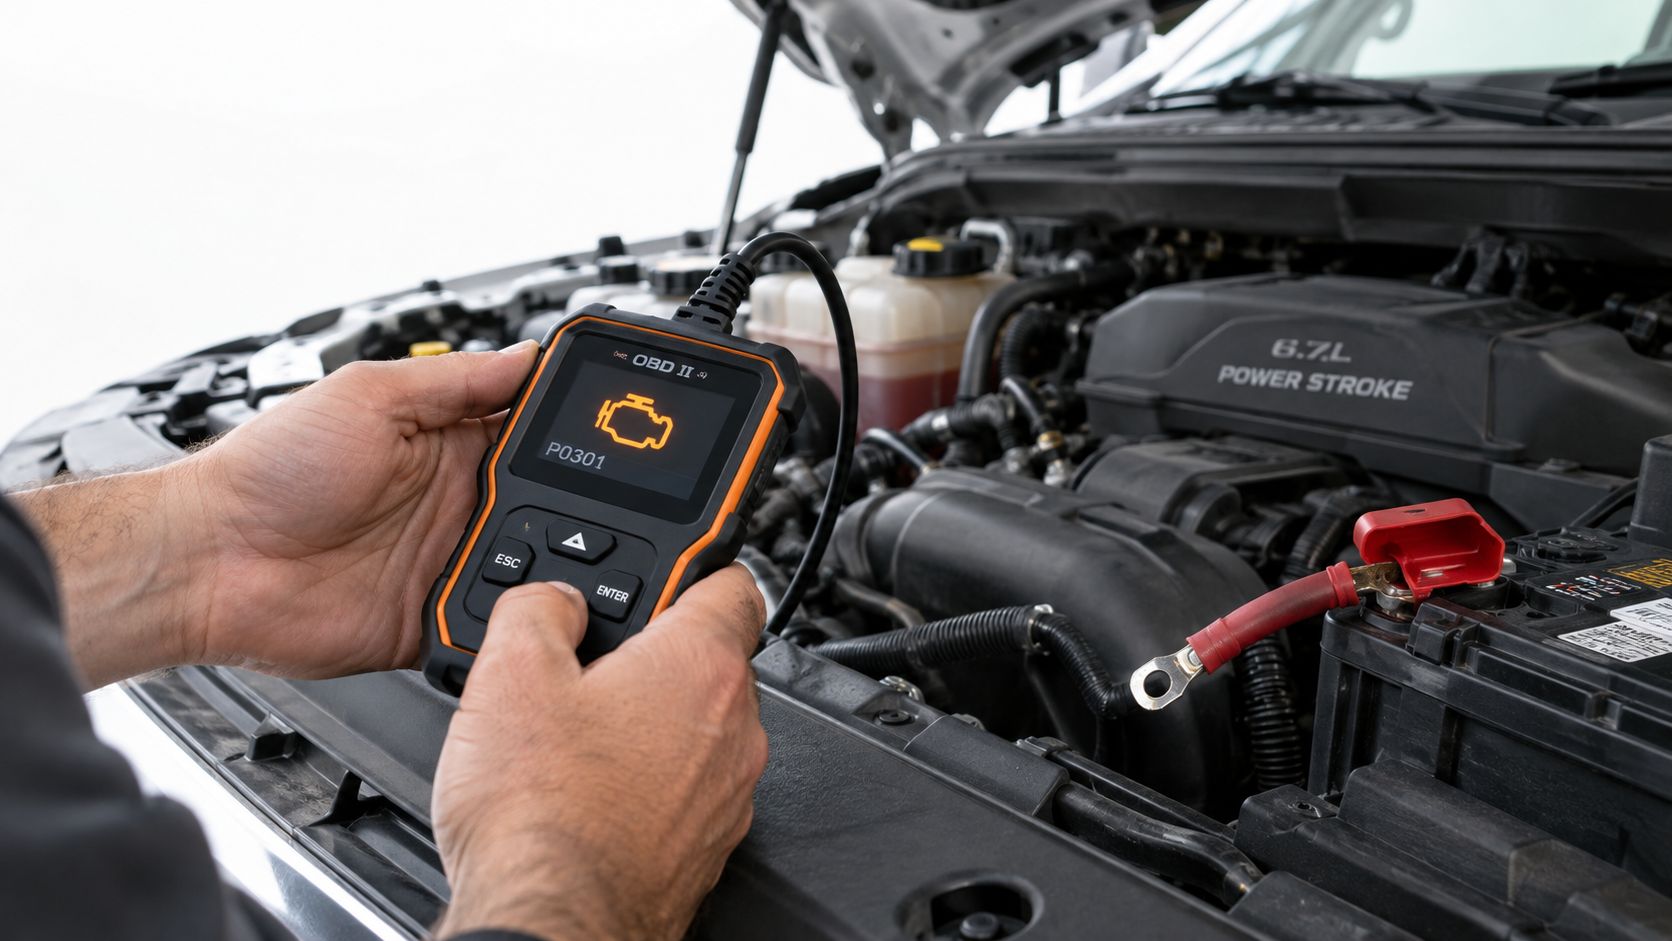
Why a reset produces a “Not Ready” result
The monitors are not simple lights that switch back on as soon as you start the engine. They run self-tests during specific operating conditions. After a reset, the computer needs time and the correct drive conditions to complete them again.
The Missouri inspection guidance on readiness monitors explains that diesel vehicles can fail when required monitors haven't completed their self-tests. Battery disconnection, code clearing, a repair-shop reset, power or ground problems, and unmet temperature conditions can all leave monitors incomplete.
The same principle applies even if the original fault has been repaired. A reset may remove the warning light, but it also removes evidence that the emissions systems have completed their checks. The inspection station sees the incomplete state, not your intention.
Use a scan tool to diagnose the code rather than erase it. Record the code, freeze-frame information, and monitor status before making repairs. If the problem is repaired, follow the vehicle's specified drive cycle and confirm that the monitors have returned to Ready before booking the inspection.
The guide to clearing a check engine light can help explain the difference between resetting a warning and resolving the fault, but clearing codes alone isn't a pass strategy.
Treat electrical problems as emissions problems
A weak battery, poor ground, damaged connector, or charging fault can interrupt monitor testing. The diesel may start and drive normally while the computer loses the stable power or communication it needs to complete diagnostics.
Watch for these warning signs:
- Recent battery work: The monitors may have been reset during replacement or service.
- Intermittent warning lights: A power or ground fault can cause inconsistent computer behavior.
- Scan-tool communication failure: The inspection can't proceed normally if the vehicle's diagnostic connector doesn't communicate.
- Repeated “Not Ready” status: A drive cycle won't solve a monitor that cannot run because an enabling condition or circuit fault remains.
The correct order is diagnosis, repair, drive cycle, and verification. Don't erase the evidence before you know what caused the warning.
Deciding Between a Long Drive and Diagnostic Repair
A long highway drive is a reasonable first step when the diesel's main problem is its operating pattern. Short trips can prevent the vehicle from reaching the conditions needed for effective emissions-system operation, and a sustained warm drive may help the vehicle complete its routine.
It's not a universal repair. A drive can't restore a damaged sensor, repair an exhaust leak, reconnect a diagnostic circuit, or undo emissions-control software changes.
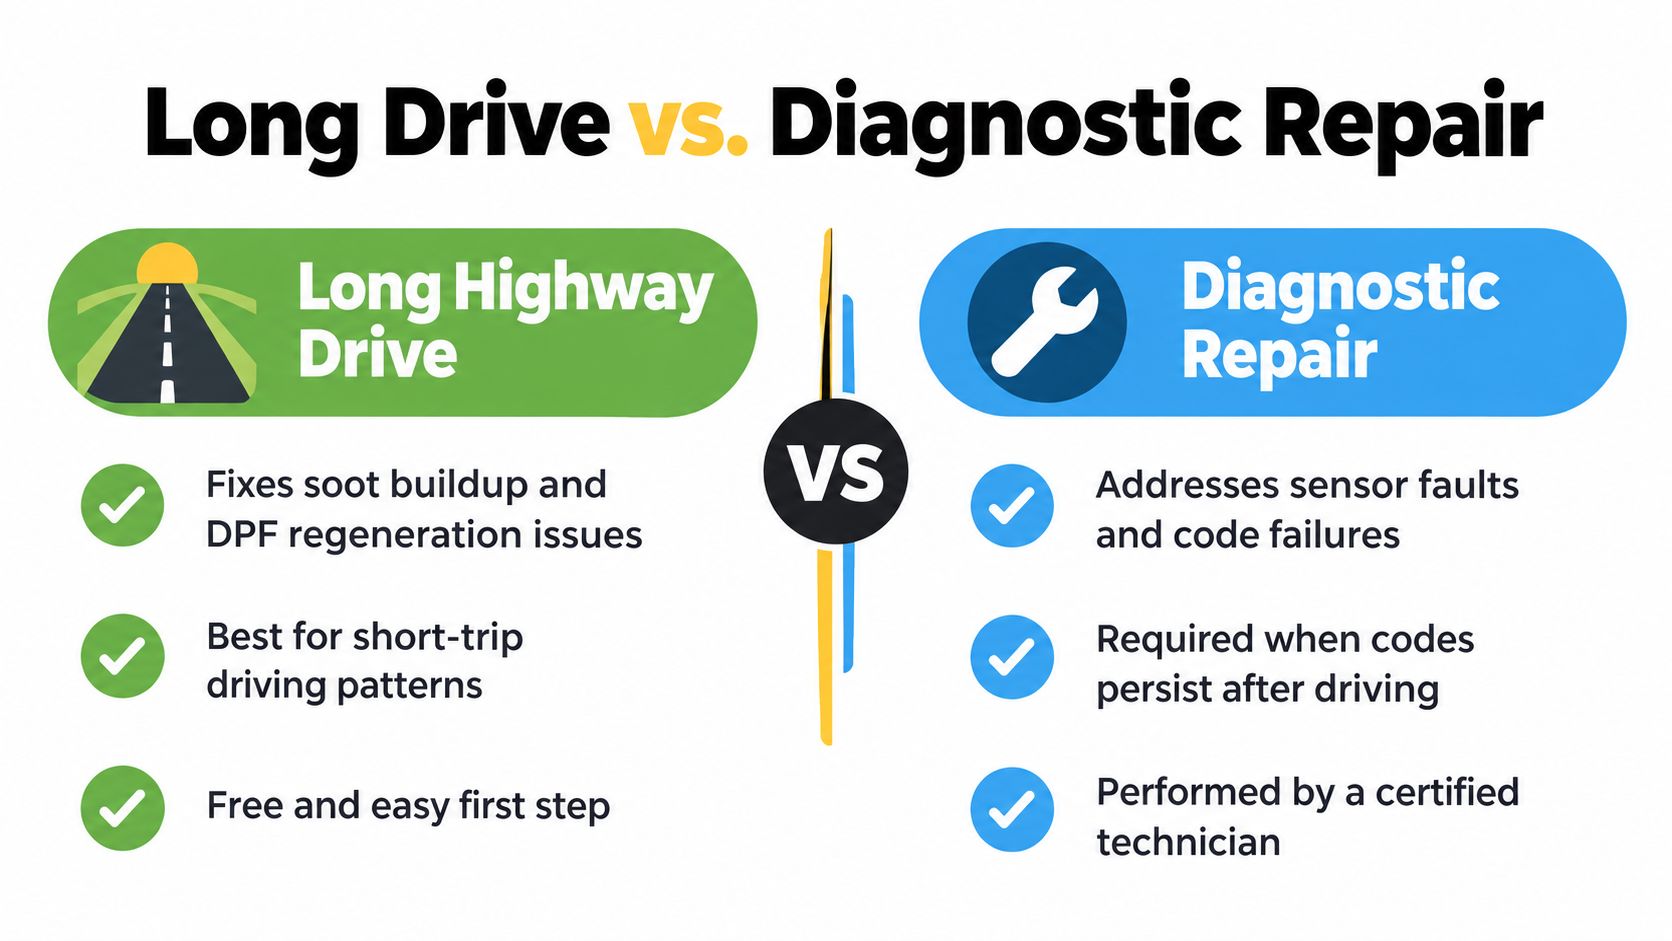
When a highway drive makes sense
Choose the low-cost preparation route when the vehicle has no active warning light, communicates normally with the scanner, and the issue appears related to repeated short-trip use. Give the engine a complete warm-up, drive steadily on the highway, and scan the vehicle afterward.
A fuel top-up and correct engine oil may be sensible maintenance steps if the vehicle is due for them, but neither should be treated as a guaranteed emissions repair. Use only fluids and specifications approved for the vehicle, particularly where a diesel particulate filter requires low-ash oil.
The test is simple: did the monitors become Ready, and did the warning condition stay away? If yes, the preparation may have addressed a readiness issue. If not, more driving is unlikely to provide a different result.
When diagnosis comes first
Persistent codes deserve repair before testing. Common failure signatures include DPF-related codes such as P2002, P244A, and P246C, along with visible exhaust leaks and communication problems at the diagnostic connector, according to this diesel emissions failure guide.
A technician should investigate rather than repeatedly clear these codes. Possible causes include damaged pressure or temperature sensors, wiring faults, an exhaust leak that affects readings, inactive regeneration logic, or deleted DPF software. These conditions can keep returning after every reset and can prevent the required monitors from completing.
| Long highway drive may help | Diagnostic repair is the better choice |
|---|---|
| The vehicle has no active warning light | A warning light returns after clearing |
| The issue follows repeated short trips | DPF codes remain stored or return |
| The scan tool communicates normally | The connector won't communicate reliably |
| Monitors are incomplete but no fault is present | Sensors, wiring, software, or exhaust components show faults |
| The engine reaches normal temperature | The engine or emissions system can't meet enabling conditions |
A clean-looking exhaust doesn't prove that the emissions system is healthy. The scanner and the physical inspection need to agree.
Don't drive aggressively to hide smoke. Excessive load, unsafe speeds, or improvised regeneration attempts can add risk without fixing the underlying fault. If the scan shows a persistent problem, pay for diagnosis before paying for another test.
Managing Test Day Logistics and STAR Certification
A prepared vehicle can still have an avoidable problem on test day. Bring the vehicle's registration information and any documents connected with the inspection request or recent emissions repair. If a prior failure report identifies a specific monitor or emissions component, give it to the technician instead of relying on memory.
Arrive with the engine fully warmed through normal driving, but don't turn the trip into an aggressive “tune-up.” A warm engine allows the inspection to occur under normal operating conditions, while careful driving protects you, other road users, and the vehicle.
Confirm the station and procedure
Choose a station that handles the diesel category and test method your vehicle requires. California diesel inspections may involve OBD checks, visual review, and opacity testing depending on the vehicle and applicable rules. Ask before arrival if you're uncertain about model year, GVWR, or the required equipment.
A STAR Certified station meets the Bureau of Automotive Repair's performance standards for participating inspections. That designation doesn't replace vehicle maintenance, but it gives you a compliant testing location for transactions that require a STAR inspection.
Before the technician begins, mention recent battery replacement, code clearing, electrical repairs, or a check engine light. These details help explain why monitors may be incomplete and can prevent you from treating a readiness problem as a mechanical mystery.
Use the result intelligently
If the vehicle passes, keep the paperwork for your records and complete the registration process as required. If it fails, read the failure result carefully. The next repair should target the listed cause, whether that's monitor readiness, a DPF-related code, smoke, visible emissions equipment, or communication.
Don't approve unrelated parts replacement before the diagnostic evidence supports it. A proper pre-test scan can tell you whether the vehicle needs more drive-cycle time or a repair appointment, which is often the difference between a useful visit and paying for a repeat inspection.
For East Bay owners, Speedy Smog performs diesel Smog Checks in San Leandro for applicable vehicles, with OBD, visual, or opacity procedures selected according to the vehicle and inspection requirements. Visit the station with your monitors verified and any recent repair information available so the technician can complete the inspection accurately.
A passed smog check remains valid for 90 days, and the certificate is sent electronically to the DMV, so you generally don't carry paperwork to the registration counter. For 2000-and-newer vehicles, about 7% failed their initial check in California's 2024–2025 cycle, which makes preparation worthwhile rather than optional.
You're probably looking at a renewal notice, a recently purchased car, or a dashboard light that appeared at the worst possible time. The practical question is simple: how do you get a DMV smog certificate, and what should you do if the car doesn't pass?
California's system connects the inspection directly to registration. The licensed station records the result, the Bureau of Automotive Repair processes the inspection data, and the DMV uses the passing result to clear the registration requirement. That electronic path is convenient, but it also means a failed test can stop renewal until you resolve the underlying issue.
Table of Contents
- What a DMV Smog Certificate Actually Is
- Where to Get Your Smog Check Done
- How the Smog Test Works for Different Vehicles
- What Happens After You Pass
- What to Do If You Fail a Smog Check
- How to Improve Your Chances of Passing
What a DMV Smog Certificate Actually Is
Your renewal notice is on the counter, the deadline is close, and you are checking whether a paper certificate must go to the DMV. Usually, it does not. California requires a Smog Check for many registration renewals, and the licensed station submits the result electronically after testing. The California Bureau of Automotive Repair's Smog Check guidance explains the certificate and reporting process.
The electronic result becomes part of your DMV record. A passing inspection satisfies the emissions requirement attached to that registration transaction, while a failure leaves no passing result for the DMV to apply. You then have to address the diagnostic work, repairs, and retest before the renewal can clear.
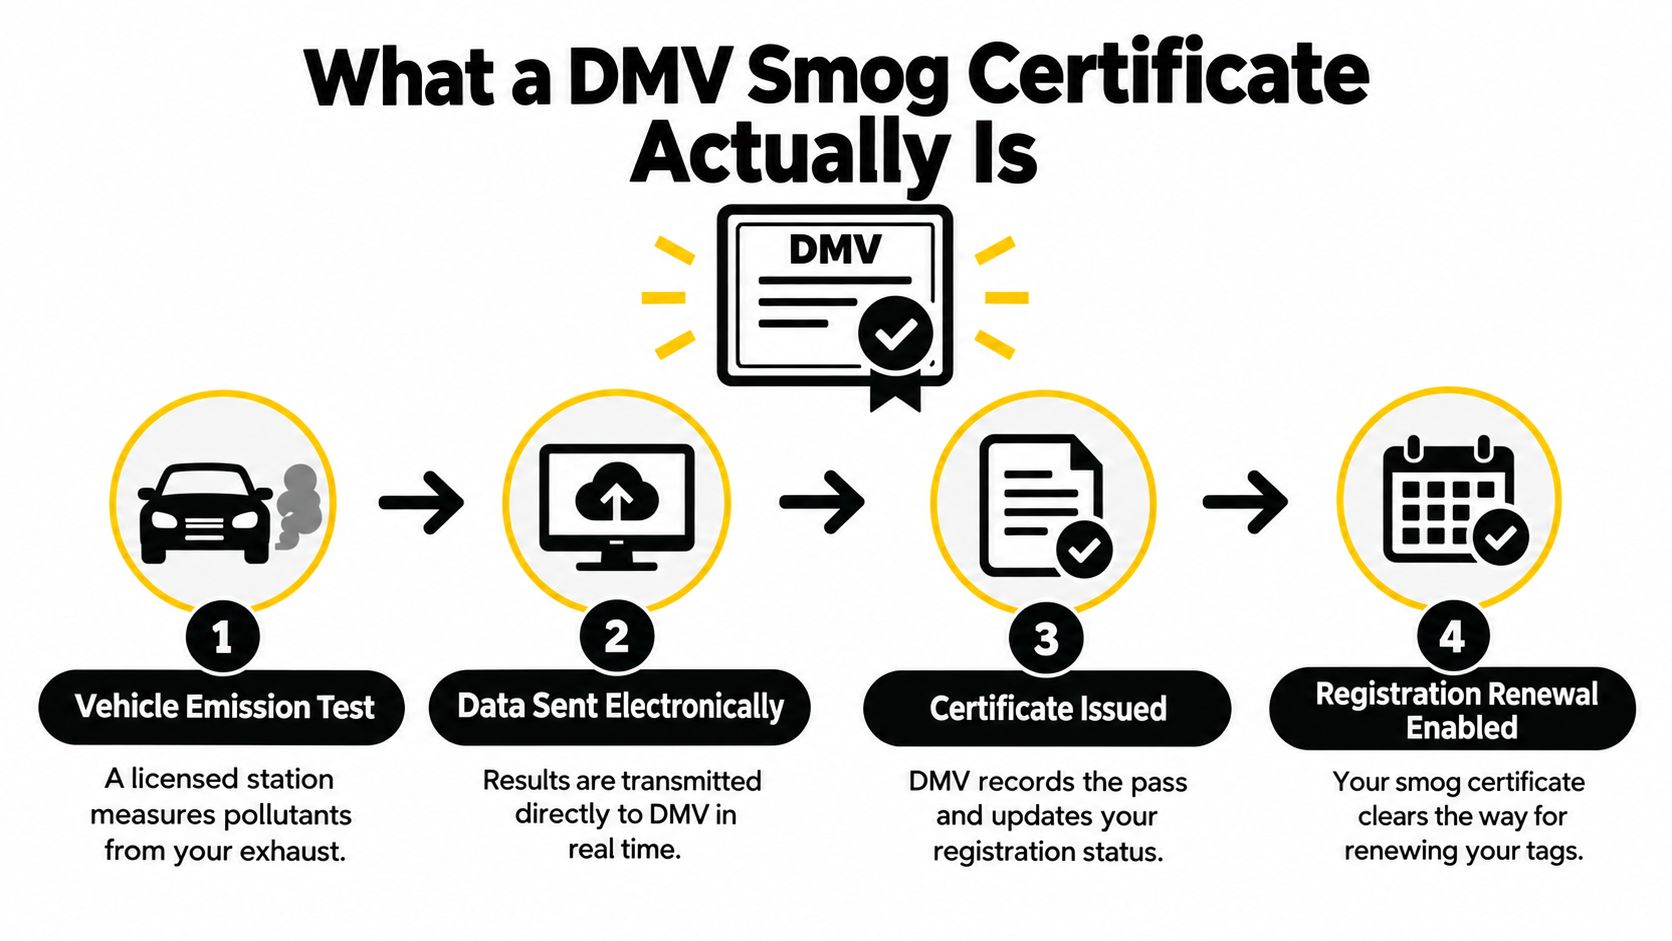
Why the certificate matters
The certificate is a state-recorded inspection outcome, not a form a driver can type up or replace with a repair invoice. The station must enter the vehicle and test information correctly, and the state system must accept the passing result before it can support the DMV transaction.
California's program has operated through a large network for decades. An OECD and International Transport Forum presentation on California Smog Check describes the program's history, vehicle coverage, inspections, stations, and inspection personnel. That scale is why electronic reporting matters: the DMV relies on a standardized record rather than documents handled individually at each renewal.
Practical rule: After the station confirms a pass, check that the result has been transmitted before leaving if your registration deadline is tight. Keep the invoice and test paperwork for your records, but do not assume either document can replace the electronic DMV record.
A failed result also creates a repair decision. Ask the shop to identify the failure component, separate required repairs from maintenance suggestions, and provide an estimate before authorizing work. If qualifying repairs become expensive, ask whether a state repair-cost waiver could apply. A waiver is not automatic, and it does not erase the failed test, but checking the option can prevent paying for repairs that do not make financial sense.
For a second explanation of how the result is checked, review this smog check verification information. The working sequence is simple: the station performs and records the inspection, the result moves through the state system, and the DMV uses the accepted passing record for the registration requirement.
Where to Get Your Smog Check Done
If your DMV notice names a STAR station, do not book at the nearest shop and hope it qualifies. Confirm the station's STAR certification on the California BAR website before making an appointment. A regular renewal may allow more station choices, while a STAR-directed notice can require that specific inspection category.
STAR stations participate in California's performance-based inspection network. The designation matters when the DMV requires a STAR inspection, and it can also indicate that the shop regularly handles electronically reported certification work. Certification alone does not guarantee a pass, so confirm that the station can test your vehicle before you arrive.
A simple booking checklist
Ask these questions while scheduling:
- Station type: Is the shop STAR certified, and does that status match the wording on your DMV notice?
- Vehicle details: Can it test your fuel type, model year, and configuration? Mention if the vehicle is a hybrid, diesel, modified, unusually old, or recently repaired.
- Registration purpose: Are you completing a routine renewal, transferring ownership, or responding to a directed notice? The answer can affect which station you need.
- Retest policy: If the vehicle fails, is a retest available, and what conditions apply after repairs?
- Price and timing: What is the total inspection price, and how long should the appointment take?
Use the BAR station listing to verify certification instead of relying only on a sign, search result, or verbal assurance. Ask the shop to confirm the station type when the notice is unclear.
Station experience and appointment availability vary by location. A properly certified shop may process a routine inspection efficiently, but older vehicles, diesels, modified cars, and vehicles with recent repairs often require more discussion before testing. This guide to finding a place to get your car emissions tested can help you organize those local questions.
Here's the video placement for drivers who want to see the basic process before booking:
Bring the vehicle in normal operating condition. Do not arrive immediately after clearing a warning light or disconnecting the battery, and tell the technician about recent work. If a repair has left the emissions monitors incomplete, the station may not be able to issue a passing certificate. Ask about the likely repair path and waiver eligibility before approving expensive work, since a costly repair does not automatically mean the waiver requirements are met.
How the Smog Test Works for Different Vehicles
A car that runs smoothly can still fail its smog inspection. The test method depends on the vehicle's age, fuel system, and emissions equipment. For many 2000-and-newer gasoline vehicles, the station performs an OBDII inspection. The technician connects a scan tool, confirms communication, checks readiness monitors, and looks for emissions-related trouble codes or an active malfunction indicator lamp.
Older vehicles follow a different process. A 1999-and-older vehicle may undergo BAR-97 testing, which measures tailpipe emissions and checks emissions-control equipment. A vehicle can drive normally while failing because its monitors are incomplete, its emissions exceed the limit, or required hardware is missing.
Newer vehicles and OBDII readiness
Battery replacement, clearing diagnostic codes, or recent emissions repairs can reset readiness monitors. The vehicle then needs normal driving under varied conditions before the monitors complete. Arriving too soon can prevent the station from issuing a passing certificate, even when the warning light stays off.
Communication problems can stop the inspection before emissions performance is evaluated. An active warning light, stored emissions codes, or a scan tool that cannot communicate with the vehicle all require attention.
The BAR's January 2026 performance report placed OBDII-related failures near 6.8% at OIS stations and about 9.3% at BAR-97 stations. Across approximately 19 million 2000-and-newer vehicles, the broader 2024–2025 initial failure rate was roughly 7%, according to the BAR Smog Check performance report.
| Station Type | Failure Rate Context |
|---|---|
| OIS stations | OBDII-related failures near 6.8% |
| BAR-97 stations | OBDII-related failures about 9.3% |
| 2000-and-newer vehicles statewide | Overall initial failure rate about 7% |
Older vehicles and tailpipe testing
Before testing an older vehicle, inspect visible emissions hardware, vacuum lines, hoses, the catalytic converter area, and related controls. A missing component, obvious leak, or altered system will not be fixed by extra highway driving.
Repair cost deserves a separate decision. If a failure points to expensive work, ask the station or repair shop which repairs are required and whether a repair-cost waiver could apply before authorizing the job. Paying for a repair that does not satisfy waiver rules can still leave the registration unresolved.
Hybrid owners should confirm the vehicle's requirements and choose a station familiar with the procedure. This hybrid smog check service information explains why hybrid testing may require different handling. The technician should understand the vehicle's limited engine runtime and identify unusual conditions before starting.
What Happens After You Pass
You leave the station with a passing result, but the registration task still needs to be completed. The station normally sends the result electronically to the DMV, so you generally do not have to mail or hand-deliver a paper certificate. Confirm that the renewal, transfer, or other registration action is finished while the result remains valid.
The 90-day validity period limits how long you can use the passing result for the applicable DMV transaction.
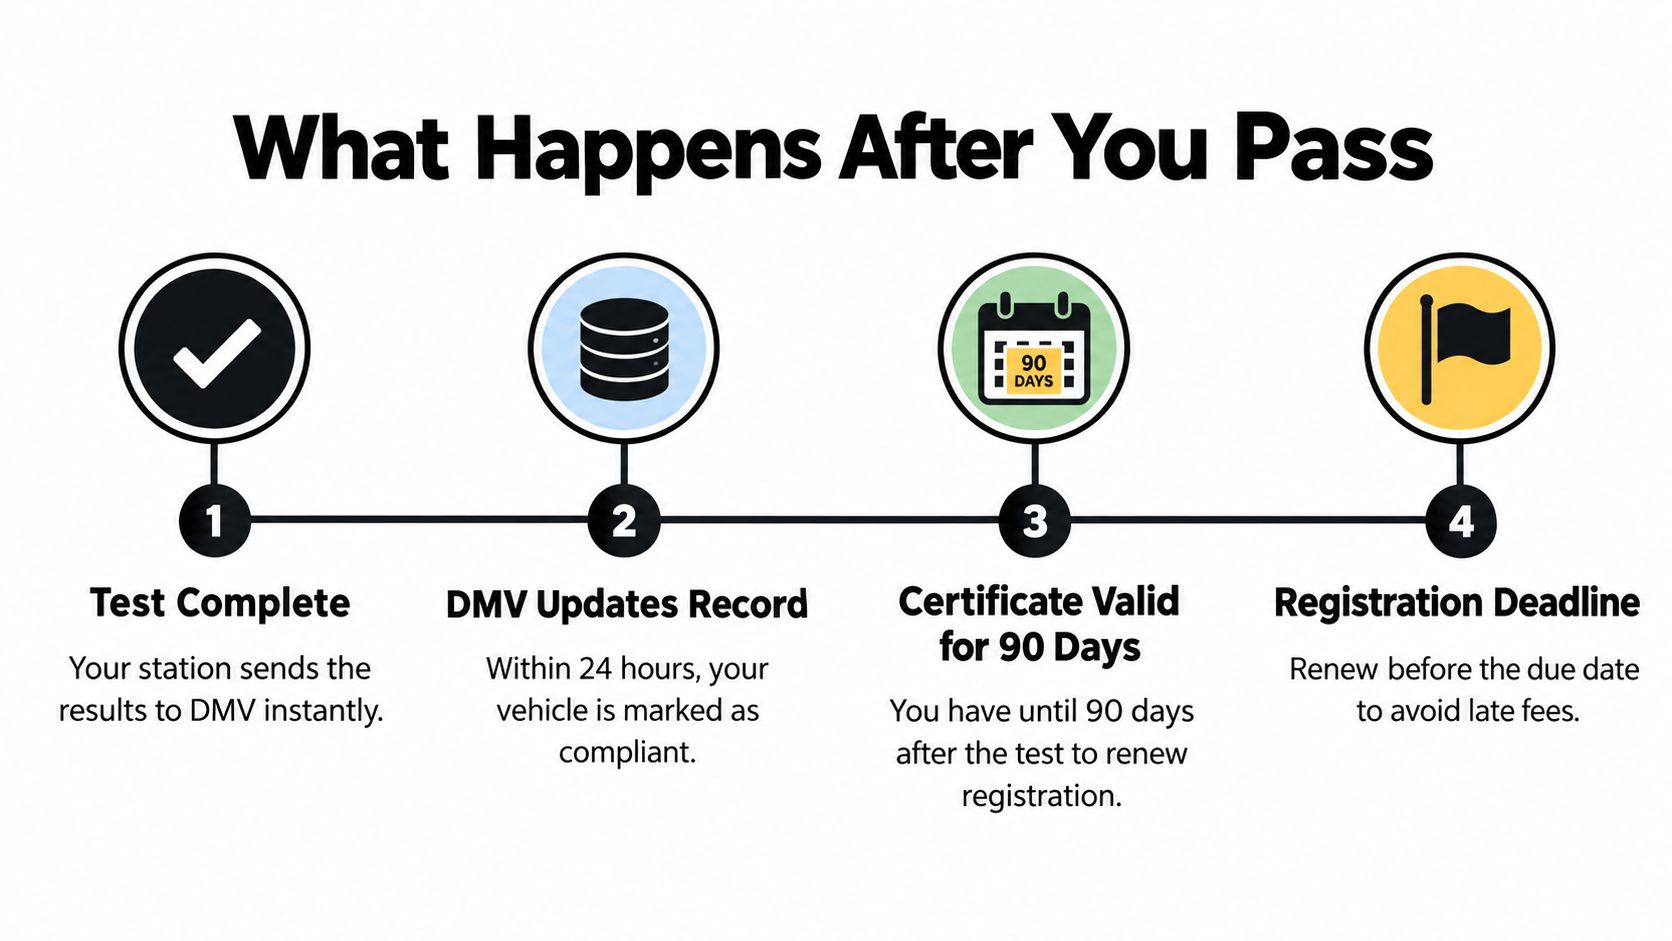
Confirm the electronic record
Use this sequence after the inspection:
- Confirm the pass: Ask the technician to verify that the result was recorded as passing.
- Check the DMV record: Allow time for the electronic submission, then review your online renewal or registration status. If the result does not appear, contact the station before assuming the test was rejected.
- Finish the transaction: Submit any remaining fees, forms, insurance information, title documents, or transfer details required for your situation.
- Keep your paperwork: Retain the inspection receipt and DMV confirmation. For a transfer or dealer purchase, keep the smog receipt with the purchase and title records until the transaction is complete.
The electronic record should connect the passing inspection to the vehicle and the relevant DMV transaction. A handwritten note or an altered paper document does not replace that accepted record. If the DMV system shows no passing result, ask the station to verify the vehicle identification and submission details.
Transfer transactions deserve extra attention. A valid pass does not resolve separate title, fee, insurance, or ownership requirements. Ask the seller or dealer what remains outstanding, and confirm which party is responsible for completing the DMV filing.
A repair shop or seller may tell you that a passing result settles everything. It does not. If the record is missing or the transaction is stalled, request a clear explanation before paying additional fees or allowing the validity window to close.
A passing test helps only after the DMV receives it and the registration task is completed.
Schedule the inspection with enough time to correct a data mismatch or handle another DMV requirement. Keep the receipt even when the submission is electronic, especially for ownership transfers where proof of the inspection date and result may be requested. For program rules and electronic certificate guidance, consult the official Smog Check program information.
What to Do If You Fail a Smog Check
A failed smog test does not authorize a repair bill. Start with the failure report and identify the specific reason for the denial. An emissions code, incomplete readiness monitor, communication error, visible equipment problem, and high tailpipe emissions each require a different fix. The failure result also helps you decide whether to repair, seek a waiver, or stop spending on the vehicle.
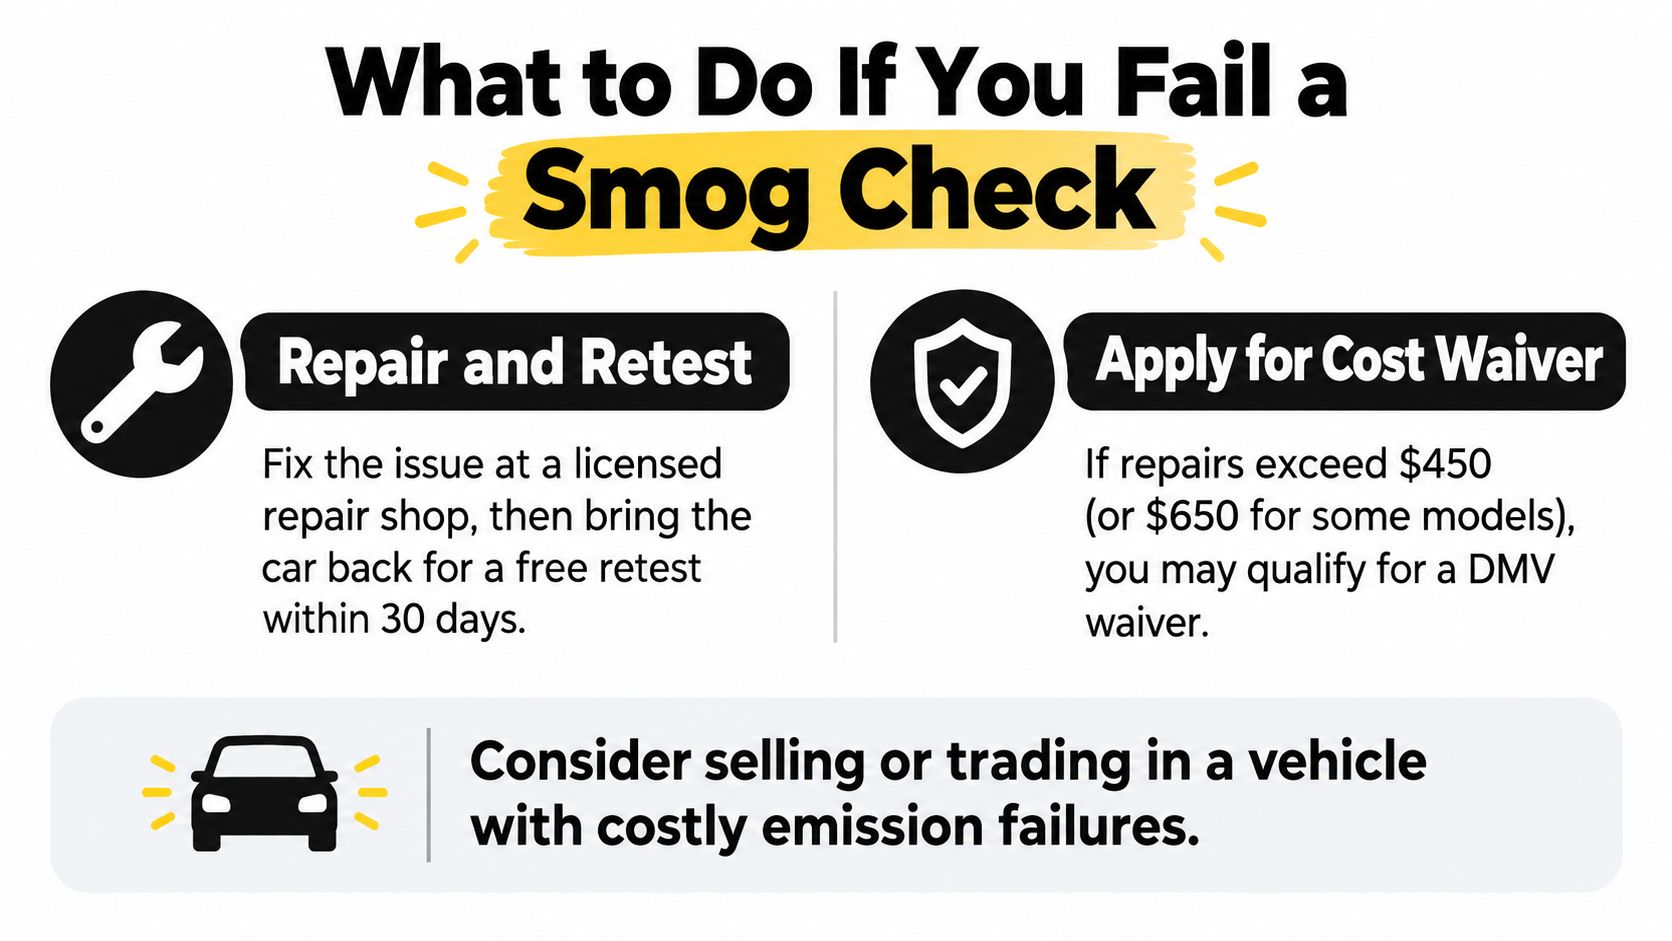
Diagnose before authorizing repairs
Ask the technician to explain the failure in plain language. If the recommended work is expensive, request the diagnostic basis in writing and get a second opinion from a shop that regularly handles emissions faults. Parts-swapping can add cost without correcting the recorded problem.
Use this order:
- Read the failure details: Separate an incomplete monitor from an emissions-output failure or equipment violation.
- Check recent work: A disconnected battery or cleared code may explain incomplete monitors.
- Verify the diagnosis: Confirm that the proposed repair addresses the exact failure recorded by the station.
- Assess the vehicle as a whole: A major emissions repair may be reasonable for a dependable car, but difficult to justify when the vehicle has several unrelated problems.
- Plan the retest: Confirm with the repair shop and testing station what must happen before paying for another inspection.
Failure rates vary by vehicle condition, maintenance history, emissions system, and inspection type. A failed result alone does not prove that every recommended repair is necessary. Ask what test evidence supports the estimate and whether another fault could produce the same symptom.
When a waiver may make sense
California's repair-cost waiver is a limited alternative when the required work no longer makes financial sense. The BAR Smog Check Reference Guide states that the waiver can postpone the DMV smog certificate requirement for up to two years. Eligibility requires at least $650 in repairs, and the process must be handled through a Referee facility.
The limits matter. A waiver does not cover a tampered emissions system, and repeated waivers under the same ownership can disqualify the vehicle. Reaching the repair threshold does not guarantee approval. Keep invoices, diagnostic records, and proof of qualifying work, then ask the Referee facility to determine eligibility.
Before approving a large repair: Ask whether the work addresses the recorded failure, whether the vehicle can be retested afterward, and whether a Referee waiver is realistic.
Selling or trading may be reasonable after comparing the estimate with the vehicle's condition and registration consequences. Disclose the failed result to any buyer. Do not approve costly work under pressure when the diagnosis is unclear or the waiver route has not been checked.
How to Improve Your Chances of Passing
The most effective preparation starts with the inspection type, not a generic “drive it hard” routine. Confirm whether the vehicle will receive an OBDII-based inspection or an older BAR-97-style evaluation, then prepare for the checks that control the result.
For a newer vehicle, scan for trouble codes and readiness status before the appointment. If the battery was disconnected or a repair recently cleared codes, allow the monitors to complete through normal driving. Don't clear the codes again just before testing. That can erase useful diagnostic information and leave the monitors incomplete.
For an older vehicle, look at the physical emissions system first. Check for disconnected vacuum hoses, damaged wiring, missing emissions components, exhaust leaks, and obvious modifications. A visual problem can fail the vehicle even when it appears to drive normally.
Use this short pre-test list:
- Warning lights: Resolve an active check-engine light before booking.
- Recent repairs: Tell the station what was repaired and whether the battery was disconnected.
- Maintenance records: Bring invoices or diagnostic notes if the vehicle has a recurring emissions issue.
- Vehicle eligibility: Verify the correct rules for hybrids, diesels, older cars, and modified vehicles.
- Station capability: Confirm that the location is certified for your vehicle and registration requirement.
- Timing: Leave enough room for diagnosis or a retest before the DMV deadline.
The statewide data supports a practical expectation. Most newer vehicles pass, but roughly 1.3 million of about 19 million tested 2000-and-newer vehicles failed during the 2024–2025 cycle, according to the BAR Smog Check data. Preparation won't guarantee a pass, but it helps you avoid preventable denials and makes a real failure easier to diagnose.
If you're in San Leandro or the East Bay, Speedy Smog offers STAR Certified inspections with electronic submission of passing results to the DMV. Contact the station before arriving to confirm it can handle your vehicle type, inspection requirement, and registration timing.
You pull into a smog check station with the DEF warning light on, the tank recently refilled, and one question: will the truck pass? A technician can't answer that by looking at the fluid level alone. Diesel exhaust fluid testing examines whether the fluid has the right concentration, whether something contaminated it, and whether storage conditions have damaged its quality.
That distinction matters at the counter. A tank with diluted DEF needs different attention from a tank contaminated with diesel fuel, and an old container stored in high heat creates another problem entirely. Understanding those differences can help you avoid an unnecessary failed inspection and recognize when the vehicle needs DEF service before testing.
Table of Contents
- What Diesel Exhaust Fluid Testing Actually Covers
- Why Diesel Exhaust Fluid Exists and How SCR Uses It
- How Diesel Exhaust Fluid Testing Works in Practice
- What a Technician Looks For During a DEF Inspection
- Common Reasons Diesel Exhaust Fluid Fails Before a Smog Test
- How Drivers Can Prepare for a Smog Test With a Diesel
- Bringing It All Together Before You Head to the Shop
What Diesel Exhaust Fluid Testing Actually Covers
At a smog check counter, a driver may say, “The truck has DEF.” The technician needs a more useful answer: what condition is that DEF in? A full level does not prove that the fluid is suitable for the emissions system.
Diesel exhaust fluid, also called AdBlue in some markets, is a prepared solution. Concentration testing checks whether its urea-to-water ratio remains within the expected range. Contamination testing looks for fuel, oil, coolant, dust, metal particles, or other unwanted material. Storage-condition assessment considers whether heat, age, packaging, or handling has made the fluid unreliable. DEF quality and testing guidance from Intertek identifies ISO 22241 as the foundation for these checks, including the expected mixture of urea and deionized water.
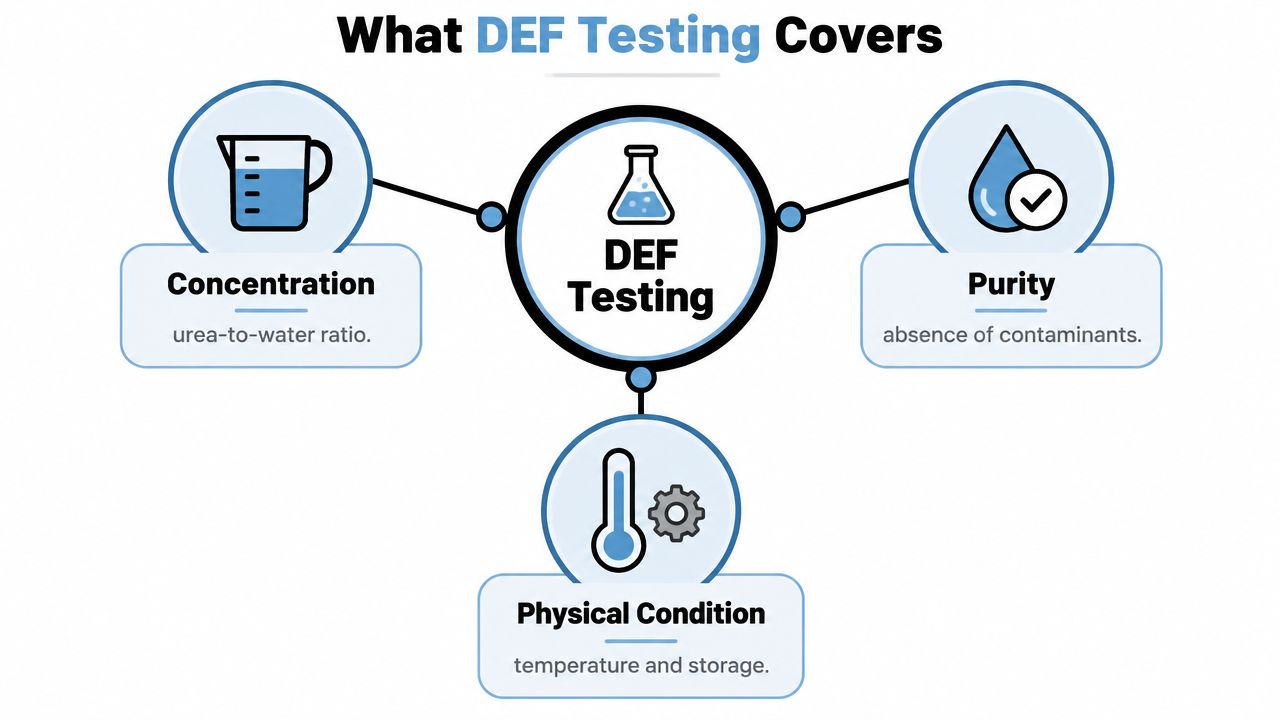
Three checks, three different responses
Suppose a driver added water after seeing a low-fluid warning. The liquid may look clean, yet its concentration can fall outside the operating range. That is a concentration problem. Adding correct fluid may not restore it if the mixture has been substantially changed.
A different truck could show a clear concentration reading while the sample has a brown tint or oily film. A refractometer mainly estimates urea concentration, so it may not reveal the entire problem. The sample needs a contamination evaluation, and the practical response may be to drain, flush, and replace the fluid. Manufacturer guidance warns against correcting contaminated DEF with water, since unwanted material can remain and affect SCR operation (John Deere DEF guidance).
Storage creates another path to failure. DEF kept in unsuitable conditions can lose its reliable service window even inside a sealed container. Temperature, packaging, and handling all affect its condition, particularly in hot climates or bulk storage (DEF storage guidance from Parts for Trucks).
For context on equipment used during emissions work, see diesel emissions testing equipment. At the counter, the distinction is practical: concentration testing measures the mixture, while contamination and storage checks address whether the fluid remains usable.
Why Diesel Exhaust Fluid Exists and How SCR Uses It
At the smog-check counter, a driver may describe DEF as something added to diesel fuel. It is a separate fluid delivered to the exhaust. The engine creates nitrogen oxides, commonly called NOx, and the selective catalytic reduction system, or SCR, uses DEF to help change those compounds into nitrogen and water vapor.
The process follows a clear sequence:
- The diesel engine produces exhaust containing NOx.
- The dosing system injects DEF into the hot exhaust stream.
- Heat helps the urea solution produce ammonia.
- The ammonia reacts with NOx inside the SCR catalyst, producing nitrogen and water vapor.
A simple analogy is a recipe. The SCR system expects an ingredient with a dependable composition, so the fluid must be prepared correctly. Under ISO 22241, DEF is standardized as 32.5% high-purity urea and 67.5% deionized water. That ratio gives the vehicle's control system a predictable chemical input. If the mixture is too weak, the reaction may not produce enough ammonia for the intended treatment. Contamination or another out-of-specification condition can also trigger a fluid-quality fault or reduce the system's ability to control emissions.
Why the engine computer cares
The vehicle's control module coordinates DEF injection with exhaust temperature, engine operation, and sensor feedback. It does not inject a fixed amount at all times. Information from parts such as NOx sensors and the dosing system helps the computer judge whether the emissions treatment is working.
A truck can therefore start, idle, and accelerate normally while a DEF issue develops. The dashboard may still display an SCR or exhaust-fluid warning. Depending on the vehicle's control strategy and the fault, ignoring that warning can eventually bring operating restrictions.
The reason this matters at inspection is straightforward. Diesel emissions standards explain why the aftertreatment system is part of emissions compliance, while a DEF check helps determine whether the fluid can support that system. Concentration, contamination, and storage condition answer different questions.
DEF does not clean engine oil, improve combustion, or replace routine maintenance. It supports a separate exhaust-treatment process. Correct fluid gives the SCR system the material it needs, but a proper concentration reading alone does not establish that the sample is clean or properly stored.
This short visual walkthrough shows where DEF enters the SCR process:
How Diesel Exhaust Fluid Testing Works in Practice
At a smog check counter, a technician usually begins with a small DEF sample and a handheld refractometer. A drop goes onto the instrument's prism, the cover closes, and the technician reads the scale through an eyepiece or display. The device estimates urea concentration by measuring how the sample bends light, much like a quick screening test rather than a full laboratory examination.
The target is 32.5% urea. Field guidance allows a practical range of 32.5% plus or minus 1.5%, or 31.0% to 34.0%, depending on the instrument and measurement conditions. A narrower operational window of 31.8% to 33.2% may be used when assessing good-quality DEF under specified service guidance (ASTM D7821-12 field-testing reference).
Reading the result correctly
A result within the accepted range supports an on-spec concentration finding. It does not establish that the fluid is free of oil, fuel, minerals, or particles. Concentration and cleanliness are separate questions, which is why a normal refractometer result cannot by itself explain every SCR warning.
A result outside the expected range calls for further investigation. The refractometer screens concentration, while ISO 22241-2 laboratory methods examine additional chemical and quality characteristics.
| Concentration Reading | Status | Typical Smog Outcome |
|---|---|---|
| Below the applicable field range | Concentration is out of specification | Further diagnosis is needed before a compliance decision |
| Within the applicable field range | Concentration supports an on-spec finding | DEF concentration itself is less likely to be the cause of an SCR concern |
| Above the applicable field range | Concentration is out of specification | Further diagnosis is needed before a compliance decision |
Laboratory testing makes sense for a borderline reading, suspected contamination, or documentation required by a fleet or repair facility. It can identify quality concerns that an optical reading may miss, including insoluble matter, particle content, or mineral contamination (DEF laboratory analysis services from Fluid Life).
A concentration check can support a diesel car emissions test, but it is only one part of the counter inspection. The technician must also review warning lights, diagnostic information, readiness status, and the emissions procedure that applies to the vehicle.
What a Technician Looks For During a DEF Inspection
At a smog check counter, a technician first needs a trustworthy sample. Fluid may come from the filler neck or a dedicated sampling point. The cap and surrounding bodywork are kept clean so dirt does not enter the container. A contaminated container can make a good fluid look questionable before testing even begins.
The sample then gets a visual check. Usable DEF should not show obvious cloudiness, an unusual color change, floating particles, or an oily surface. A technician may smell it cautiously. A mild ammonia smell can fit a urea-based fluid, while a strong or unusual odor, especially with discoloration, can suggest degradation or contamination.
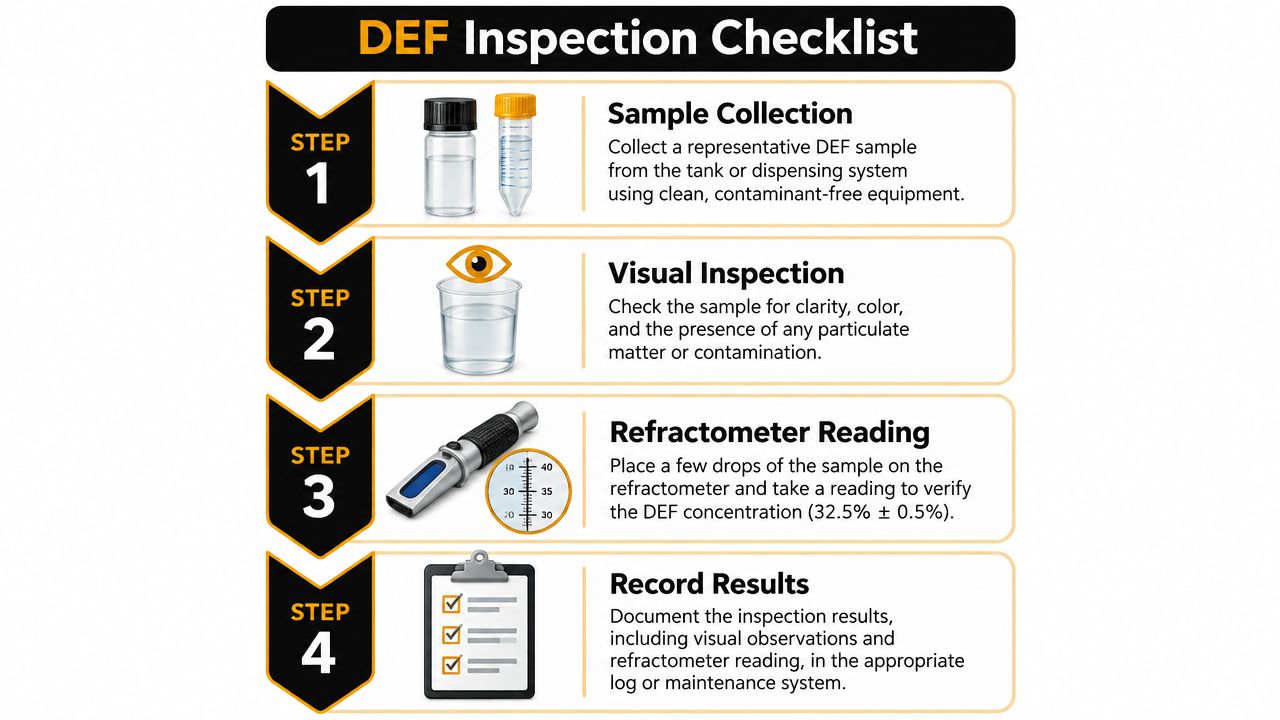
What happens after the sample is collected
A refractometer measures concentration. The technician compares the reading with the expected 32.5% target and the instrument's accepted tolerance. A normal result makes simple dilution less likely, but it does not prove that the fluid is free from every defect. Concentration testing is one check, not a complete diagnosis.
The vehicle and filler area provide the rest of the context:
- Dashboard warnings: An SCR, exhaust-fluid, or check-engine warning may involve fluid quality, a sensor, dosing, or the catalyst.
- DEF level information: A low-fluid warning or implausible gauge reading can point to a level sensor or another system fault.
- Cap and filler area: White, crusty deposits indicate that DEF has dried or crystallized after escaping or spilling.
- Lines and dosing hardware: Deposits near the injector or connections can interfere with delivery.
- Stored diagnostic codes: Scan data may identify a quality, pressure, sensor, or efficiency concern.
Practical rule: A clear-looking sample and a normal refractometer reading do not automatically explain an SCR warning.
The technician separates a fluid-quality concern from a vehicle-system problem. A cloudy sample or an out-of-range result may justify laboratory analysis instead of an immediate pass-or-fail conclusion. Laboratory evaluation can examine insoluble material, particle count, and mineral content, while field testing mainly checks concentration (Fluid Life's DEF analysis overview).
This distinction helps prevent unnecessary parts replacement. It also keeps a technician from calling contaminated or degraded DEF healthy because one optical reading appears normal. At the counter, concentration testing answers one narrow question. The inspection must still account for storage condition, contamination, warnings, and hardware operation.
Common Reasons Diesel Exhaust Fluid Fails Before a Smog Test
At a smog check counter, a DEF concern usually falls into concentration, contamination, or degradation. These categories can look similar, but each points to a different next step. A refractometer checks concentration, while contamination and age require a broader inspection.
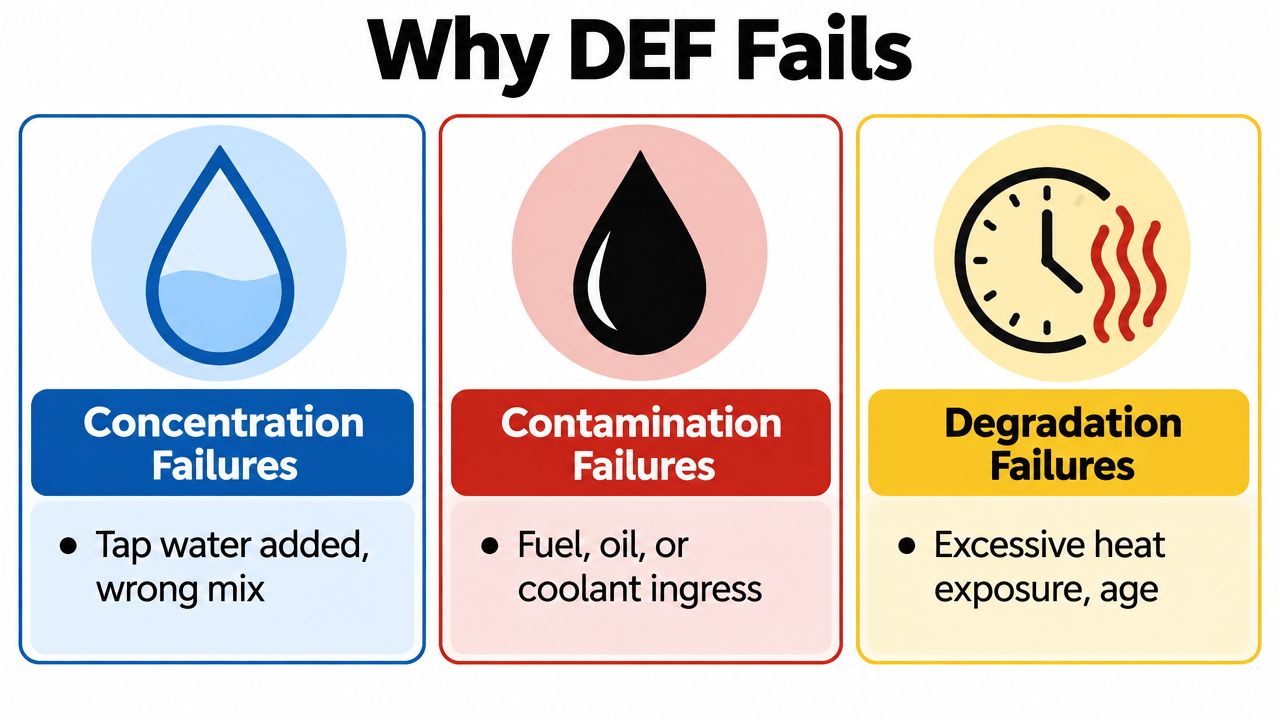
Concentration problems
DEF concentration can change if the tank receives the wrong liquid, a product outside the required specification, or water. A sample may look clear and still fail the concentration test because appearance cannot show its chemical balance.
A common mistake is treating DEF like a fluid that can be diluted or adjusted at home. Never add tap water, coolant, fuel, or another product. If the mixture seems wrong, use fresh compliant DEF and have the tank checked. Guessing at the chemistry can turn a simple fluid issue into an SCR repair problem.
Contamination is a separate failure
Fuel contamination needs prompt attention because diesel fuel and DEF belong in separate reservoirs. Oil, coolant, dust, and metal particles can enter through an uncapped filler, a dirty container, damaged equipment, or an internal system problem.
Contamination can exist even when the concentration reading looks plausible. A technician therefore compares the refractometer result with the sample's appearance and the vehicle's symptoms. If contamination is confirmed, draining and replacing the fluid is safer than trying to dilute it. Water adjustment does not remove contaminants, and those materials can interfere with SCR dosing or catalyst performance.
A clear reading answers one narrow question. It does not prove that the fluid is clean.
Heat and age reduce confidence
Storage conditions affect how much trust a technician can place in DEF. Heat, time, and an unsuitable container can reduce fluid quality before a driver notices anything unusual. Check the product's date, storage history, and container condition alongside the test result.
An older container has not automatically failed. Its history matters, especially if it spent extended time in high heat or was left open to dust and moisture.
Crystallization adds another layer. Deposits may develop in the exhaust system or dosing hardware even when a tank sample appears acceptable. A satisfactory concentration result therefore cannot explain every SCR fault. At the counter, this distinction keeps a technician from treating a concentration pass as proof that the entire DEF system is healthy.
How Drivers Can Prepare for a Smog Test With a Diesel
A driver arrives for a smog check with no warning light, but the DEF tank was recently refilled from an unmarked container. That detail matters. Preparation starts with the dashboard and refill history, not just the fluid level.
Several days before the appointment
Check for an active exhaust-fluid warning, an SCR message, a check-engine light, or a speed-restriction notice. Watch the fluid gauge after refilling and note whether the level changes normally. These signs can point to a system problem that a routine appointment will not solve by itself.
Inspect the filler cap and the surrounding area for white deposits, dirt, cloudiness, or signs that another fluid entered the tank. If the level is low, add fresh DEF from a sealed container marked as meeting ISO 22241. Do not add water or mix in an unidentified product.
Keep the cap and filler area clean. Dust introduced during refilling can travel to the pump, filter, lines, or injector, much like grit carried through a small plumbing system.
Use this preparation list as a quick screen:
- Check the warnings: Address active DEF or SCR messages before relying on a routine smog appointment.
- Inspect the filler: Look for crystals, debris, cloudiness, or an unusual smell.
- Verify the product: Use sealed, properly identified DEF that meets the required specification.
- Review storage: Consider whether the fluid spent prolonged time in high heat or an unsuitable container.
- Ask about recent refills: Tell the technician what product you added and whether the tank was exposed to another fluid.
The day before testing
Drive normally rather than making only short starts and stops. After maintenance or a battery disconnect, normal driving gives the vehicle time to complete its own diagnostic checks. The goal is an accurate inspection, not a forced pass.
Leave diagnostic codes alone before the appointment. Clearing them can leave readiness checks incomplete and erase fault history that would help the technician identify the problem.
You can inspect the cap, confirm the product, and check the dashboard yourself. A shop should handle suspected contamination, unusual concentration readings, crystallized dosing hardware, persistent SCR codes, or any mistake involving diesel fuel or coolant.
Bring your registration and previous inspection paperwork if available. Keep the cap secured, and be ready to explain when you last added DEF and whether a warning appeared afterward.
Bringing It All Together Before You Head to the Shop
DEF condition is one part of a diesel emissions inspection. At the smog counter, the technician may also check OBD readiness, visible smoke, stored faults, and the emissions test required for that vehicle.
Keep three questions separate. Concentration testing asks whether the urea mixture is near the 32.5% target. The accepted measurement range is 32.5% plus or minus 1.5%, while the operational window for good-quality DEF is 31.8% to 33.2%. Contamination testing asks whether diesel fuel, coolant, dirt, or other unwanted material is present. A storage review asks whether heat, age, or an unsuitable container may have affected the fluid. These problems need different repairs, so an out-of-range reading should lead to diagnosis rather than guesswork.
Before booking, check the dashboard, inspect the filler area for crystals or debris, confirm the product, and consider how it was stored. An active SCR warning, suspected contamination, or persistent fault is a reason to arrange DEF diagnosis first. A STAR station can perform the required inspection, but the final result also depends on the vehicle's overall emissions condition and California's testing requirements.
Bring your registration and prior inspection paperwork if available. Tell the technician when you last added DEF and whether a warning appeared afterward.
Correct concentration helps, clean fluid matters, and good storage protects both.
Speedy Smog performs diesel emissions inspections in San Leandro and can check DEF-related status before the appointment. Visit Speedy Smog to schedule a compliant smog check or ask what to address before bringing in your diesel.
The renewal notice is on the kitchen counter, your coffee is getting cold, and one line keeps pulling your attention back: smog certification required. If the check-engine light is off, the car drives normally, and nothing looks wrong, it's easy to wonder why the DMV needs another inspection.
A California car smog test is less mysterious once you separate the paperwork, the emissions equipment, and the onboard computer checks. The most important detail for many drivers now isn't visible smoke or even the dashboard light. It's whether the vehicle's readiness monitors have finished their self-tests.
Table of Contents
- Why Your Renewal Notice Just Mentioned a Smog Test
- What a Car Smog Test Actually Is
- The Two Test Types California Drivers Face
- How to Prepare So You Pass the First Time
- What Happens at a Smog Station
- Exemptions, Penalties, and Why Rules Differ by Region
- Common Reasons Cars Fail and How to Fix Them
- Picking the Right Station and Passing with Confidence
Why Your Renewal Notice Just Mentioned a Smog Test
California's Smog Check Program has been tied to vehicle registration for decades. The state became the 20th U.S. state to adopt a vehicle inspection and maintenance program in 1982, and the Bureau of Automotive Repair began administering the statewide program in 1984 under SB 33. The original program combined biennial testing, change-of-ownership testing, and inspection of emission-control components. California's Smog Check history and registration connection
That means a renewal notice mentioning a smog certificate usually isn't a sign that the DMV has discovered a new problem. It's often a routine part of the vehicle's registration cycle. Most qualifying vehicles need a Smog Check every other year, and the state transmits passing certificates to the DMV for registration purposes. A change of ownership or first registration in California can create another testing requirement.
Read the notice as a checklist
Start by checking the vehicle identification number, license plate, renewal deadline, and any instruction about where to complete the inspection. If the notice asks for a smog certification, the next step is to schedule or visit an authorized station, not to order a general mechanical inspection.
A smog requirement also doesn't mean California is checking every part of the car. The appointment focuses on emissions-related equipment and data. Brakes, tire tread, suspension, lights, and other safety items may deserve attention, but they aren't the purpose of a Smog Check appointment.
Practical rule: Treat the renewal notice as an action item, not a diagnosis. Confirm eligibility, prepare the emissions system, complete the test, and allow the result to reach the DMV.
Clean-air goals sit behind the program, but drivers experience the rule through a practical registration process. If the vehicle passes, the certificate is sent electronically for registration purposes. If you skip the test or receive a failing result, renewal can't move forward until the requirement is resolved.
What a Car Smog Test Actually Is
A car smog test is a standardized emissions inspection. Depending on the vehicle, the technician checks either the onboard diagnostic system, the exhaust coming from the tailpipe, or both. The inspection looks for evidence that the engine and emissions controls are operating within California's requirements.
California's program developed in stages. The state adopted its vehicle inspection and maintenance program in 1982, then implemented the first statewide Smog Check program in March 1984 under SB 33. California Smog Check program background
The result is connected directly to registration. A passing certificate is transmitted to the DMV, so you generally don't need to carry a paper certificate to a DMV office to prove the test occurred. The station records the inspection result, and the state uses that information during the registration process.
It isn't a safety inspection
A smog appointment isn't a full evaluation of whether the car is safe to drive. The technician isn't performing a brake inspection, measuring tire condition, or certifying the suspension. You can pass the emissions test and still need repairs that have nothing to do with emissions.
The reverse can happen too. A car that feels smooth and looks clean can fail because its diagnostic system reports an emissions fault or hasn't completed the required self-tests. That's why a visual impression isn't enough.
Which vehicles usually fall under the program
California generally requires testing for gasoline-powered vehicles from model year 1976 and newer and diesel vehicles from model year 1998 and newer, with additional rules based on fuel type, vehicle category, age, first registration, and ownership transfer. Some newer vehicles receive an initial exemption period, and hybrid requirements differ by category. California BAR Smog Check requirements
The technician chooses the inspection path based on the vehicle's model year and equipment. Newer qualifying vehicles usually communicate through an OBD II diagnostic connector. Older vehicles may need a loaded-mode test on a chassis dynamometer, where the station measures pollutants directly from the exhaust.
The Two Test Types California Drivers Face
California uses two main inspection approaches. OBD II testing reads information from the vehicle's computer, while the dynamometer test measures emissions from the exhaust while the vehicle runs under load.
For qualifying 1996-and-newer spark-ignition passenger vehicles and trucks under 14,001 GVWR, the OBD II inspection evaluates three technical gates:
- MIL status, meaning whether the malfunction indicator light, commonly called the check-engine light, is operating as required.
- Readiness monitors, which show whether the vehicle's emissions self-tests have completed.
- Fault-code retrieval, which checks for stored emissions-related trouble information.
The state's regulatory framework describes these elements and the readiness requirements for the OBD II portion. California OBD II inspection requirements
California Smog Test Types at a Glance
| Feature | OBD II Test | Dynamometer (Tailpipe) Test |
|---|---|---|
| Main evidence | Vehicle computer data | Direct exhaust measurement |
| Vehicle operation | Usually stationary while connected to the diagnostic port | Vehicle runs on chassis rollers |
| What gets checked | MIL, readiness monitors, and fault codes | Hydrocarbons, carbon monoxide, carbon dioxide, and oxides of nitrogen |
| Smoke inspection | May apply as part of the broader inspection | Visible tailpipe smoke check follows the emissions phase |
| Typical application | Newer vehicles equipped with OBD II | Older vehicles or vehicles directed to a loaded-mode procedure |
In a loaded-mode inspection, the vehicle runs at a stabilized cruise condition on a chassis dynamometer. The station samples hydrocarbons, carbon monoxide, carbon dioxide, and oxides of nitrogen, then performs a visible tailpipe-smoke check at idle with an unobstructed observation period of at least 10 seconds. California loaded-mode and visible-smoke testing requirements
Vehicles equipped with OBD II are evaluated through that computer-based pathway rather than treated like older tailpipe-only vehicles. The key preparation issue for these drivers is monitor status, especially after electrical work or emissions repairs.
How to Prepare So You Pass the First Time
You arrive for renewal with the check-engine light off, expecting an easy pass. The overlooked problem may be hidden in the vehicle's readiness data. Effective October 1, 2025, California's new readiness rule requires all readiness monitors to be set for a vehicle to pass a Smog Check, subject to limited exceptions for unique design issues. BAR's explanation of the October 2025 OBD readiness-monitor regulations
Readiness monitors are internal self-tests. They examine systems such as fuel control, oxygen sensors, catalytic-converter performance, and evaporative emissions equipment. A monitor marked ready has completed its check. Incomplete means the check has not finished. Not supported means the vehicle does not use that monitor, so it is different from an incomplete result.
Check readiness before booking
A basic OBD scanner can show monitor status. Some vehicles also display inspection information through a dashboard test mode, though the procedure varies by manufacturer. Check before visiting a station if you recently disconnected the battery, cleared trouble codes, replaced a battery, or completed emissions repairs.
Clearing codes only to turn off the warning light can reset the monitors. The vehicle may then need normal driving under specific conditions before the diagnostic system completes its checks. Follow this order: diagnose the problem, make the repair, drive normally as needed, verify that the monitors are ready, and schedule the test.
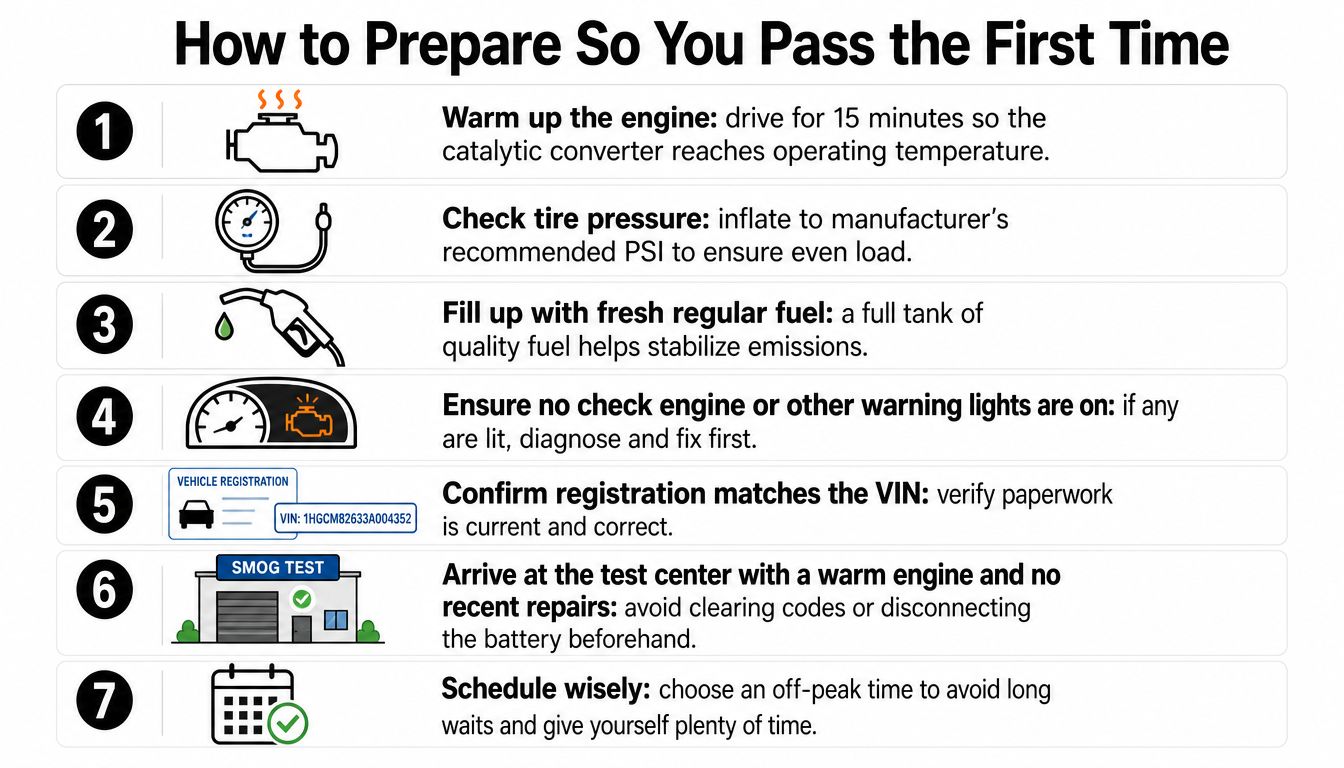
Use a sensible pre-test routine
A short routine can prevent avoidable complications:
- Warm the engine: Drive long enough for the engine and emissions equipment to reach normal operating temperature.
- Check tire pressure: Use the manufacturer's recommended pressure, particularly if the vehicle will run on a dynamometer.
- Use normal fuel: Fresh, appropriate fuel supports normal engine operation.
- Inspect the dashboard: Do not arrive with an illuminated emissions warning light.
- Verify the paperwork: Confirm that the registration information matches the vehicle identification number.
- Avoid last-minute resets: Do not disconnect the battery or erase codes immediately before testing.
For a practical walkthrough, review this guide to passing a California emissions test.
A vehicle that fails after a legitimate repair attempt may qualify for California's repair-cost waiver option. Eligibility depends on the program's conditions, so ask the station or BAR before assuming every failure requires unlimited repairs.
What Happens at a Smog Station
You pull into a station, provide the registration information, and tell the technician whether the test is for renewal, a transfer, or another DMV requirement. A STAR-certified station, such as Speedy Smog in San Leandro, can inspect vehicles that need the STAR pathway, although the correct station depends on the vehicle's DMV direction and local program requirements.
The technician begins by confirming the vehicle information and checking the equipment relevant to the inspection. The appointment may include a visual inspection of emissions components, a connection to the OBD II port, or a dynamometer procedure for a vehicle that requires loaded-mode testing.
The inspection itself
For an OBD II vehicle, the technician connects a test device and retrieves the MIL status, readiness information, and trouble-code data. For an older vehicle subject to loaded-mode testing, the technician places it on a chassis dynamometer and measures exhaust pollutants while the car runs through the required operating condition.
A visible-smoke inspection can also be part of the procedure. California's regulation requires the observation immediately after the emissions phase, with the engine at idle and an unobstructed view for at least 10 seconds. California emissions and smoke inspection procedure
The visit can feel routine, but ask questions if the result isn't what you expected. A useful technician should be able to tell you whether the vehicle passed, which monitor or code caused a failure, and whether the result was transmitted electronically for DMV registration purposes.
A test result is more useful when you leave knowing what the vehicle reported, not just whether the paper says pass or fail.
The final certificate is not a general guarantee of mechanical health. It confirms the outcome of the required emissions inspection. Keep any repair documentation and ask about the retest process before you leave if the result is unsuccessful.
Exemptions, Penalties, and Why Rules Differ by Region
California's Smog Check rules aren't perfectly uniform across every vehicle and air basin. Eligibility depends on model year, fuel type, vehicle category, registration events, and the region where the vehicle is registered.
The state's current requirements cover gasoline vehicles from model year 1976 and newer and diesel vehicles from model year 1998 and newer, while some newer vehicles receive an initial exemption period and hybrid rules differ by category. California BAR eligibility guidance
Why the San Joaquin Valley deserves attention
The San Joaquin Valley illustrates why older online guides can become misleading. BAR's 2026 update says a contingency measure could move the new-vehicle exemption in that area from eight model years to seven, which would bring more vehicles into the inspection cycle if the measure takes effect under the stated conditions. BAR's San Joaquin Valley contingency update
That change matters even if a statewide summary still lists the older exemption language. Local air-quality requirements can affect eligibility differently, so owners should rely on the current DMV notice and BAR guidance for the vehicle's registration location.
Don't assume an exemption from memory
Owners often remember an exemption that applied to an older vehicle, a different fuel type, or another county. First registration in California and a change of ownership can also trigger testing, even when the vehicle's usual renewal pattern looks different.
| Region | STAR Required? | Typical Fee Range | Key Exemptions |
|---|---|---|---|
| East Bay and other Bay Area locations | Depends on DMV direction and vehicle status | Varies by station and inspection type | Vehicle age, fuel type, and qualifying categories |
| San Joaquin Valley | May change under regional contingency requirements | Varies by station and inspection type | Local exemption rules can be affected by air-quality measures |
| Other California areas | Depends on county, vehicle, and DMV instruction | Varies by station and inspection type | Some newer vehicles and specific vehicle categories |
The table is a decision aid, not a substitute for the notice attached to your vehicle record. If the DMV directs you to a specific type of station, follow that instruction rather than relying on a general internet checklist.
Common Reasons Cars Fail and How to Fix Them
A failure usually points to a specific emissions issue or incomplete diagnostic process. The most avoidable problem is testing before the vehicle's readiness monitors have finished after a battery disconnect or code clear.
Use this repair checklist as a starting point, not a substitute for diagnosis:
- Readiness monitors are incomplete: Drive the vehicle normally through varied conditions after repairs or electrical work, then verify monitor status with an OBD scanner before testing. Don't assume a short trip has completed every self-test.
- The gas cap doesn't seal: Tighten it until it seats correctly. If the seal is worn or the cap is damaged, replace it with a suitable replacement, preferably an OEM part, because an evaporative leak can trigger a fault.
- The oxygen sensor is faulty: Have the diagnostic code and sensor data checked before replacing parts. A sensor that reports incorrectly can disturb fuel control and increase emissions.
- The catalytic converter isn't working properly: A converter that's damaged, clogged, or no longer converting pollutants may require replacement after the underlying cause is identified.
- The engine is producing excess emissions: Misfires, fuel-mixture problems, vacuum leaks, a failing mass-airflow sensor, or an emissions-control fault can all require attention before the test.
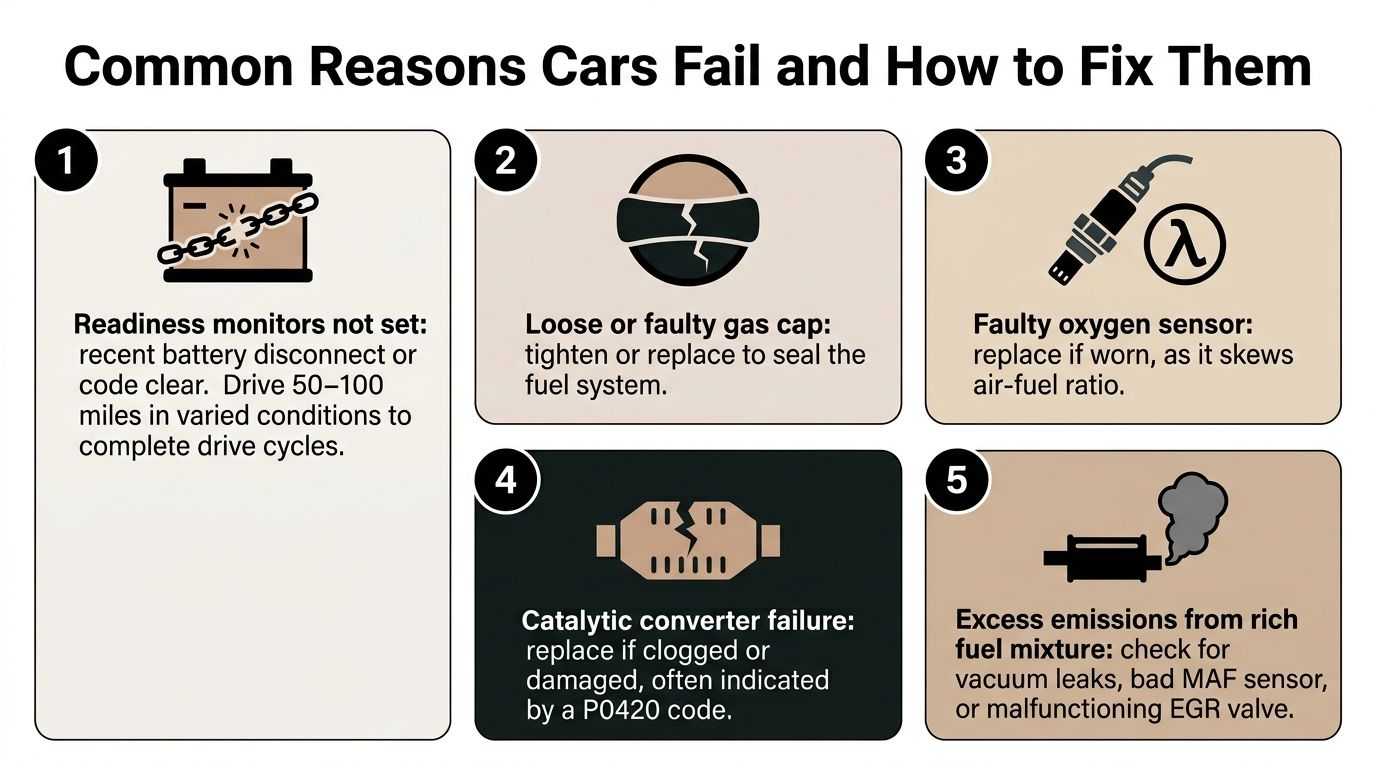
Start with the evidence
A glowing check-engine light is a strong warning that the vehicle's OBD II inspection may fail. Stored fault codes matter too, even when the car feels normal. Ask a repair shop to scan the system and explain the code before authorizing a catalytic converter, oxygen sensor, or other expensive replacement.
Older vehicles may fail because of measured tailpipe emissions, visible smoke, altered emissions equipment, or engine problems that affect the loaded-mode result. California's dynamometer procedure measures hydrocarbons, carbon monoxide, carbon dioxide, and oxides of nitrogen, so clean-looking exhaust doesn't prove the readings will be acceptable. California loaded-mode testing rules
For a more detailed repair-oriented checklist, review these common Smog Check failure reasons. Repair the cause, let the vehicle complete its self-tests where applicable, and retest only after the system is ready.
Picking the Right Station and Passing with Confidence
The right station can prevent confusion, but it can't make an unready vehicle pass. Choose a facility that can explain the vehicle's inspection path, confirm readiness-monitor status, and tell you what the result means before you leave.
A Test Only station performs inspections without selling repairs. A STAR station meets additional program requirements and handles vehicles that BAR or the DMV directs through the STAR pathway. If your notice names STAR or Test Only, follow the notice rather than choosing a station based only on distance.
What to ask before the test
Call or check the station's posted information and ask:
- Which station type applies: Can the facility test your vehicle under the DMV's instruction?
- What the price includes: Does the quoted amount cover the inspection, certificate transmission, and any required retest terms?
- Whether readiness can be checked first: Will the technician show you which monitors are ready, incomplete, or unsupported?
- What happens after a failure: Will you receive the trouble code or failure reason in writing?
- Whether the result is transmitted electronically: Confirm how the passing certificate reaches the DMV.
For a plain-language explanation of station categories, read what a STAR Smog station is.
The most dependable habit is simple: book with a station that explains the result before you leave. That matters more under the readiness-monitor rule because a vehicle can have no visible smoke and no obvious driving complaint, yet still fail when its diagnostic self-tests remain incomplete.
Speedy Smog in San Leandro offers STAR-certified smog inspections, accepts walk-ins, and transmits passing results electronically to the DMV. If you're an East Bay driver preparing for renewal, visit Speedy Smog to confirm the appropriate test and have the vehicle's readiness status reviewed before inspection.