
You've got the DMV renewal notice in one hand and a failed Vehicle Inspection Report in the other, and the car drove fine on the way in. That disconnect is normal in California. A smooth idle doesn't mean the emissions systems have proven themselves to the car's computer, and on most newer vehicles that proof is what the test measures.
California checks three things. There's a visual inspection for missing or modified emissions equipment, a functional check that includes the OBD II scan on newer vehicles, and for older vehicles a tailpipe or dynamometer test that measures gases directly. In an August 2025 statewide sample, the overall initial test failure rate was 8.45%, based on 975,369 initial tests and 82,389 failures, according to California BAR smog check performance reporting. Most of those failures aren't mysteries. They trace back to eight fixable causes, and knowing which one you're dealing with tells you whether you need a gas cap, a drive cycle, or a real repair before you pay for a retest.
Table of Contents
- 1. Illuminated Check Engine Light (Malfunction Indicator Lamp)
- 2. Incomplete OBD II Readiness Monitors
- 3. Failing Catalytic Converter
- 4. Faulty Oxygen (O2) Sensors
- 5. EVAP System Leaks
- 6. Engine Misfires and Ignition System Faults
- 7. Vacuum Leaks
- 8. Malfunctioning EGR (Exhaust Gas Recirculation) Valve
- 8 Common Smog Check Failures Compared
- Fix It Fast and Pass Your Retest
1. Illuminated Check Engine Light (Malfunction Indicator Lamp)
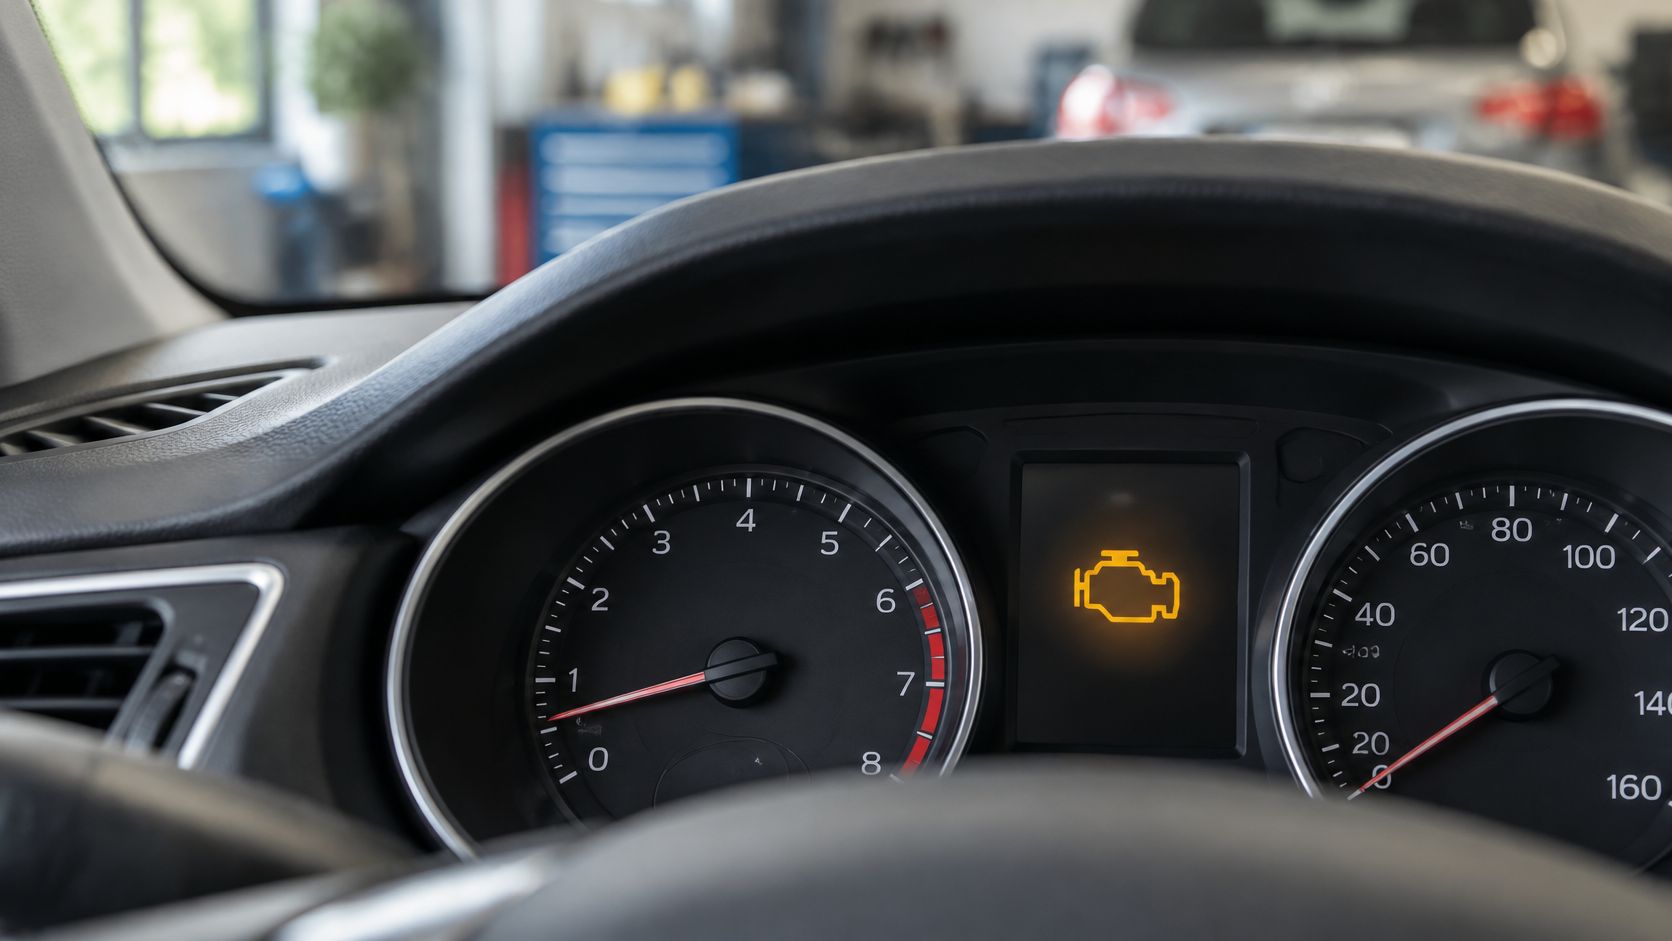
If the Malfunction Indicator Lamp, or MIL, is on with the engine running, you fail. There's no partial credit and no argument about how well the car drives. On 2000 and newer vehicles, the inspector plugs into the OBD II port and the car reports its own verdict. A commanded-on MIL or a stored emissions related diagnostic trouble code means the computer has already found a fault.
That's also why the bulb check matters. Turn the key to on without starting the engine and the light should illuminate briefly. If it doesn't, that fails too, because there's no way to prove the warning system works.
A quick diagnostic example
A driver comes in with the light on, gets the codes read first, and finds a faulty oxygen sensor code. The shop replaces the sensor, confirms the code doesn't return after driving, and the car passes on the next visit. The order matters. Reading the code before you test saves you a documented failure, and learning how to read OBD codes helps you tell a loose gas cap code from something that needs a shop.
- Scan before you test: Get the codes read so you know what repair you're facing.
- Don't clear and rush in: Erasing codes turns the light off but wipes readiness, which creates a different failure.
- Treat a flashing light as urgent: A flashing MIL usually signals a severe misfire that can overheat and destroy the catalytic converter.
Practical rule: The light is the test on a newer car. Fix the cause the code points to, then let the car prove the fix through normal driving.
2. Incomplete OBD II Readiness Monitors
A car can run normally and still fail because its emissions self-tests are incomplete. Readiness monitors check systems such as the catalytic converter, EVAP, oxygen sensors, and EGR. Disconnecting the battery or clearing diagnostic codes can reset monitors to “not ready.” After a repair, the vehicle also needs suitable driving conditions to run those tests again.
California's readiness requirements depend on the vehicle and the monitor. A smog technician can check the car's status against the applicable BAR rules; an incomplete monitor does not automatically mean every vehicle fails. The percentage reported in BAR's August 2025 smog check executive summary should not be read as a readiness-only failure rate without a clear definition of what the figure measures.
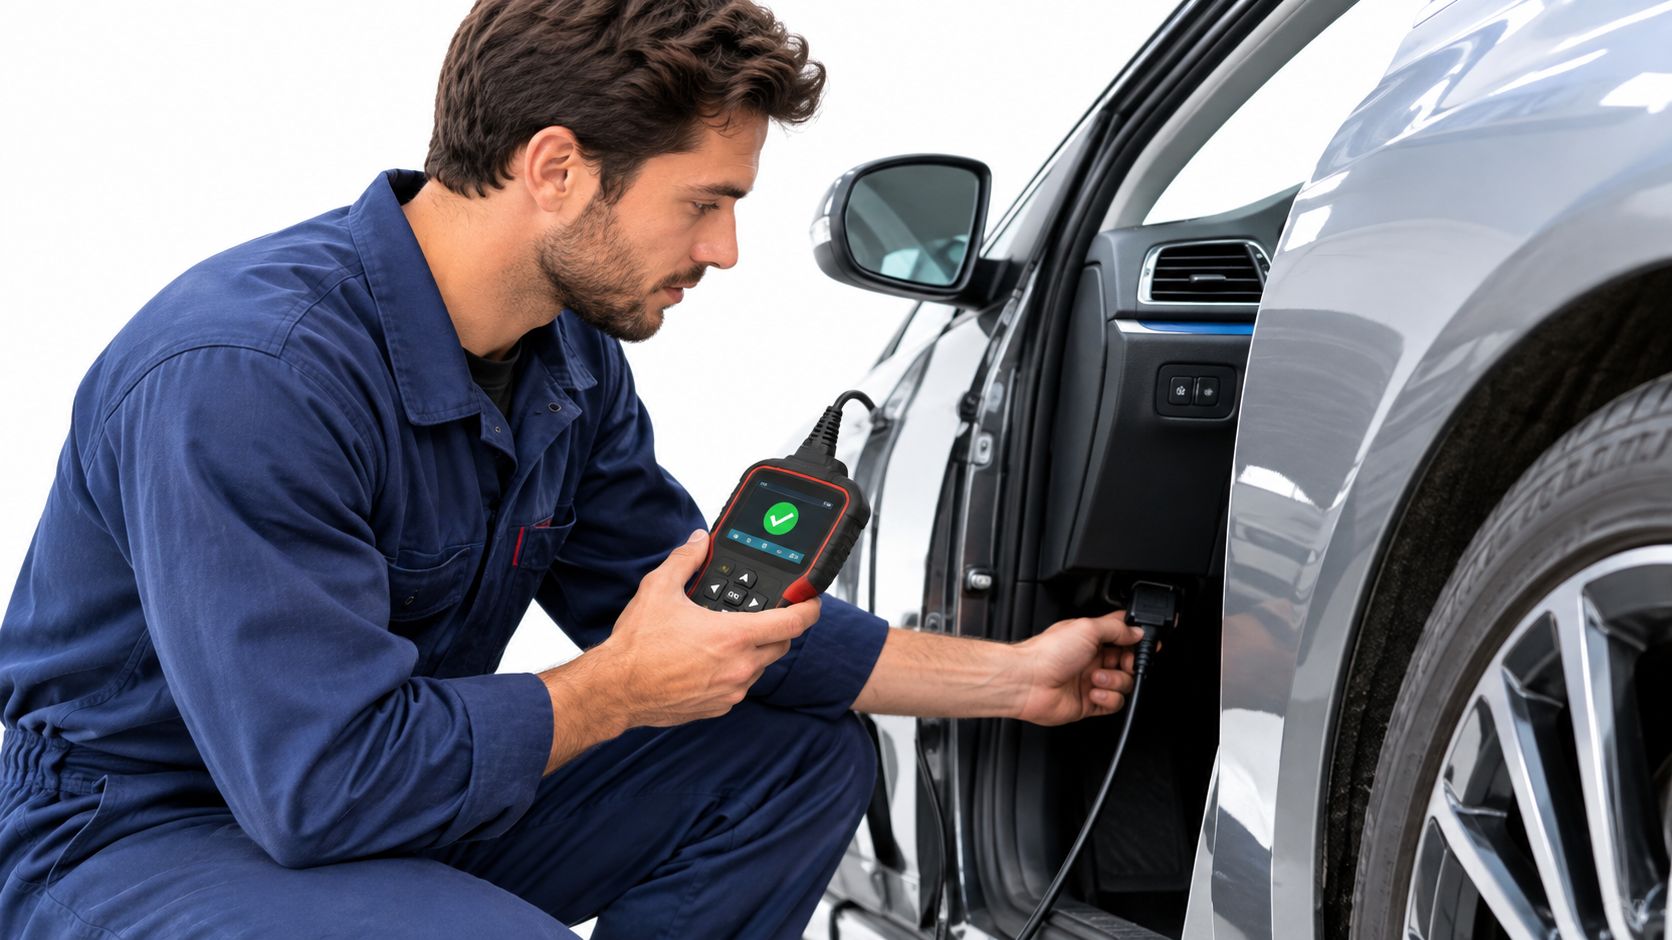
For example, an owner replaces a dead battery on Saturday and drives to the test station Monday. The engine runs well and the warning light is off, but one or more monitors may not have completed. A mix of city and freeway driving, with the engine cooling fully between trips, can help. There is no universal mileage target: fuel level, temperature, cold starts, and steady cruising affect monitor operation, and some vehicles require a manufacturer-specific drive cycle.
- Avoid resets before testing: Don't disconnect the battery or clear codes before an appointment. If a repair requires either, check readiness afterward.
- Vary your driving: Include stop-and-go trips, steady freeway cruising, and full cool-downs.
- Check before the test: Ask a technician to scan monitor status and identify any incomplete tests.
A basic scan tool can show whether monitors are ready before you pay for an inspection. If one remains incomplete, use the vehicle's specified drive cycle or have a technician diagnose why the test has not run.
3. Failing Catalytic Converter
The catalytic converter is where the expensive failures live. It uses platinum, palladium, and rhodium to convert hydrocarbons, carbon monoxide, and nitrogen oxides into less harmful gases. When it wears out, clogs, or gets contaminated by oil or unburned fuel, pollutants pass straight through. Newer cars get caught by a catalyst efficiency code, often P0420. Older cars get caught by the tailpipe numbers themselves.
Age works against you here. California data shows the failure rate rising from about 4% for eight year old vehicles to approximately 15% for 23 year old vehicles, a pattern tied to aging emissions equipment and converter wear in the Bureau of Automotive Repair performance report. Age alone doesn't doom a converter, but wear plus neglected upstream problems usually does.
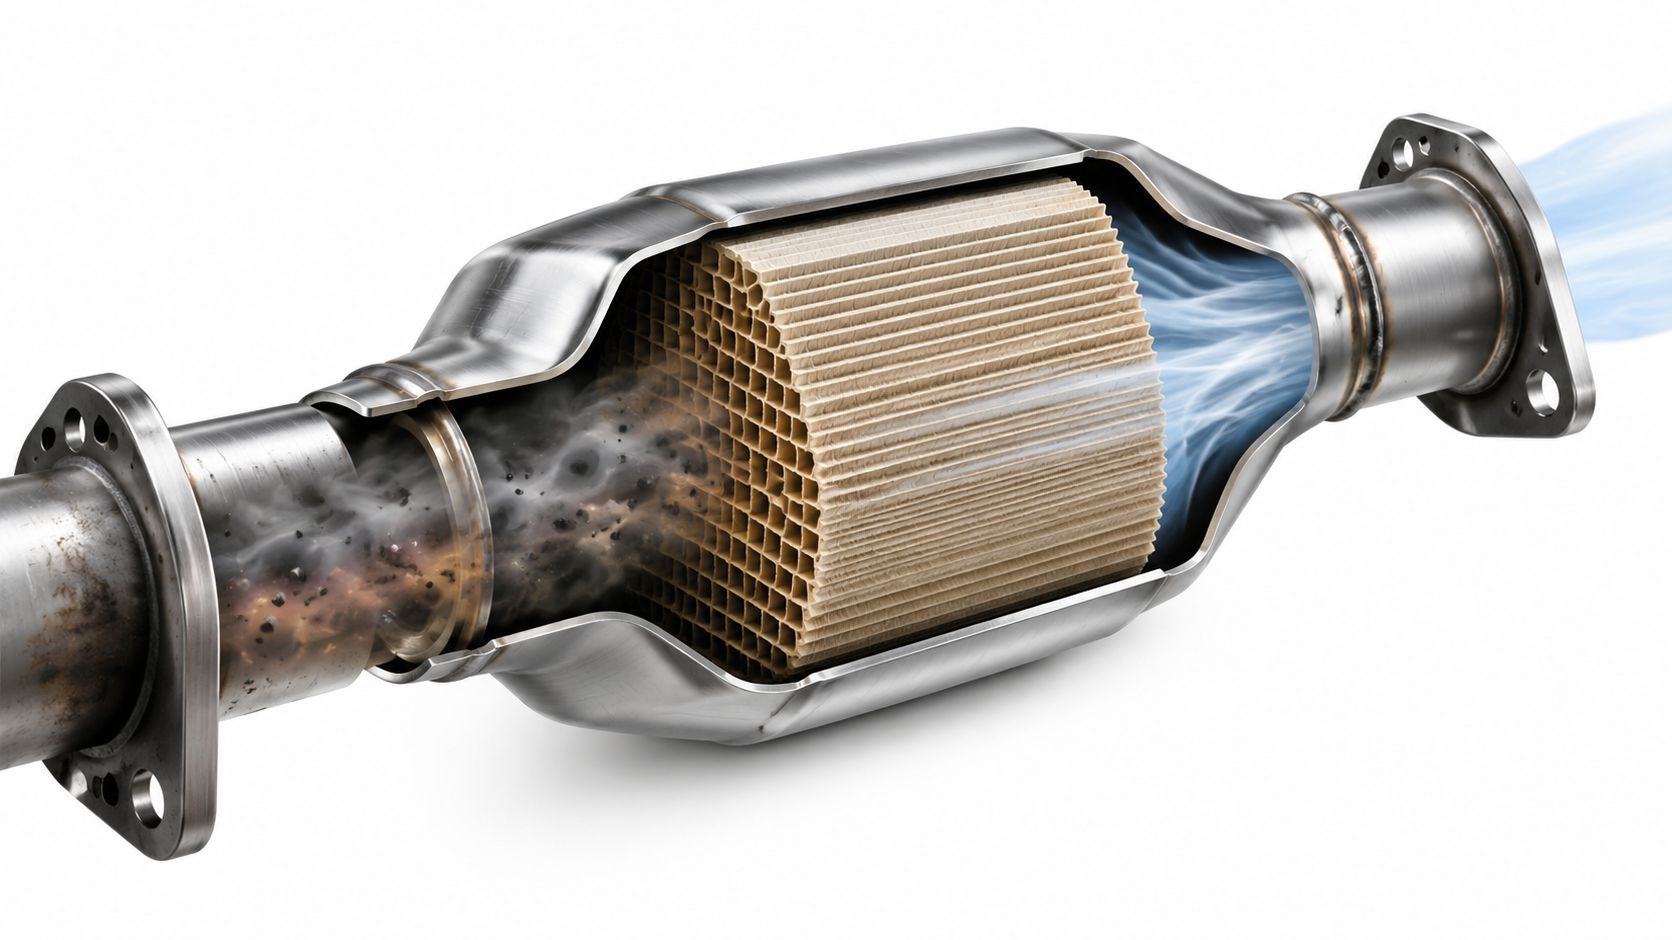
Take a 2005 sedan that fails with a catalyst efficiency code after months of ignored misfires. Replacing the converter alone would waste money, because raw fuel from the misfire is what killed it. The owner repairs the ignition fault first, then installs a California compliant converter, and passes. Understanding how a catalytic converter functions makes that sequence easier to follow when a shop explains the estimate.
Protecting a replacement converter
- Fix misfires and oil leaks first: Both poison or overheat a new converter quickly.
- Confirm CARB compliance: A cheap out of state converter that isn't approved for California can fail the visual inspection.
- Listen for rattles: A rattle at idle or a sudden loss of acceleration can mean the internal substrate has broken apart.
4. Faulty Oxygen (O2) Sensors
Oxygen sensors tell the computer how much unburned oxygen is left in the exhaust, and the computer trims fuel delivery based on that signal. Upstream sensors, mounted before the converter, control the air fuel mixture in real time. Downstream sensors sit after the converter and mostly watch whether it's doing its job. When a sensor gets lazy, responding slowly instead of switching crisply, the mixture drifts rich or lean and emissions climb before you feel anything wrong.
The tricky part is that a dying sensor and a dying converter can look similar. A downstream sensor that's lying can trigger a catalyst code on a healthy converter. A good technician watches live sensor data and compares upstream and downstream waveforms before condemning either part. That diagnostic step is the trade-off. Guessing is faster, but guessing wrong on a converter is an expensive lesson.
Here's a common scenario. A driver notices fuel economy slipping, then the check engine light appears. The scan shows a slow upstream sensor, and after replacement the fuel trims settle back to normal and the emissions reading drops. Reading up on how oxygen sensors affect your smog test helps you ask the right questions about which sensor failed and why.
- Match the position: Upstream and downstream sensors aren't interchangeable, so order by exact location and connector.
- Keep silicone away: Silicone based gasket makers near the exhaust can contaminate sensor elements.
- Respect service intervals: On high mileage vehicles, replacing worn sensors at the manufacturer's recommended interval protects the converter downstream.
A sensor is a wear item, not a lifetime part. Treating it that way prevents bigger bills.
5. EVAP System Leaks
Your gas tank constantly produces fuel vapor, and the EVAP system exists to keep that vapor out of the air. It stores vapor in a charcoal canister, then purges it into the engine to be burned when conditions are right. Any leak in the hoses, canister, purge valve, vent valve, or filler cap lets vapor escape, and the OBD II EVAP monitor is sensitive enough to catch very small leaks. Codes like P0442 for a small leak or P0455 for a large one are smog failures.
Start with the cheapest suspect. A vehicle fails with an EVAP code, the technician inspects the gas cap, and the rubber seal is cracked and flattened. A new cap, a few drive cycles, and the monitor passes. It doesn't always end that easily, but you'd be surprised how often it does.
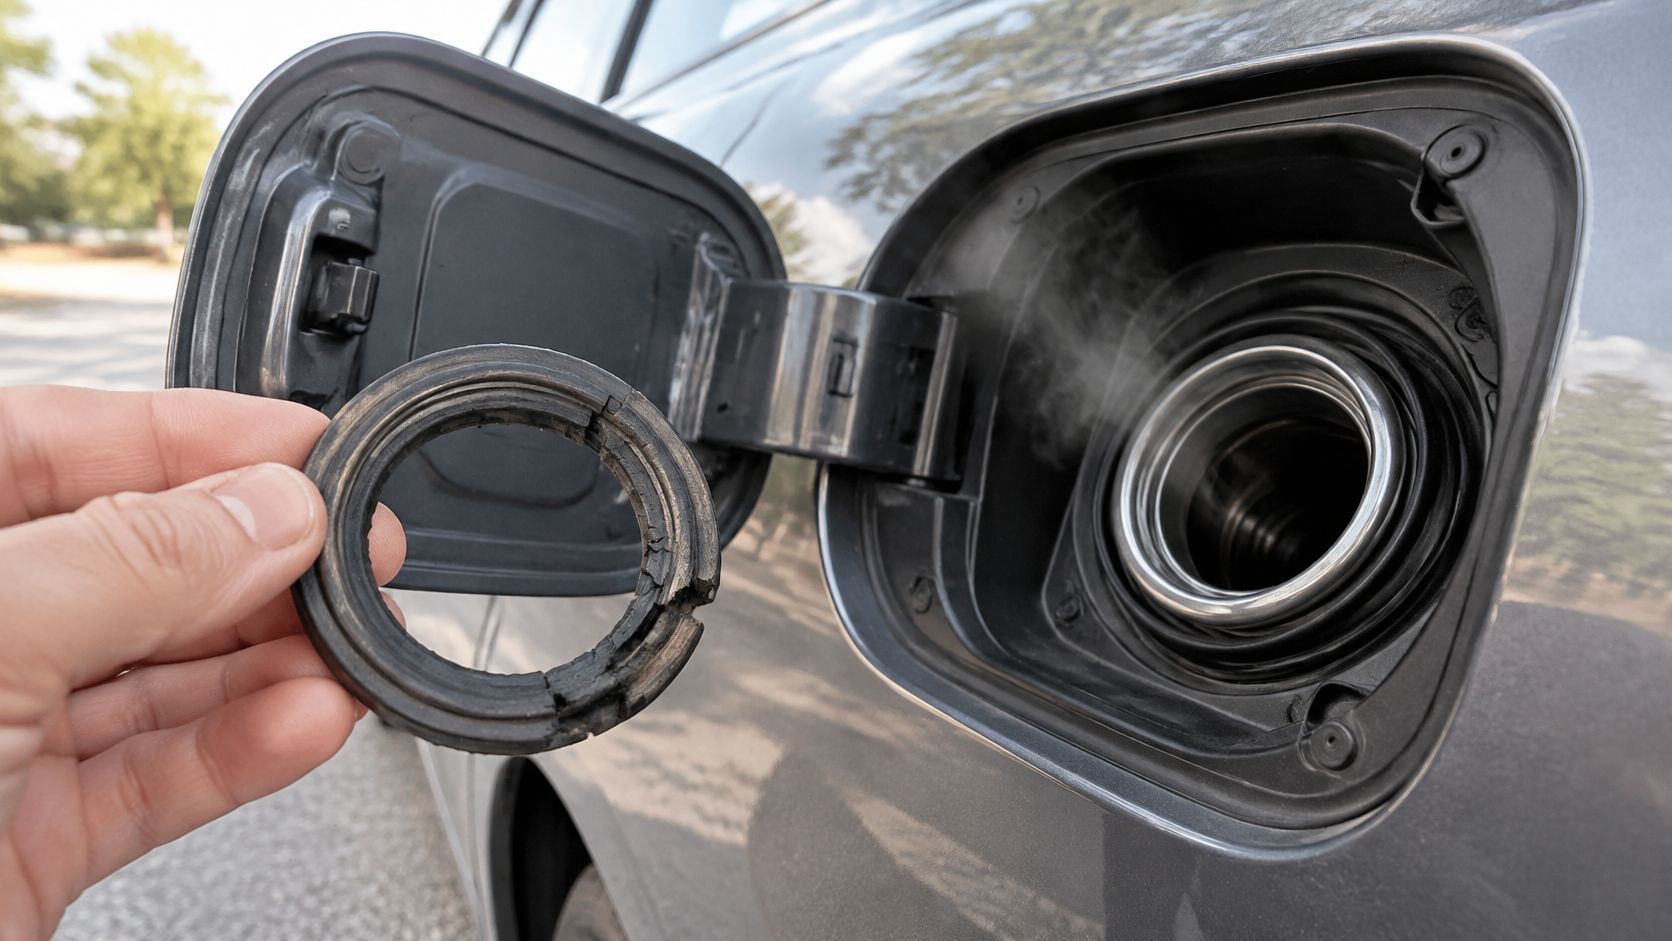
When the cap isn't the culprit, a smoke test is the honest way forward. The shop fills the system with visible smoke and watches where it escapes, which beats replacing valves one at a time on suspicion.
Simple checks before you book a repair
- Click the cap: Tighten it until it clicks and inspect the seal for cracks or a flattened edge.
- Stop at the first click at the pump: Overfilling pushes liquid fuel into the canister and can ruin it.
- Ask for a smoke test: If the leak isn't obvious, pinpointing it first is cheaper than swapping parts.
EVAP failures reward patience. Test, find the leak, fix that one thing, and confirm the monitor completes.
6. Engine Misfires and Ignition System Faults
A misfire means a cylinder didn't burn its fuel charge properly. Worn spark plugs, a failing ignition coil, damaged plug wires, or a fuel delivery problem are the usual causes. That unburned fuel travels into the exhaust, hydrocarbon emissions spike, and the extra fuel burning inside the catalytic converter can overheat it. Of everything on this list, an active misfire does collateral damage the fastest.
Codes help narrow it down. P0300 means random misfires across cylinders. P0303 points at cylinder three specifically, which tells the technician where to start swapping coils or inspecting plugs to see if the misfire follows the part.
Picture a car with a shaky idle that fails for a cylinder three misfire. The shop moves that cylinder's coil to another cylinder, the code follows the coil, and the diagnosis is confirmed. New coil, fresh plugs all around since they're the same age, and the car passes its retest with the converter still intact because the owner didn't keep driving on it.
- Replace plugs on schedule: Follow the interval in your owner's manual and use the exact plug type specified for your engine.
- Don't drive on a flashing light: A flashing MIL during a misfire is the car telling you the converter is at risk right now.
- Fix the whole pattern: If one plug is worn out, the rest aren't far behind, so replacing the set makes sense.
That last point is where people cut corners and end up back in the shop a month later with a different cylinder misfiring.
7. Vacuum Leaks
Engines measure incoming air carefully, and a vacuum leak sneaks in air the computer never counted. Cracked rubber hoses, a failed intake manifold gasket, or a leaking brake booster all create that unmetered air. The mixture goes lean, idle gets rough or hunts up and down, and the computer compensates by adding fuel until it runs out of adjustment range and sets lean or fuel trim codes like P0171. On tailpipe tested vehicles, that lean condition can push hydrocarbons and nitrogen oxides over the limit.
Your ears are a legitimate diagnostic tool here. A driver hears a faint hiss near the intake, follows it to a split PCV hose that's gone brittle with heat, and replaces a part that costs very little. Idle stabilizes, the lean code clears after driving, and the retest passes. Spanish speaking drivers and visual learners alike benefit from seeing the inspection process, and this walkthrough shows what a hose inspection looks like.
Not every leak announces itself. Small cracks that open only when the engine is hot, or leaks under the intake manifold, hide from a visual check. That's when a smoke machine earns its keep, pressurizing the intake so leaks reveal themselves as wisps of smoke.
- Inspect rubber closely: Squeeze hoses and look for brittleness, cracking, or loose clamps.
- Replace proactively on older cars: Aging hoses are cheap insurance on high mileage vehicles.
- Smoke test the stubborn ones: If inspection finds nothing, stop guessing and test.
8. Malfunctioning EGR (Exhaust Gas Recirculation) Valve
The EGR valve routes a measured amount of exhaust gas back into the intake. That dilutes the intake charge, lowers combustion temperatures, and cuts nitrogen oxides, or NOx, which form when combustion gets too hot. It's a simple idea with a dirty working environment, because exhaust deposits carbon everywhere it goes.
Failure cuts both ways. A valve stuck closed, or passages clogged with carbon, sends NOx climbing, which shows up clearly on dynamometer and tailpipe tests for older vehicles. A valve stuck open leaks exhaust into the intake at idle when it shouldn't, causing rough running, stalling, and lost power. Codes in the P0400 range point to flow problems, but the code alone doesn't tell you whether the valve, the passages, or the control solenoid is at fault.
A typical case involves a vehicle with a rough idle and a high NOx reading. The technician removes the EGR valve, finds the pintle and passages packed with carbon, cleans them, tests valve movement, and the next test comes in within limits. Cleaning works when the valve itself still functions. When the diaphragm is torn or the electronic actuator has failed, cleaning is wasted labor and replacement is the honest fix.
Before you authorize EGR work
- Confirm how you're tested: EGR's role in your inspection varies by model year and test type, so ask the technician.
- Clean first if it's sticking: Carbon removal is worthwhile when the valve tests functional.
- Watch the early signs: Rough idle, pinging under load, or a new check engine light often appear before a hard failure.
NOx failures on older vehicles point here more often than anywhere else.
8 Common Smog Check Failures Compared
| Item | 🔄 Complexity | ⚡ Typical resources or effort | 📊 Expected smog-check impact | 💡 Ideal next step | ⭐ Key advantage |
|---|---|---|---|---|---|
| Illuminated Check Engine Light (MIL) | Moderate; depends on the stored fault | OBD II scan and potentially targeted repairs | Lit MIL or emissions-related codes can cause automatic failure | Read and diagnose codes before testing; allow readiness monitors to complete after repairs | Provides an early warning and often points toward the affected system |
| Incomplete OBD II Readiness Monitors | Low; usually requires driving | Several days of varied driving; avoid clearing codes | Test may be rejected or fail if too many monitors are incomplete | Ask which monitors are incomplete and follow an appropriate drive cycle | Often resolves without repairs |
| Failing Catalytic Converter | High; diagnosis and replacement can be costly | Diagnostic testing and a California-compliant replacement if needed | Reduced conversion efficiency can raise emissions and cause failure | Fix misfires or fluid leaks first; verify replacement parts are CARB-compliant | A functioning converter substantially reduces tailpipe pollutants |
| Faulty Oxygen (O2) Sensors | Moderate; correct sensor and location must be identified | Code and sensor testing; replacement is often less costly than a converter | Incorrect fuel control or catalyst monitoring can lead to failure | Confirm the sensor fault before replacing parts | Repair may improve emissions, fuel economy, and drivability |
| EVAP System Leaks | Low to moderate; locating small leaks can take time | Gas cap inspection; smoke testing may be needed | Failed leak detection can cause an OBD II failure | Check the gas cap seal; request a smoke test if the leak is not obvious | Some causes are inexpensive and simple to fix |
| Engine Misfires and Ignition System Faults | Low to high; depends on the cause | Scan tool and ignition or fuel-system diagnosis | Unburned fuel raises emissions and may damage the converter | Address flashing Check Engine lights promptly and diagnose the misfire | Repair can restore smooth operation, fuel economy, and emissions |
| Vacuum Leaks | Low to moderate; locating hidden leaks may require tools | Hose inspection, fuel-trim checks, or smoke testing | Unmetered air can disrupt combustion and trigger failure-related codes | Inspect hoses and intake connections; use a smoke test if needed | Small hose repairs can improve idle and fuel economy |
| Malfunctioning EGR Valve | Moderate; deposits or related passages may need attention | Inspection, cleaning, or valve replacement | Excess NOx can cause failure, particularly on applicable tailpipe tests | Check whether EGR testing applies to the vehicle and inspect the valve and passages | Restoring EGR operation helps control NOx emissions |
Fix It Fast and Pass Your Retest
Knowing What Fails a Smog Check is only useful if it changes what you do before the test. Run through a short checklist a week out. Confirm the check engine light is off and has been off through several days of normal driving, not just since this morning. Make sure you haven't disconnected the battery or cleared codes recently, and if you have, drive a mix of city streets and freeway miles with full cool downs in between so the readiness monitors can complete. Click the gas cap tight, top up your maintenance, and arrive with the engine fully warmed up after a real drive rather than a two minute trip from home.
That preparation matters more than most drivers realize. California's newer readiness expectations mean a repaired car can still fail if its monitors haven't rerun, even with no active code present. The statewide failure rate for 2000 and newer vehicles was about 7% in calendar years 2024 to 2025, and the updated rule applies to gasoline vehicles model year 1996 and newer and diesel vehicles model year 1998 and newer, according to BAR's explanation of the new OBD readiness monitor regulations. In plain terms, repairing the fault and proving the repair are two separate steps, and the inspection checks both.
If you've already failed, don't guess. Read your Vehicle Inspection Report and identify the exact failure category, whether that's OBD codes, readiness, visual, functional, or tailpipe emissions. That category tells the repair shop where to start and keeps you from paying for parts the car doesn't need. After the repair, resist the urge to drive straight back. Complete the drive cycle, verify monitor status with a scanner if you can, and then retest. Drivers who skip that verification step are the ones who fail twice for two different reasons.
Shop advice: Bring your failed inspection report to the repair shop. It turns a vague conversation into a specific work order.
East Bay drivers who want the testing side handled efficiently can visit Speedy Smog in San Leandro, a STAR Certified station that tests 2000 and newer models, 1999 and older vehicles, diesels, and hybrids. Whether you're coming in for a first test or returning after a repair, going in with the light off, the monitors ready, and the gas cap clicked puts the odds firmly in your favor.
If your renewal deadline is coming up or you're returning after fixing a check engine light, incomplete monitor, or EVAP leak, bring your vehicle to Speedy Smog in San Leandro for STAR Certified testing for newer cars, older vehicles, diesels, and hybrids. The team will run your inspection efficiently, explain your Vehicle Inspection Report in plain English if anything doesn't pass, and help you understand what to fix before a retest. Stop by and get certified so you can finish your DMV registration without another wasted trip.
You're staring at the dash in the parking lot, the smog appointment is coming up, and that check engine light is sitting there like a warning you can't ignore. In that moment, a lot of drivers want the fastest fix possible, especially if the car still feels fine. The problem is that clearing the light is not the same thing as fixing the fault, and in California that difference can decide whether you leave with a clean result or get turned away.
Table of Contents
- What the Check Engine Light Actually Means
- Using an OBD2 Scanner to Read and Clear Codes
- Alternative Reset Methods and Their Trade-Offs
- Common Causes Behind the Light and When to Seek Repair
- California Smog Test Implications You Cannot Ignore
- Prevention Tips and Your Reset Decision Framework
What the Check Engine Light Actually Means
A driver rolls into the bay after tightening a gas cap, then asks why the light is still on. That's a normal scene, because the dashboard warning does not care whether the problem feels small. It is triggered by the vehicle's ECU or ECM, which watches emissions and engine behavior, stores trouble codes, and turns on the light when something falls outside expected limits.
The light is a diagnostic alert, not a bulb problem
The most important thing to understand is that the light itself is not the issue. The ECU controls the alert, so clearing it only removes the warning, it does not repair the underlying fault. That is why a reset can make the dash look better for a while and still leave the car failing emissions in the background.
Practical rule: if the car needed a code to turn the light on, it still needs a real diagnosis to make the light stay off.
A steady light usually points to a fault that needs attention, but a flashing light is a different situation. That warning usually means a more serious active problem, and it should not be treated like a simple clear-it-and-go job. If the light is flashing, the car needs attention before you keep driving it hard.
What a successful reset looks like
Real success is not a dark dashboard for ten minutes. It is a repaired system, cleared codes, and a vehicle that does not immediately object again after a few trips. In California, that matters even more because the vehicle has to convince the inspection equipment that the emissions systems are behaving normally, not just that someone erased memory.
OBD-II troubleshooting became universal in the 1990s, which is why reset steps are so standardized across brands and models. That universal structure is helpful, but it also creates a trap. It makes code clearing look easy, so people forget that the code existed for a reason.
For a plain-English breakdown of reading and clearing fault codes, see this OBD code guide for California drivers.
Using an OBD2 Scanner to Read and Clear Codes
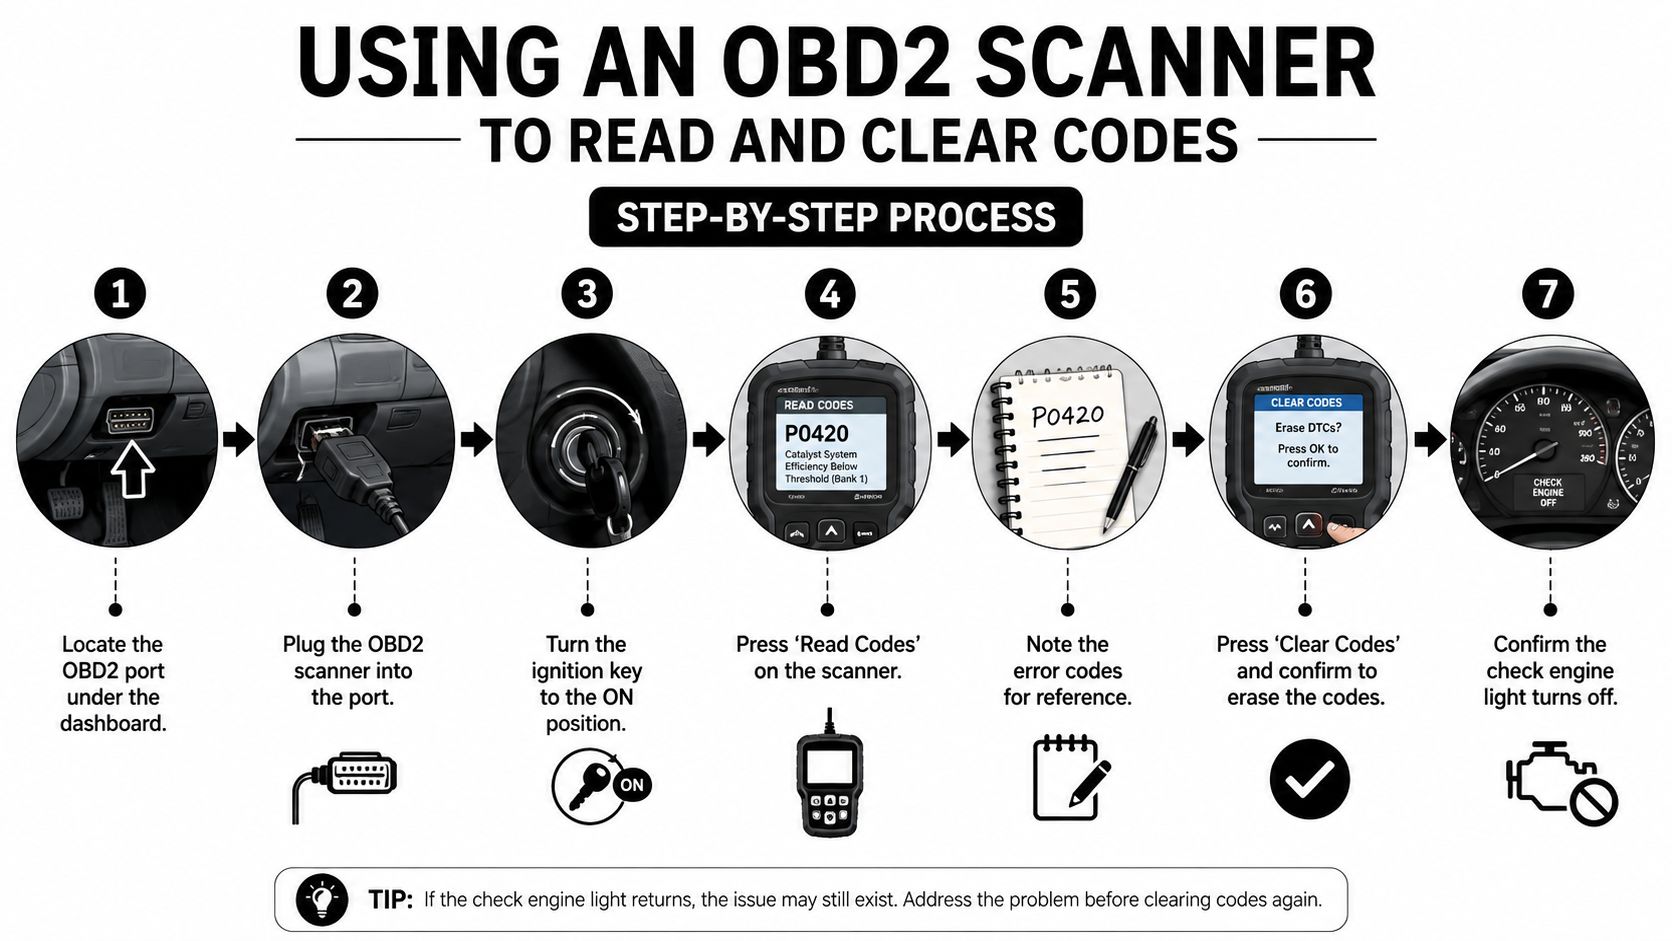
The scanner method works because it matches the way the car's computer stores faults. Plugging in the tool under the dashboard lets you read the codes before you clear them, and that order matters because erasing the memory also erases the clue trail. If you are trying to clear a check engine light before a California smog test, reading first helps you avoid guessing at a fix that may not hold up in inspection.
Read first, clear second
Plug the OBD2 scanner into the diagnostic port with the ignition turned to ON and the engine off. Then read both stored and pending codes, and save or write them down before you touch the erase function. If you skip that step, you lose the most useful information the car can give you.
A lot of drivers try to clear the light first and then see whether it returns. That approach leaves you blind if the fault comes back, and it does nothing to tell you whether the problem is an intermittent sensor issue, a wiring problem, or a repair that did not take. Keep the record even if you do not know what it means yet, because the code family and the freeze-frame context usually tell more than the warning lamp itself.
If you want help understanding the numbers before you clear anything, this OBD code guide for San Leandro drivers is a useful companion.
Clear codes only after the repair is confirmed
The better sequence is straightforward. Fix the fault, reconnect the scanner with the ignition on and the engine off, check the stored and pending codes again, confirm the repair, then use “Erase Codes” or “Clear DTCs” Automotoflux's clear-code guide. If the light goes out, that only means the computer memory was cleared.
Readiness is the part many guides leave out. The monitor status needs to return to “Ready” or “Complete” in Mode 01 PID 01 before the reset means much for smog purposes Automotoflux's clear-code guide. A dark dash and a ready vehicle are not the same thing, and California inspection equipment cares about the second one.
A cleared code is not the same as a fixed car. The scanner can turn off the warning, but it cannot prove the fault stayed gone.
A note on using a professional station
If you do not want to guess, a smog-focused shop can help you check the result after repairs. A station such as Speedy Smog in San Leandro fits that workflow because it performs emissions testing for California drivers who need a compliance result, not just a blank dashboard.
Alternative Reset Methods and Their Trade-Offs
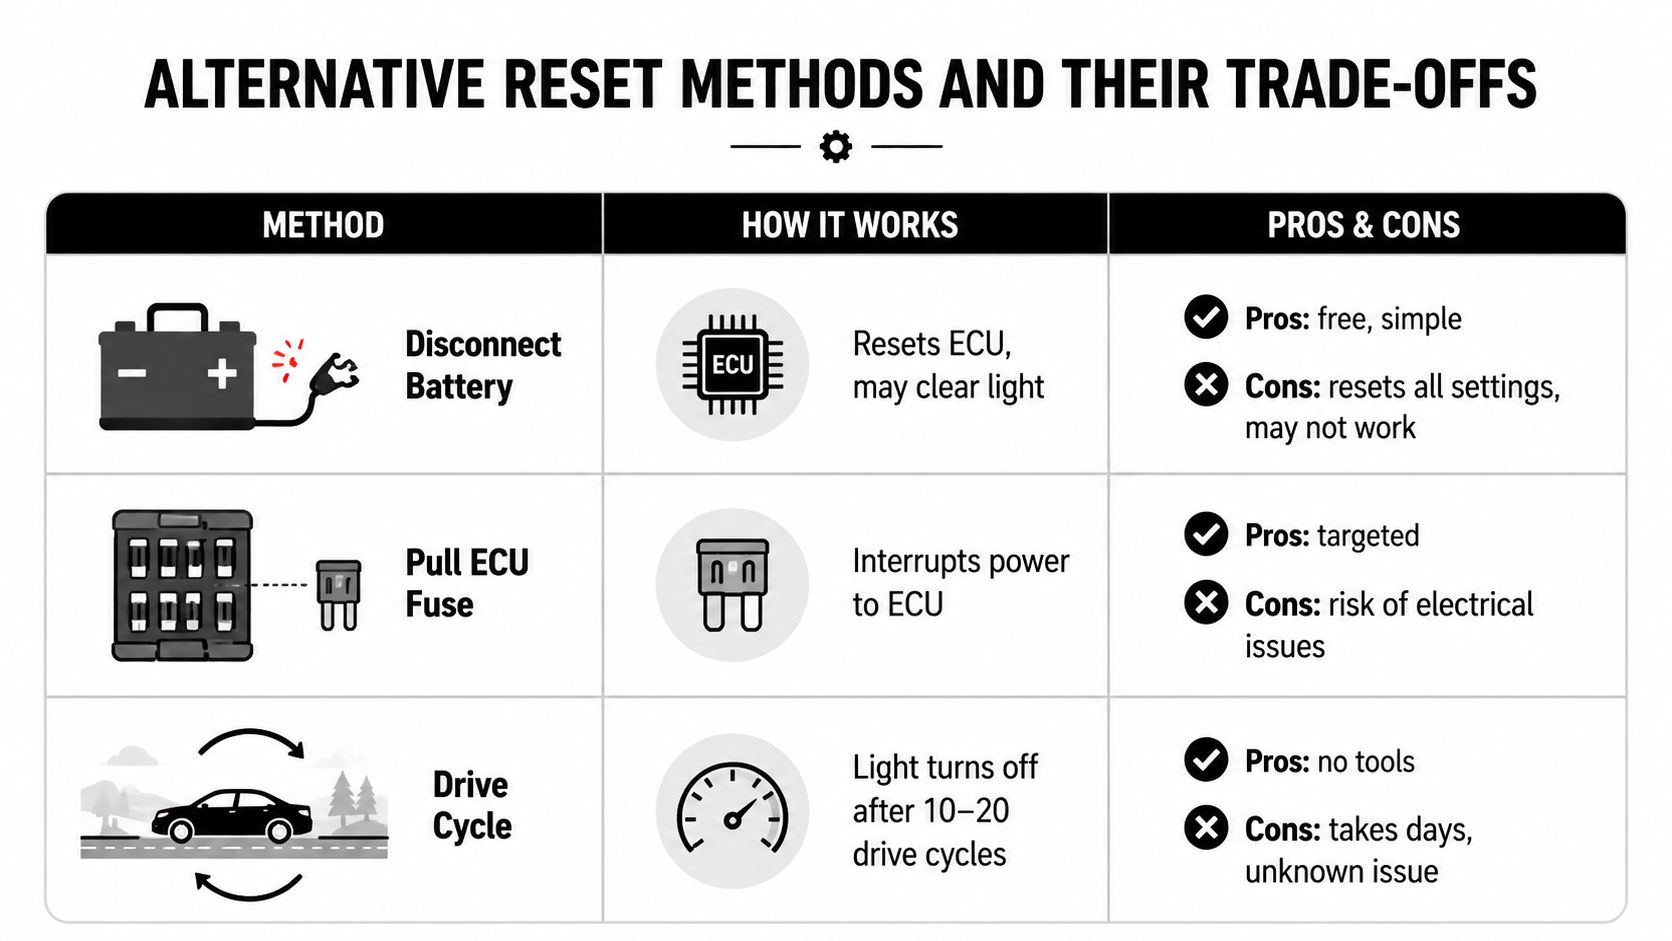
A lot of drivers reach for a power reset when they do not have a scanner handy. It can make the light disappear for a while, but it also skips the part that matters before a California smog test, confirming the fault is resolved AMP Auto's clear-light guide.
Battery disconnect and ECU fuse removal
Disconnecting the negative battery terminal is the common shortcut. Some guides say to wait about 10 to 15 minutes before reconnecting so the ECU reboots and the light turns off AMP Auto's clear-light guide. That can work, but it also wipes radio presets and learned settings, and the same issue can return as soon as the car sees the fault again.
Pulling the ECU fuse does something similar by cutting power to the computer. It is a little more targeted than removing the whole battery, but it still means you are changing the electrical system instead of finding the cause. For a driver trying to quiet the dash before an appointment, that is a risky trade.
Drive cycle resets take patience
The slowest route is letting the car clear itself after the original problem has corrected. One expert source says that after a self-corrected issue such as a tightened gas cap, the ECU may clear the code automatically after 3 to 5 drive cycles, with confirmation recommended over roughly 100 miles of mixed driving AMP Auto's clear-light guide. That approach makes sense only when the problem was temporary and the repair has already happened.
If the fault is still there, a battery disconnect only buys time. The code comes back because the ECU sees the same problem again.
The practical comparison is simple. Battery disconnect is fast but messy. Fuse removal is a little more precise but still a shortcut. Drive cycles are gentle on the vehicle and do not erase settings, but they only make sense when the problem corrected itself and you can afford to wait. For drivers trying to avoid a smog-day surprise, a clear-light trick is not the same as a compliant car. If you want a fuller look at what tends to trigger inspection trouble, this smog fail reasons guide for San Leandro drivers is a useful reference.
Common Causes Behind the Light and When to Seek Repair
A light on the dash doesn't tell the whole story, but the code family usually points in the right direction. A loose gas cap is one of the easiest fixes, while issues tied to sensors, misfires, or the catalytic converter often need more attention. The smart move is to match the symptom to the repair, not to clear the alert and hope the problem behaves.
What the usual suspects look like in practice
| Common Cause | Typical Code | DIY Fixable | Estimated Cost Range |
|---|---|---|---|
| Loose or damaged gas cap | EVAP-related codes | Yes, often | Usually low |
| Oxygen sensor problem | Sensor-related codes | Sometimes, if accessible | Moderate |
| Mass airflow sensor issue | Air metering codes | Sometimes | Moderate |
| Spark plug wear or misfire | Misfire codes such as P0300 | Sometimes, if the service is basic | Variable |
| Catalytic converter issue | Efficiency codes such as P0420 | No, usually not | High |
The exact code matters because different failures affect the car in different ways. A gas cap may be a quick driveway fix, while a catalytic converter concern is a different level of problem altogether. If you want a fuller breakdown of what tends to trip a smog inspection, this smog fail reasons guide for San Leandro drivers is a useful reference.
Which repairs are worth doing yourself
A gas cap replacement is the easiest DIY call when the cap is cracked, loose, or won't seal properly. Some spark plug work is also reasonable if you already know the vehicle and have the right tools. But once the issue involves emissions sensors, misfires that keep returning, or catalyst efficiency codes, the odds favor a proper diagnosis instead of repeated resets.
Real-world test: if the code returns after a reset and a short drive, the car is telling you the fault is still live.
The mistake many drivers make is treating every code like a nuisance. That approach can backfire fast because a small issue left alone can become a larger repair later. A reset is useful only when it follows the right repair, not when it replaces one.
California Smog Test Implications You Cannot Ignore
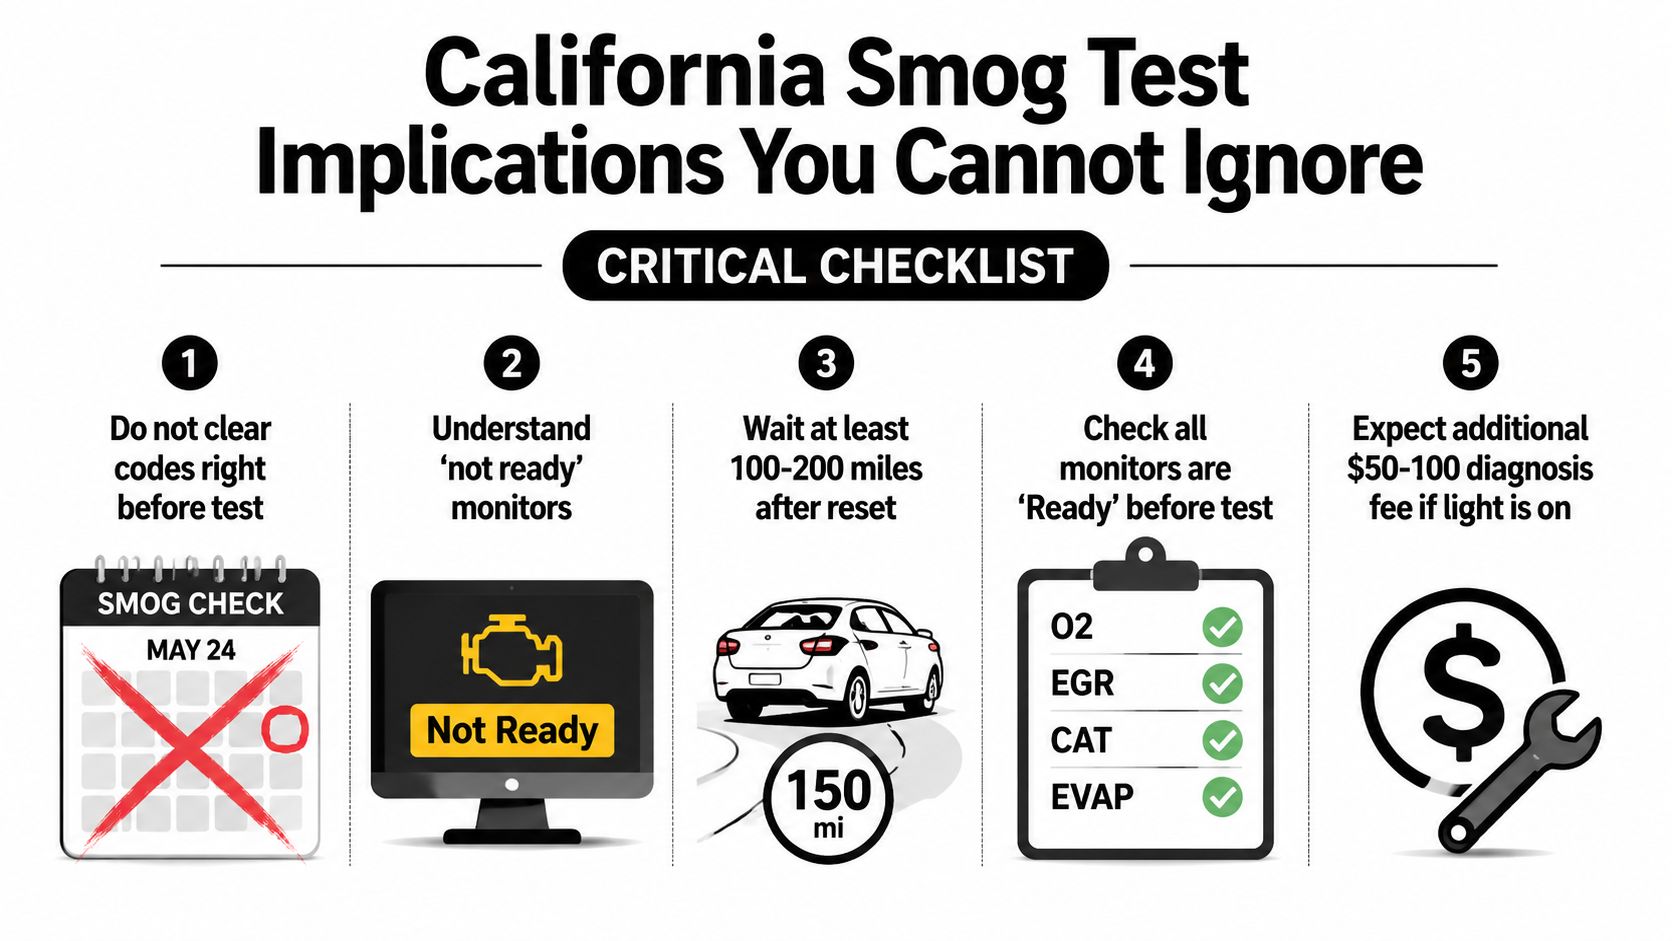
Many East Bay drivers get burned here. Clearing the light right before a smog appointment feels like a fast fix, but it also resets the readiness monitors that inspectors check before the emissions test. If those monitors show Not Ready, the car can be turned away even when the dashboard looks clear.
That is the hidden cost of a quick reset. You may erase the warning on the dash, but you do not erase the inspection problem.
Why timing matters more than most drivers think
After a reset, the vehicle needs time and the right driving conditions to rebuild readiness. Clearing codes the night before a test often leaves the computer without enough time to rerun its self-checks, so the station sees an incomplete snapshot instead of a verified one. A five-step checklist illustrating important tips for passing a California smog test for vehicles. spells out the same basic problem, a recent reset can leave the monitors unfinished when it matters most.
California drivers also need to treat the smog appointment as a compliance check, not a convenience check. If the system is not ready, the station does not give extra credit for a recent reset. It just has less to verify.
Repair first, then drive long enough for the monitors to complete before you book the test. A monitor that says Ready means the car has had a fair chance to run its checks after the repair and reset. That is the condition you want before you pull into a California inspection lane.
Smog stations and the compliance angle
For drivers who want an inspection that lines up with California requirements, a STAR Certified station is usually the safer lane because it follows the higher standard used for DMV-recognized testing. If the goal is a registration renewal that does not come back with another problem, a place like Speedy Smog's check engine light smog test page fits that need because it focuses on the testing process instead of a guess-and-hope reset.
A recent reset can make a car look cleaner than it really is. That matters because a smog lane is checking for readiness and compliance, not just a blank dash. As noted earlier, code clearing has its place, but using it as a last-minute smog strategy usually creates more trouble than it solves.
The practical move is simple. Clear the code after the repair, then give the car time to prove it is ready before the test.
Prevention Tips and Your Reset Decision Framework
The cheapest check engine light is the one that never shows up. Regular maintenance keeps the emissions system from drifting into the kind of fault that turns into a code, a failed test, or a hurried reset attempt. That means handling routine service before the car starts complaining.
Maintenance habits that prevent nuisance codes
- Change oil on schedule: Dirty oil can create avoidable stress on the engine and related systems.
- Tighten the gas cap properly: A sloppy seal is one of the simplest ways to invite an emissions warning.
- Replace air filters when they're due: Restricted airflow can make the engine work harder than it should.
- Keep spark plugs in good shape: Old plugs can contribute to rough running and misfire behavior.
- Take longer drives now and then: Short trips alone don't always let the system run its checks cleanly.
Use a simple decision tree
If the light is steady, read the codes first. If the code points to a clear mechanical issue, repair it before clearing anything. If the issue looks minor and the fault has already been corrected, a proper scanner reset makes sense, followed by a drive cycle and monitor check.
If the light is flashing, stop treating it like a maintenance task and get help. If the code comes back after a reset, the fault wasn't solved. If your smog deadline is close and the monitors haven't finished, don't gamble on a last-minute clear.
A final practical note for East Bay drivers. Speedy Smog handles smog checks for 2000 and newer vehicles, 1999 and older models, diesels, and hybrids, and typical tests for newer vehicles are completed in about 10 to 15 minutes at its San Leandro location Speedy Smog about page. That makes it a sensible stop when you want a compliant result instead of a rushed reset.
If your check engine light is on, bring the car in after the repair and let a proper smog station confirm where it stands. Visit Speedy Smog for a fast, California-compliant inspection in San Leandro, and avoid the mistake of clearing codes right before your test only to get sent back for unreadiness.
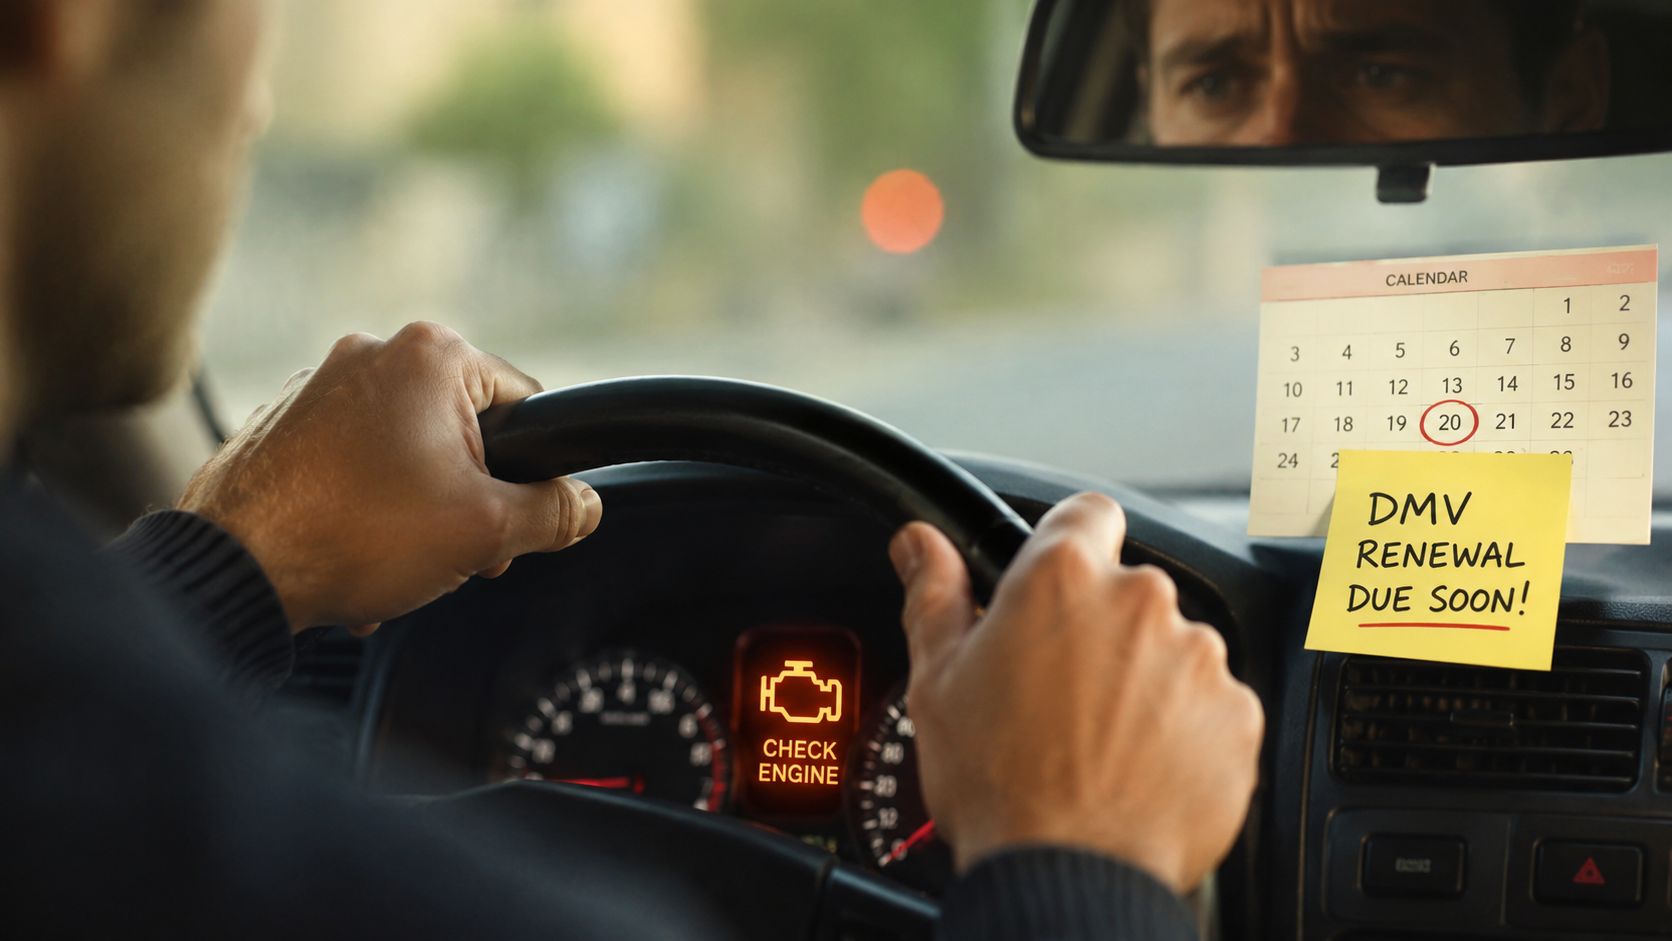
You're driving in the East Bay, the DMV renewal notice is sitting on the counter, and then that orange check engine light comes on. It's the kind of timing that makes a simple errand feel like a deadline you can't ignore. In California, that light isn't just annoying, it's tied directly to whether your car can pass Smog Check.
The good news is that this problem is usually manageable if you handle it in the right order. Diagnose the fault, repair it, make sure the light stays off, and then give the car enough time to finish its self-checks before you test. California's Smog Check program is built to catch emissions problems at scale, and the California Air Resources Board says it removes about 400 tons of smog-forming pollutants every day from California's air. California Smog Check program background
Table of Contents
- That Sinking Feeling Your Check Engine Light and the Smog Test
- California Rules Why an Engine Light Guarantees a Fail
- Decoding the Message Reading Your Car's Trouble Codes
- Common Culprits Behind the Check Engine Light
- The Critical Step The Post-Repair Drive Cycle
- When to Visit a STAR Station Like Speedy Smog
That Sinking Feeling Your Check Engine Light and the Smog Test
The timing usually feels personal. A driver notices the check engine light on the commute home, then finds the DMV notice that says the smog certificate is due, and suddenly the whole week turns into calls, guesses, and maybe one too many internet searches. At a STAR-certified station, that combination shows up all the time, and the pattern is familiar enough to be reassuring.
A common mistake is treating the light like a simple warning lamp. In California, it's also a sign that the vehicle is reporting an emissions-related problem, which is exactly what Smog Check is designed to catch. That's why a quick reset or a hopeful drive around the block usually doesn't solve the bigger issue.
The state's program is not small or casual. The California Air Resources Board says the Smog Check program removes about 400 tons of smog-forming pollutants every day from California's air, which explains why the inspection rules stay strict. When a system is supposed to protect air quality at that scale, an illuminated warning light gets taken seriously.
The most useful mindset is simple. Don't treat the light as a mystery to outsmart, treat it as a diagnostic clue that needs to be understood before you show up for the test. That approach saves time, avoids repeat visits, and keeps the repair path clear.
Practical rule: if the light is on now, the inspection problem starts at the repair bay, not at the test lane.
California Rules Why an Engine Light Guarantees a Fail
California's rule is direct. If the check engine light is on, the vehicle has to be repaired before Smog Check, and it will not pass with the light illuminated. The California BAR Smog Check rules make that clear, and there isn't a workaround built into the inspection.
That matters because this rule reaches a wide range of vehicles. California's Smog Check program applies to gasoline, hybrid, and alternative-fuel vehicles model year 1976 and newer, and also to diesel vehicles model year 1998 and newer. So this is not a niche issue for one engine type or one age group, it affects a broad slice of drivers.
Why the state treats the light as a hard fail
The light is tied to the emissions system, not just engine performance. When it comes on, the vehicle's computer is telling you that something in the emissions control path needs attention. The inspection is built to catch exactly that condition, which is why the light itself is enough to stop the test.
If you want the state-level rule in plain English, it's this. A lit malfunction indicator means the car is currently reporting an emissions problem, and California won't certify a car in that condition. That's the same reason drivers often hear that the repair comes first and the test comes second.
For a simple overview of what California drivers should expect at the station, see these California Smog Check rules explained for drivers. The key takeaway is still the same, don't book the test until the light is out and the vehicle is ready to be checked.
A lit warning light isn't a judgment call at the counter. It's a pass-fail condition built into the program.
Decoding the Message Reading Your Car's Trouble Codes
A code reader gives you the first real clue. Most cars use an OBD-II port, which is the small connector the technician or scanner plugs into to read stored trouble codes. Once you know the code, you're no longer guessing, and that changes the whole repair conversation.
There are two practical ways to get those codes. You can buy a basic scanner and read them yourself, or you can go to an auto parts store that offers code reading as a free service. Either way, the point is the same, get the code before anyone starts clearing lights or replacing parts.
Start with the code, not the dashboard light
The dashboard only tells you that the car sees a problem. The code tells you where to look. A P0420 code usually points toward catalyst efficiency concerns, while a P0455 code generally points to a large evaporative emissions leak.
| DTC Code | Common Cause | What It Means |
|---|---|---|
| P0420 | Catalyst system concern | The catalytic converter system may not be working efficiently |
| P0455 | Large EVAP leak | The evaporative emissions system may have a major leak |
| P0300 | Random misfire | The engine is misfiring in more than one cylinder |
| P0171 | Lean fuel condition | The engine may be getting too much air or not enough fuel |
| P0442 | Small EVAP leak | A small leak is affecting fuel vapor control |
A code is not a diagnosis by itself. It points you toward the system that needs inspection, which might be something simple or something that needs a shop's tools and experience. That distinction matters because replacing the wrong part gets expensive fast.
Two ways to use the code without wasting money
If the code points to a loose cap or an obvious hose issue, you may be able to solve it quickly. If it points to an emissions sensor, a catalyst issue, or a recurring misfire, it's smarter to confirm the repair path before you pay for parts. For a step-by-step example of this process, this guide to reading OBD codes is a practical place to start.
The code is the map. The repair is the trip.
Common Culprits Behind the Check Engine Light
Some check engine lights come from problems you can spot with a few minutes under the hood. Others point to parts that need proper diagnosis, because replacing them by guesswork usually doesn't fix the underlying issue. A good triage process keeps you from overspending on the easy stuff and underestimating the hard stuff.
The simple checks drivers can handle first
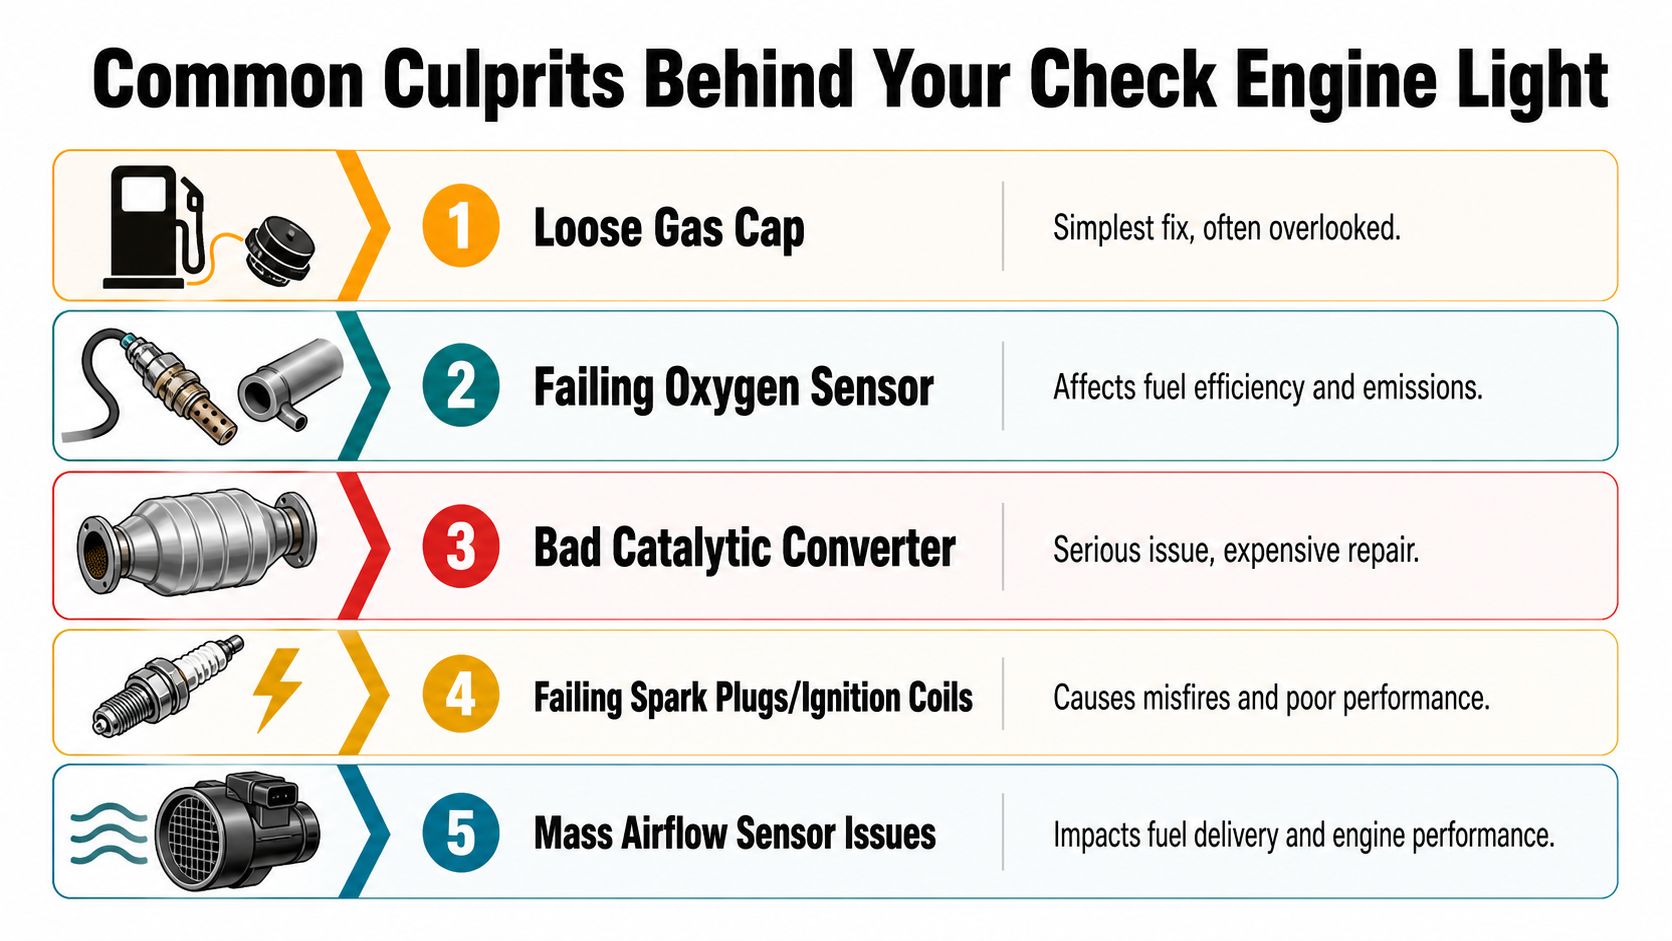
A loose gas cap is the classic quick fix. Tighten it until it clicks, then give the car time to see whether the system clears on its own. That small step can matter because the evaporative emissions system is sensitive to pressure loss.
A code tied to the evap system does not always mean a major repair. Sometimes the problem is a cap that wasn't sealed fully, or a small leak in a hose you can inspect visually. That's the kind of issue worth checking before you spend money on parts.
The problems that usually need a shop
A failing oxygen sensor can affect how the engine manages fuel and emissions. A bad catalytic converter is usually a bigger repair and often points to an upstream problem that needs to be corrected too. A mass airflow sensor issue can throw off air measurement and lead to poor drivability or a recurring light.
Spark plugs and ignition coils are worth attention as well, especially when misfire codes are present. Those parts can create rough running, and a car that misfires won't give you a clean inspection result. The important thing is not to replace parts in isolation when the code points to a deeper fault.
Speedy Smog in San Leandro is one option drivers use when they want the inspection side handled by a STAR Certified station that understands these common failure patterns. That doesn't replace a real repair, but it does help once the vehicle is close and you want the testing done by a station that works under BAR standards.
The practical rule is simple. If the fix is obvious and cheap, handle it first. If the code points to a sensor, catalyst, or misfire path, get the diagnosis right before the retest.
The Critical Step The Post-Repair Drive Cycle
A common pitfall for many drivers is that the light goes off, the repair seems successful, and the car still fails because the computer hasn't finished its internal self-checks yet. Those self-checks are the readiness monitors, and they matter just as much as the lamp itself.
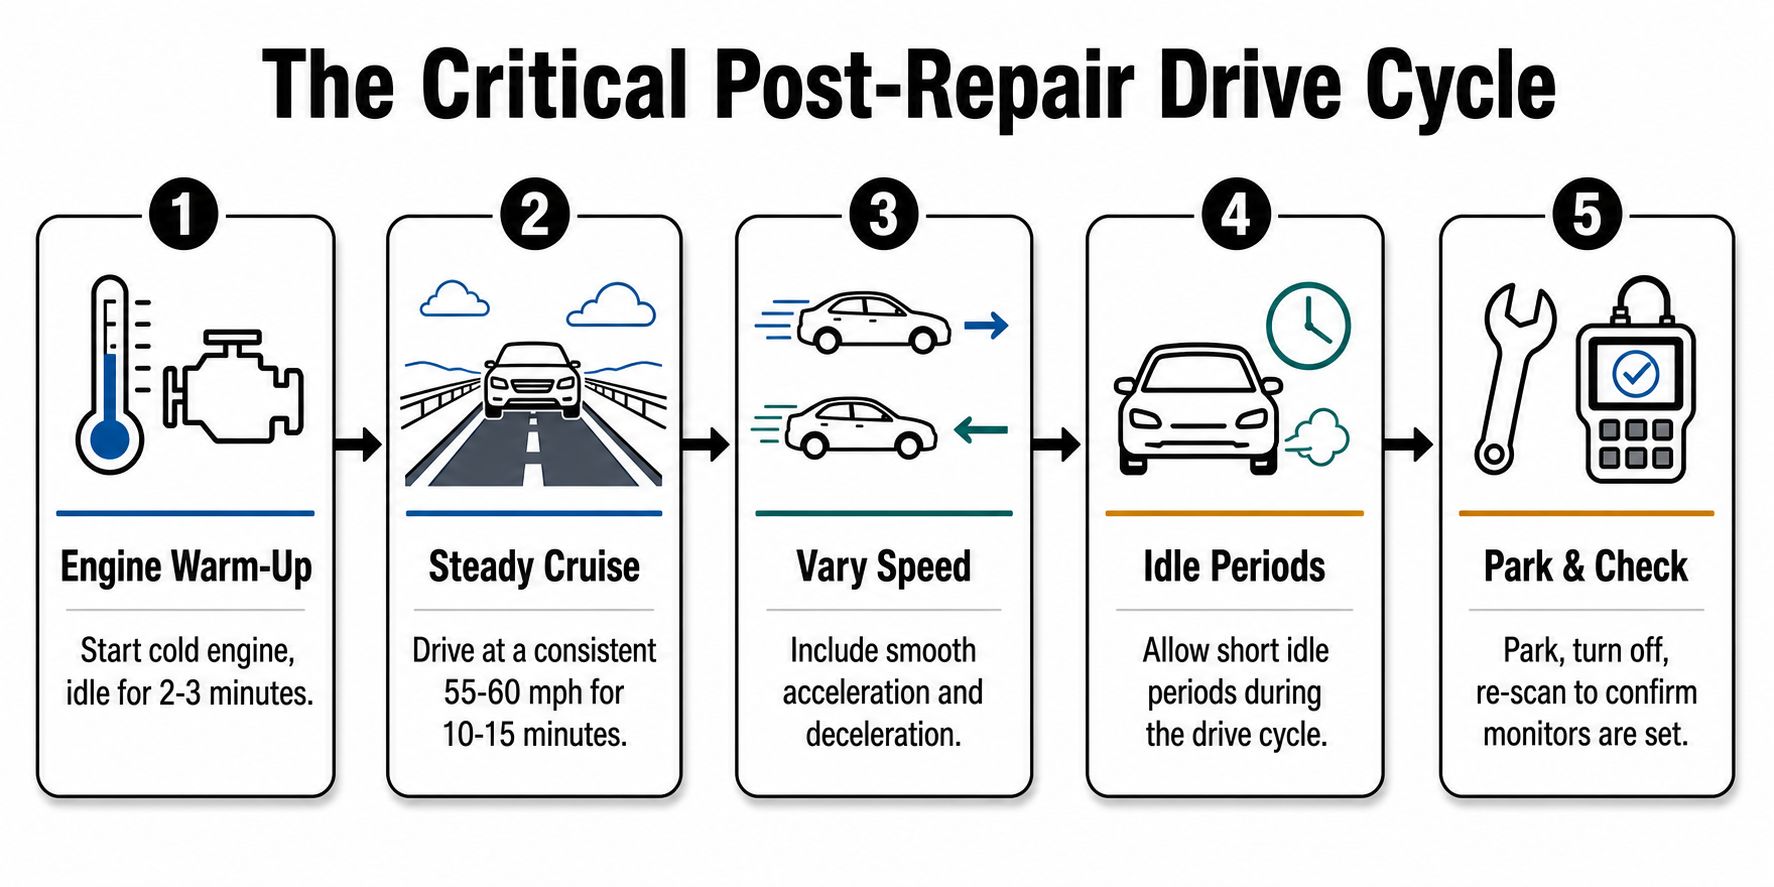
The BAR says that after a battery disconnect or replacement, drivers may need to drive one to two weeks so readiness monitors reset before testing. That's because modern inspections use the vehicle's onboard diagnostics to confirm that emissions-related checks have completed. If the monitors are still not ready, the car can still miss certification even if the dashboard looks calm.
Why clearing the code is not the finish line
A scan tool can erase a code, and a disconnected battery can wipe memory, but neither one proves the repair worked. The computer still needs normal driving time to rerun its tests. That gap between “light is off” and “car is ready” is where many unnecessary return trips happen.
For 2000-and-newer vehicles, this matters especially because BAR says most of these are checked through the onboard diagnostic system rather than tailpipe testing. So the station is looking at what the car knows about itself, not just whether the warning lamp is visible. The repair has to be confirmed by the monitor status.
What the drive cycle really means in practice
A drive cycle is just a period of normal driving that lets the car complete its self-checks. The exact pattern varies by vehicle, but the goal is steady, mixed driving with enough time for the system to run. Short errands around the corner usually aren't enough.
If you just repaired the car, don't rush the retest. Give it the time the BAR recommends, drive it normally, and confirm the readiness status before you return to the station. That one habit prevents a lot of failed inspections that feel confusing to drivers who already paid for a repair.
Practical rule: no ready monitors, no certificate, even if the light is off.
When to Visit a STAR Station Like Speedy Smog
There's a point where DIY stops being efficient. If the code keeps coming back, if the car has an intermittent problem, or if the monitor status won't set after a repair, a professional inspection lane gives you a cleaner next step. A STAR Certified station is held to higher performance standards set by the BAR, which matters when you want the test handled in a compliant, straightforward way.
A good station doesn't replace the repair, but it does reduce confusion. The technician can verify whether the light is off, whether the monitors are ready, and whether the vehicle is positioned for a clean test. If you're trying to avoid repeated trips across town, that kind of clarity is worth a lot.
When professional testing makes more sense
- Complex or repeating codes: If the same fault returns after a basic fix, the cause probably goes deeper than the first part you swapped.
- Post-repair uncertainty: If the light is off but you're not sure the monitors are ready, the station can confirm the inspection status before you guess.
- Convenience and compliance: If you want the smog work done by a station that handles the inspection cleanly and explains the result, that's the time to use a certified shop.
For drivers who want a more detailed look at the STAR path, this explanation of how to pass a STAR smog test gives a useful overview. In San Leandro, Speedy Smog is one station that offers the inspection side of that process for drivers who already know the repair situation is under control.
Bring the car in when the light is off, the repair is done, and the monitors have had time to set. That's the cleanest path to certification, and it keeps the whole process from turning into a cycle of failed retests and extra downtime.
A CTA for Speedy Smog.
You walk out to your car, start it up, and there it is. The check engine light. Maybe the car feels fine. Maybe it has a rough idle, poor acceleration, or a smell you didn't notice last week. Either way, that little light can make a simple drive feel expensive fast.
The good news is that the light isn't a verdict. It's a message. Modern vehicles have a built-in way to tell you what system noticed a problem, and learning how to read OBD codes gives you a practical first step before you guess, replace parts, or hand the car over to a shop. The code itself matters, but the key difference between a quick answer and a wrong one often comes from the extra context professionals use, especially freeze-frame and live data.
Table of Contents
- That Dreaded Check Engine Light What It Really Means
- Choosing Your Code Reading Toolkit
- The Step by Step Guide to Reading Your Codes
- Decoding the Alphabet Soup P C B and U Codes
- Beyond the Code Freeze Frame and Live Data Insights
- Next Steps Clearing Codes and When to Call a Pro
That Dreaded Check Engine Light What It Really Means
You're driving home, the car feels mostly normal, and that amber check engine light pops on. Most owners ask the same two questions right away. Can I keep driving, and how serious is this?
Sometimes the issue is minor. Sometimes it points to a problem that can get expensive if you wait. Treat the light as an early warning, then verify what the car is complaining about before replacing parts or clearing anything.

What the light is actually doing
On OBD-II vehicles, the check engine light means the computer has seen a fault and stored information about it. That stored information usually includes a diagnostic trouble code, and many vehicles also save freeze-frame data showing the conditions present when the fault set. Engine load, coolant temperature, fuel trim, and RPM often matter just as much as the code itself.
That context is what separates a useful diagnosis from guesswork.
The code tells you which system complained. It does not automatically identify the failed part. A misfire code, for example, can come from ignition trouble, a fuel delivery issue, a vacuum leak, or even a mechanical problem inside the engine.
The check engine light starts the diagnostic process. It does not finish it.
Why owners get tripped up
The same warning light can show up for problems with very different levels of urgency. A loose gas cap, an aging oxygen sensor, an EVAP leak, or a fault affecting how the engine runs can all trigger it. From the driver's seat, they look identical.
That's why reading the code is only step one. Good diagnosis comes from pairing the code with freeze-frame details and, if your scan tool allows it, live data. Professionals rely on that extra information every day because it helps answer the question owners want to know. Is this a small fix, something that can damage the car, or an emissions issue that needs closer testing?
If registration is coming up, a warning light can also affect your inspection outcome. You can see how that works in these check engine light and smog test requirements.
One more practical point. If the light is flashing, stop driving as soon as it is safe and have the car checked. A steady light usually gives you more room to diagnose carefully. A flashing light often means an active misfire that can damage the catalytic converter fast.
Choosing Your Code Reading Toolkit
The right scanner saves time before you ever read the first code. A cheap tool that only spits out a fault number can leave you guessing. A better one shows the conditions behind that code, which is where diagnosis starts to get useful.
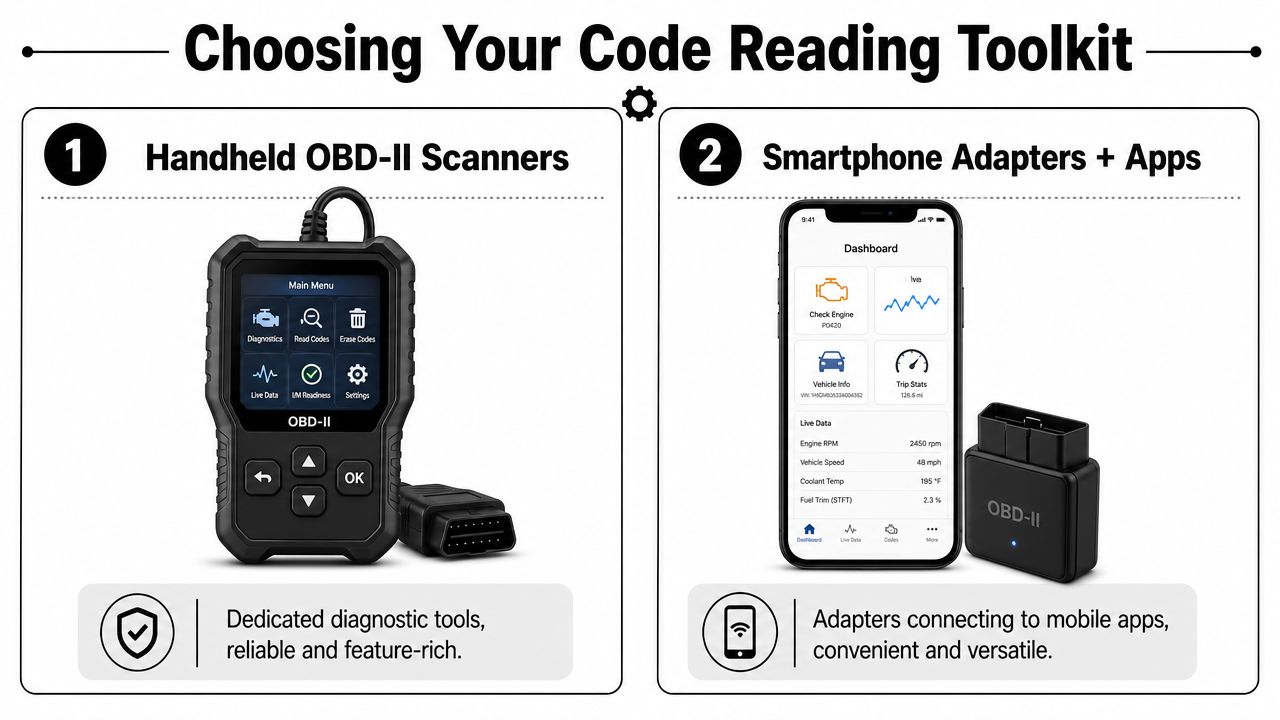
Handheld scanner or phone-based adapter
A handheld scanner fits drivers who want a dedicated tool that works every time you plug it in. No pairing. No app permissions. No dead phone battery in the driveway. I still like handheld units for quick checks because they are simple and usually less frustrating when all you want is the code and basic data.
A Bluetooth or Wi-Fi adapter paired with an app gives you more room to work. The phone screen is easier to read, and many apps do a better job showing freeze-frame details, live sensor values, and saved reports. The trade-off is setup. Some apps are excellent, some are cluttered, and some adapters lose connection at the worst time.
Here is the practical comparison:
| Tool type | Best for | What works well | Trade-off |
|---|---|---|---|
| Handheld scanner | Owners who want a dedicated tool | Fast setup, no phone required, straightforward menus | Smaller screens can make data harder to review |
| Smartphone adapter + app | Owners who want more detail and portability | Easier data review, app-based visuals, convenient storage | Setup depends on app quality and phone compatibility |
What every tool should handle
Start with compatibility. The tool needs to read standard OBD-II codes through the 16-pin connector used on U.S. cars and light trucks built since 1996. It should also show more than a code description.
These features matter most:
- Stored and pending codes so you can catch faults that come and go.
- Freeze-frame data so you can see engine load, coolant temperature, fuel trim, and other conditions present when the code set.
- Live data or PID viewing so you can check whether the problem is happening now or only under certain conditions.
- Clear code definitions that go beyond a vague one-line label.
Buying rule: Choose the cheapest tool that can read freeze-frame and live data clearly. That extra context is often the difference between replacing a part and actually fixing the problem.
Which one fits your car and your habits
For occasional use on one vehicle, a decent handheld scanner is often enough. For owners who like to save scans, compare readings, or watch sensor behavior during a road test, a phone-based setup usually gives you more for the money.
Vehicle type matters too. Gas vehicles are usually straightforward at the basic code-reading stage. Diesel emissions systems can get more complicated fast, especially when you are dealing with monitors, aftertreatment faults, or inspection concerns. If that applies to your vehicle, this guide to a California diesel smog check process gives helpful background before you decide whether to keep diagnosing at home or book a specialist.
The Step by Step Guide to Reading Your Codes
The actual process is easier than generally expected. Problems usually come from rushing, plugging into the wrong port, or turning the key at the wrong time.
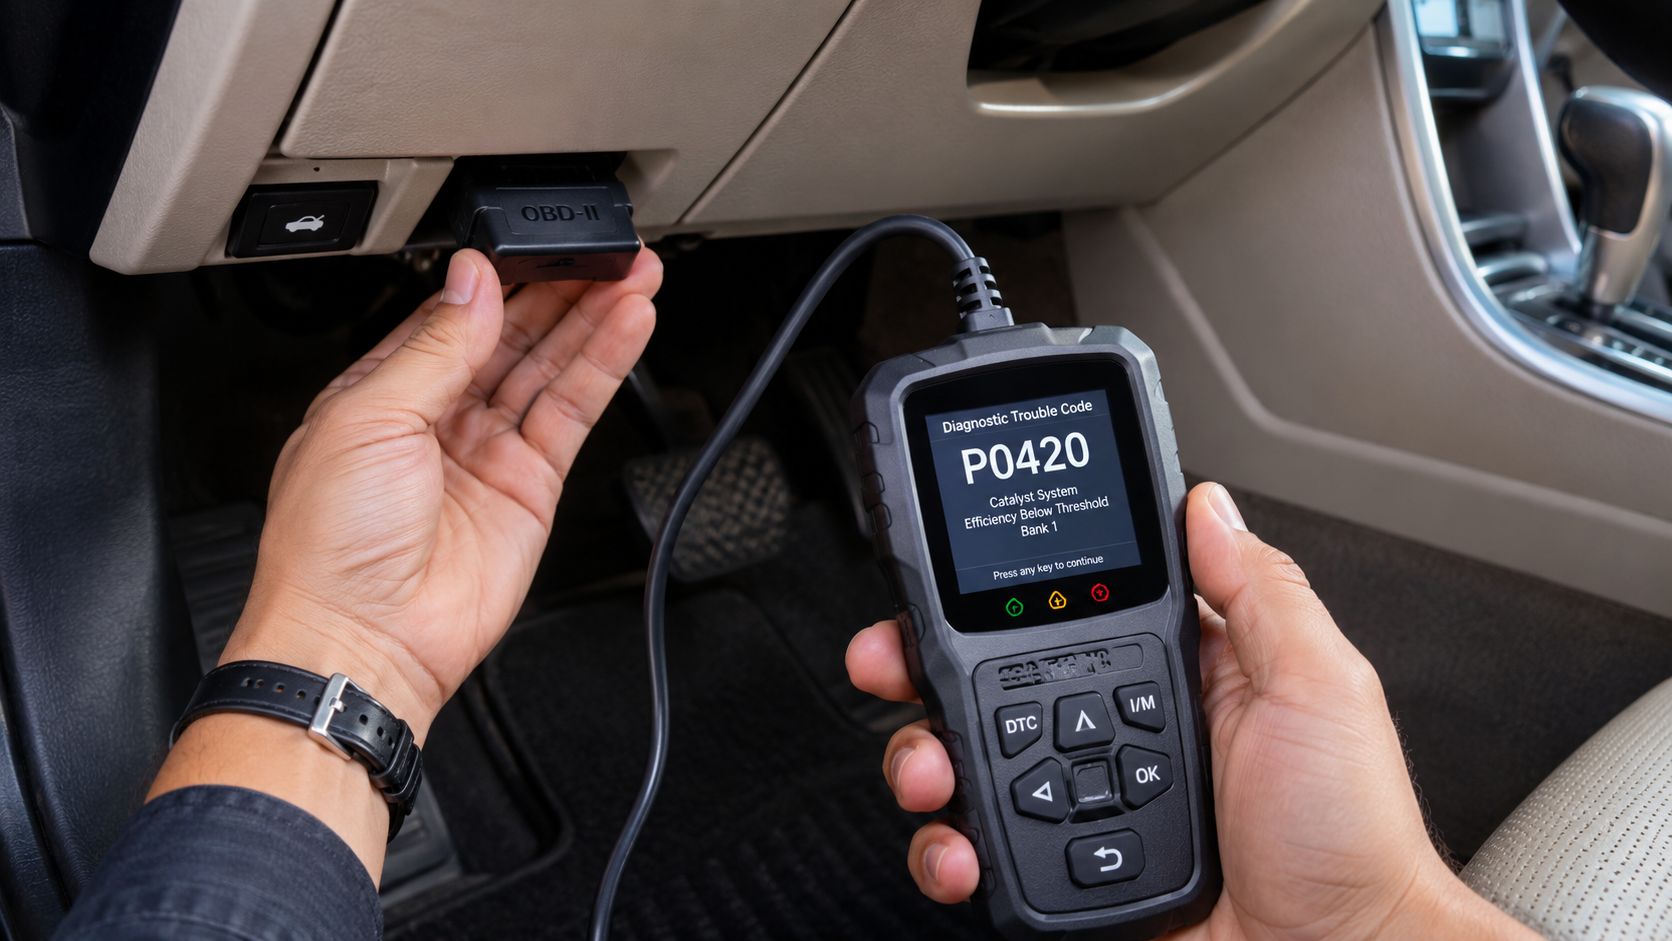
Find the port and connect the tool
Look under the driver's side of the dashboard, usually near the steering column. The connector is a 16-pin trapezoid-shaped port. In most cars, it's visible without removing trim, though sometimes it's tucked slightly upward.
Once you've found it:
- Turn the engine off before plugging the scanner in.
- Insert the scanner firmly so the connection is fully seated.
- Turn the ignition to ON without starting the engine.
- Wait for the scanner to initialize and communicate with the car's computer.
- Choose Read Codes from the menu.
According to Raise A Hood, following that standard sequence on post-1996 OBD-II vehicles gives a success rate of over 95% when done correctly. Their guide also stresses that you should record all codes before clearing anything, because pending codes can point to intermittent faults. You can review that method in their article on reading diagnostic codes before you visit the shop.
What to write down before you do anything else
Don't trust your memory. Write down:
- The full code exactly as shown
- Whether it's stored or pending
- Any symptom you noticed such as rough idle, hesitation, or hard start
- Whether the light came on during cold start, highway driving, or stop-and-go traffic
That last part matters because faults often show up only under certain conditions.
A quick visual walk-through helps if you've never done this before:
Mistakes that cause bad reads
Most failed attempts come from a few common issues:
- Key in the wrong position. If the ignition isn't in ON, the ECU may not wake up for communication.
- Loose connection. The plug has to be seated fully.
- Starting the engine too soon. For basic code retrieval, start with key on, engine off.
- Clearing too early. That wipes out clues you may need in ten minutes.
If the scanner powers up but won't link, stop and retry the sequence instead of stabbing through menus. Clean process beats speed here.
Decoding the Alphabet Soup P C B and U Codes
A code only helps if you can read the structure correctly. I see a lot of DIY scans go off track because the owner searches the last two digits and misses the letters and earlier numbers that tell you which system is even talking.
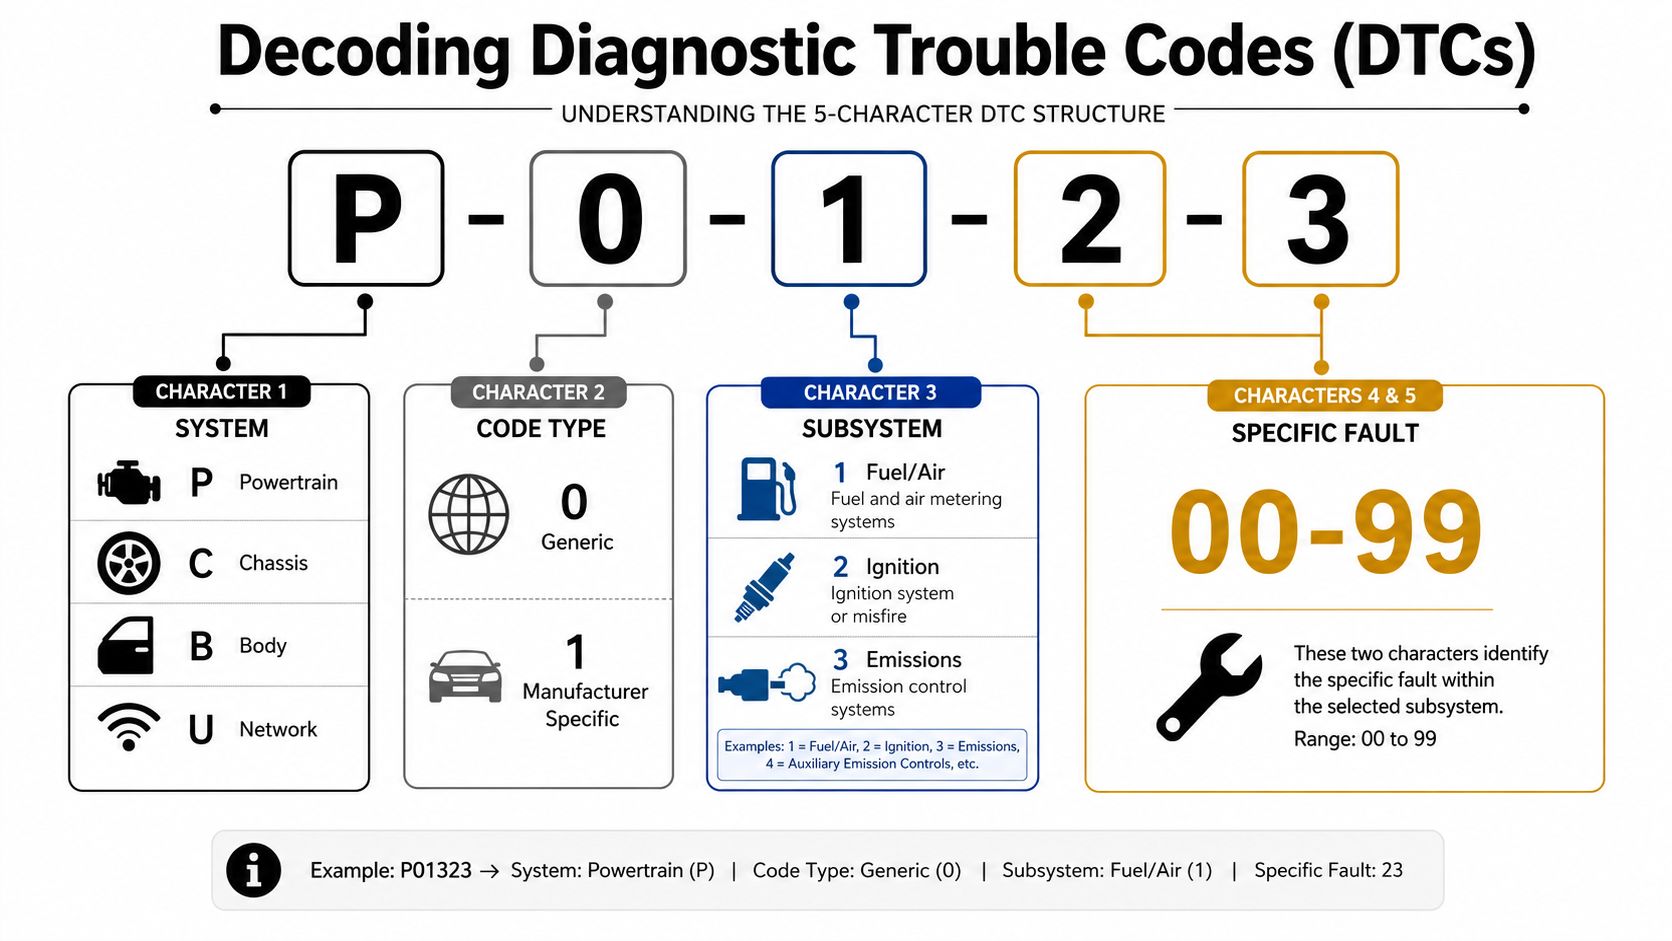
Every standard DTC has five characters. Read them left to right, because each position narrows the fault down a little more.
Start with the first letter
The first character identifies the part of the vehicle that set the fault:
- P = Powertrain, usually engine, transmission, fuel, ignition, and emissions-related systems
- C = Chassis, such as ABS, steering angle, or suspension-related controls
- B = Body, including airbags, climate control, lighting, and other cabin or body systems
- U = Network/Communication, meaning modules are not talking to each other the way they should
If the check engine light is on, you will usually find a P-code. Still, U-codes matter more than many owners expect. A communication fault can trigger symptoms that look like a bad sensor when the actual problem is voltage loss, wiring trouble, or a module that drops off the network.
The second digit tells you how specific the code is
The second character is usually the first number, and it tells you whether the code is generic or manufacturer-specific.
- 0 = generic SAE/OBD-II code
- 1 = manufacturer-specific code
- 2 and 3 can also appear on some vehicles, depending on the system and standard used
That distinction matters practically. A generic P0* code usually has a standard meaning across brands. A P1* code often needs a factory service chart or a better scan tool description to avoid guessing.
The third digit points to the subsystem
The third character groups the fault into a smaller category inside that main system. On many powertrain codes, for example, it often lines up like this:
- 1 or 2 = fuel or air metering
- 3 = ignition or misfire
- 4 = emissions controls
- 5 = idle control or vehicle speed input
- 7, 8, 9 = transmission-related faults on many vehicles
These categories are useful, but they are still only a map. They do not confirm the failed part.
The last two digits identify the fault
The fourth and fifth characters narrow it down to the specific fault that the computer recognized. That is where you get the familiar code itself, such as P0300 or P0420.
Here is a practical example.
Example: P0300
| Character | Meaning |
|---|---|
| P | Powertrain |
| 0 | Generic code |
| 3 | Ignition/misfire category |
| 00 | Specific fault ID |
P0300 means random or multiple cylinder misfire detected.
That does not mean you should install plugs, coils, or injectors right away. I have seen P0300 caused by vacuum leaks, low fuel pressure, valve sealing problems, bad grounds, and even incorrect airflow readings. The code gives you the system and the symptom path. Freeze-frame and live data are what separate a smart first check from parts swapping.
Why P, C, B, and U codes should change your next step
A P-code often sends you toward engine performance or emissions diagnosis. A C-code may push you toward ABS or stability control data that a basic code reader cannot access. A B-code can point to a body control issue that has nothing to do with drivability. A U-code often calls for wiring checks, module communication testing, or battery and charging system checks before anything else.
That is also why scan tool capability matters. A cheap reader may show only generic powertrain faults, while a better tool can read pending, enhanced, and manufacturer data across multiple modules. If you are also trying to get a vehicle ready for inspection, it helps to understand how OBD readiness monitors affect smog testing before you clear anything.
Quick decoder table
| Code part | What it tells you |
|---|---|
| 1st character | System family such as P, C, B, or U |
| 2nd character | Generic or manufacturer-specific code type |
| 3rd character | Subsystem category |
| 4th and 5th characters | Specific fault identifier |
Read the whole code before you search it. That habit alone prevents a lot of wrong turns.
Beyond the Code Freeze Frame and Live Data Insights
DIY code reading becomes real diagnosis. The code is the headline. Freeze-frame data and live data tell you what was happening when the problem showed up and whether the system is still acting up now.
Why freeze-frame matters
Freeze-frame data is a snapshot taken when the fault set. Depending on the vehicle and tool, it may show things like RPM, temperature, and speed at the time of failure. That context is often what separates a one-time hiccup from a repeatable fault.
Ignoring freeze-frame data is a major source of bad diagnosis. Mobile Elite Auto reports that nearly 60% of misdiagnosed OBD issues come from overlooking that operating context, especially on hybrid and diesel vehicles where fault patterns can depend heavily on conditions. Their article on reading OBD-II codes and interpreting vehicle health is one of the few consumer-level explanations that highlights this gap.
What live data helps you confirm
Live data shows readings while the car is running. Depending on your scanner, that can include sensor voltage, oxygen readings, and RPM. Instead of just seeing that a code exists, you can watch whether a sensor is stuck, slow to respond, or behaving normally while another issue is causing the fault.
Use it to answer practical questions:
- Does the fault happen cold or hot
- Is the sensor reading changing logically
- Does the engine smooth out when conditions change
- Do the numbers line up with the symptom you're feeling
Shop habit: Pull the code, save the freeze frame, then look at live data before you order parts.
If you're dealing with emissions-related faults, readiness status becomes part of the picture too. This guide to OBD readiness monitors is helpful when you're trying to understand why a recently repaired or recently cleared vehicle still isn't ready for inspection.
Next Steps Clearing Codes and When to Call a Pro
A lot of drivers clear the check engine light the minute they see a code. I get the temptation. The light turns off, the dash looks normal again, and it feels like progress. But if you erase codes before you finish diagnosing the problem, you also erase the history that helps confirm what failed.
That matters even more if you just spent time checking freeze-frame and live data. Those details are what separate a useful code pull from a parts guessing exercise.
The right order
Follow this sequence instead:
- Write down every code and save the freeze-frame data your scanner shows.
- Compare the code to the symptom so you're testing a problem, not chasing a label.
- Inspect or repair what the evidence points to.
- Confirm the fix with a recheck, a road test, or live data that now looks normal.
- Clear the code after that, then drive the car through the conditions that originally set the fault.
That order saves time. It also keeps you from losing the clues you may need if the problem comes back.
A simple example is an evap code. If you tighten a loose gas cap and clear the code right away, you still do not know whether the system will pass its self-test. If you check readiness and drive the car through a normal cycle, you get a much better answer.
When DIY stops making sense
Some jobs are reasonable at home. A loose connector, a damaged vacuum line, or a basic ignition problem can be within reach if you have a scanner, a meter, and a little patience.
Other cases need shop-level testing.
Call a pro if:
- The same code returns after you made a repair
- Several codes show up together and do not point to one obvious cause
- You have a manufacturer-specific code with limited service information
- The problem affects emissions readiness or smog inspection results
- The car has drivability symptoms that make road-testing unsafe
- Live data does not match the code and you need deeper circuit or smoke testing
That last point catches a lot of DIY readers. The code may name one sensor, but freeze-frame and live data can show that the sensor is reacting to another fault upstream. That is where a good technician earns their keep. They test the circuit, verify the failure, and avoid replacing parts that were never bad.
A code reader is a strong first step. Accurate diagnosis still comes from context, testing, and knowing when the trail has gone past what you can confirm in your driveway.
If you need a smog inspection or want a trusted local shop for emissions-related concerns, Speedy Smog is a STAR Certified smog check station in San Leandro that helps drivers get accurate, efficient testing without the usual hassle.