You're checking your mailbox, see a DMV renewal notice, and realize your car needs a smog check before you can finish the registration process. The station's equipment may look like a computer, a hose, and a few cables, but that setup is doing far more than sniffing the exhaust. It's identifying the vehicle, checking emissions data, measuring gases when required, and sending a regulated result into California's inspection system.
A smog check machine is best understood as a recurring compliance tool. California's Smog Check Program is biennial, so most covered vehicles are inspected every two years, rather than only when a car is sold or repaired (California Bureau of Automotive Repair). The equipment must therefore produce consistent, defensible results each time a driver returns for renewal.
The confusing part is that California doesn't use one universal machine for every car. A newer vehicle generally receives a computer-focused inspection through BAR-OIS, while an older vehicle may need the exhaust analyzer and dynamometer used by BAR-97. The sensors, software, calibration routines, and technician workflow all change with the vehicle.
This guide breaks down those systems in practical terms. You'll learn what the machine measures, how it determines pass or fail, what a technician does during the inspection, what STAR standards add, and where the equipment has limits.
Table of Contents
- Introduction to Smog Check Machines and Why They Matter
- What a Smog Check Machine Actually Is
- Two Types of Smog Check Machines in California
- What the Machine Measures and How It Decides Pass or Fail
- How Technicians Use the Machine During Your Inspection
- STAR Standards Calibration and Why Machine Quality Matters
- Getting Ready for Your Smog Check and Choosing the Right Station
Introduction to Smog Check Machines and Why They Matter
A DMV renewal notice creates a simple question: can you renew now, or does the vehicle need a passing emissions inspection first? If your car falls under California's Smog Check requirements, the answer depends on obtaining a valid inspection result from an authorized station.
The smog check machine sits at the center of that process. It doesn't decide whether a vehicle is generally “healthy,” and it isn't a substitute for a complete mechanical diagnosis. Instead, it performs the specific emissions checks California requires for the vehicle's model year and configuration, then records the outcome through the state's inspection process.
Practical rule: Treat a smog check as a compliance appointment, not as a complete vehicle health exam.
California built its program around two major inspection paths. The BAR On-Board Diagnostic Inspection System, commonly called BAR-OIS, serves 2000 and newer vehicles. The BAR-97 Emissions Inspection System, or BAR-97, serves 1999 and older vehicles (California Bureau of Automotive Repair). That model-year split explains why one driver may sit in the bay while a technician connects a cable, while another sees the car's drive wheels placed on rollers and a probe inserted into the tailpipe.
The program also has a quality-focused branch called STAR. California created STAR through Assembly Bill 2289 in 2010 to improve inspection quality and help achieve required emissions reductions. STAR stations must maintain equipment capable of testing all vehicles subject to the Smog Check Program (California Bureau of Automotive Repair).
Before arriving, gather the renewal information if you have it and tell the station about warning lights, recent emissions repairs, or a disconnected battery. Those details can affect what the technician sees, especially when the vehicle's onboard diagnostic system hasn't completed its self-checks.
Understanding the machine removes much of the mystery. You'll know which inspection system applies, why the technician follows a particular sequence, and why a reliable result depends on more than the final printed word, “pass.”
What a Smog Check Machine Actually Is
A smog check machine isn't one box with one sensor. It's an integrated inspection system that combines vehicle identification, electronic communication, physical checks, gas measurement where required, software logic, and state reporting.
A useful analogy is a medical checkup. A blood-pressure cuff measures one condition, a blood test measures another, and the clinician combines those observations with your history. The equipment doesn't diagnose every possible illness. It gathers the specific information needed for the appointment.
A smog inspection works in much the same way:
- The technician identifies the vehicle and enters the required information.
- The system communicates with the vehicle's emissions computer when an OBD inspection applies.
- The technician checks emissions-related hardware and signs of tampering.
- The equipment measures tailpipe gases for vehicles requiring that test.
- The software compares the collected information with California's requirements and records the result.
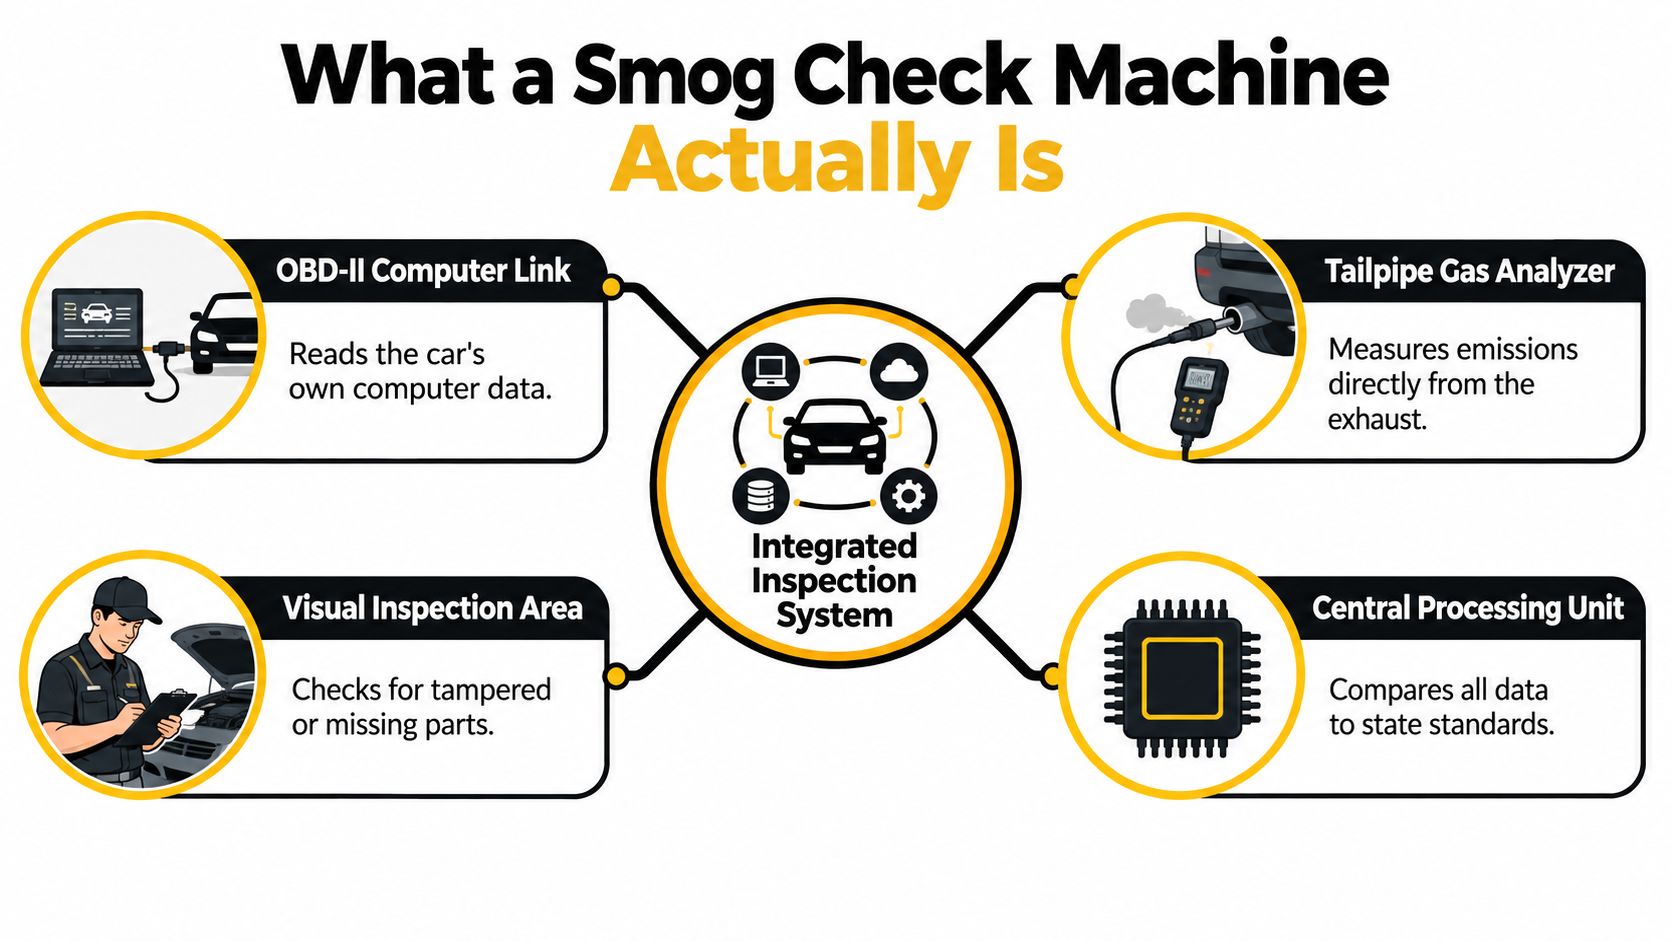
The parts work as one system
The OBD-II connection reads information stored by the vehicle's own emissions-control computer. That computer monitors emissions-related systems and can store diagnostic trouble codes when it detects a problem. The scan gives the inspection system access to data that a tailpipe probe alone can't provide.
A tailpipe analyzer measures gases directly from the exhaust. This is central to the BAR-97 process, where the equipment evaluates pollutants produced while the vehicle operates under specified conditions.
A visual inspection adds another layer. The technician may identify missing, modified, or tampered emissions components that electronic data alone wouldn't prove. The central processing and reporting system then brings the observations together.
The complete platform must be calibrated and operated according to California's rules. That's why the state regulates approved equipment and station procedures, rather than treating any generic exhaust sensor as an acceptable smog check machine.
Two Types of Smog Check Machines in California
A 2001 sedan and a 1998 pickup do not follow the same inspection path. California generally matches the machine to the vehicle's model year and emissions technology. Newer vehicles report much of their emissions information through the onboard computer, while older vehicles are tested by sampling exhaust during operation.
| Feature | BAR-OIS for 2000 and Newer | BAR-97 for 1999 and Older |
|---|---|---|
| Main approach | OBD-focused inspection | Tailpipe emissions inspection |
| Vehicle connection | Electronic link to the vehicle's diagnostic system | Exhaust probe, plus vehicle setup for loaded-mode testing where required |
| Key equipment | BAR On-Board Diagnostic Inspection System | Gas analyzer and chassis dynamometer |
| What it evaluates | Emissions-related computer information and required inspection checks | Direct gas readings under specified operating conditions |
| Typical driver experience | Technician connects to the diagnostic port | Technician positions the vehicle on test equipment and samples exhaust |
BAR-OIS uses the car's own diagnostic information
For a 2000 or newer vehicle, the technician usually connects BAR-OIS equipment to the OBD system. The machine reads emissions-related data, checks stored faults and required monitor status, and combines those results with the rest of the inspection.
The car's computer works like a built-in record keeper. If its sensors detect an emissions problem during driving, the system can store a fault even when the exhaust appears normal while the car sits at idle. An illuminated emissions warning or incomplete diagnostic check can therefore affect the result.
The inspection still includes required vehicle identification and physical checks. BAR-OIS changes where the main emissions evidence comes from. Instead of relying primarily on a universal tailpipe sample, it evaluates information produced by the vehicle's own control systems.
BAR-97 directly measures older vehicle exhaust
For a 1999 or older vehicle, BAR-97 uses a calibrated gas analyzer and a chassis dynamometer for loaded-mode testing. The dynamometer supports the drive wheels on rollers and applies a controlled load, allowing the machine to sample emissions while the vehicle operates under test conditions.
The technician positions an exhaust probe, connects the analyzer, and places the vehicle on the rollers when the procedure requires it. The equipment then records specified gas readings and compares them with the limits assigned to that vehicle. A stationary idle reading alone would not show how the exhaust behaves under the same load.
Diesel vehicles follow a separate inspection path that can rely on smoke opacity testing rather than the BAR-97 gasoline gas analyzer. Confirm that the station is equipped and authorized for the vehicle before booking. This guide to diesel emissions testing equipment explains why diesel inspections require different tools.
The machine's condition also matters. Calibration keeps its measurements within the required operating range, while approved station procedures help ensure the result comes from the correct equipment and test process. That is why two stations may offer different levels of testing capability, especially for older or diesel vehicles.
What the Machine Measures and How It Decides Pass or Fail
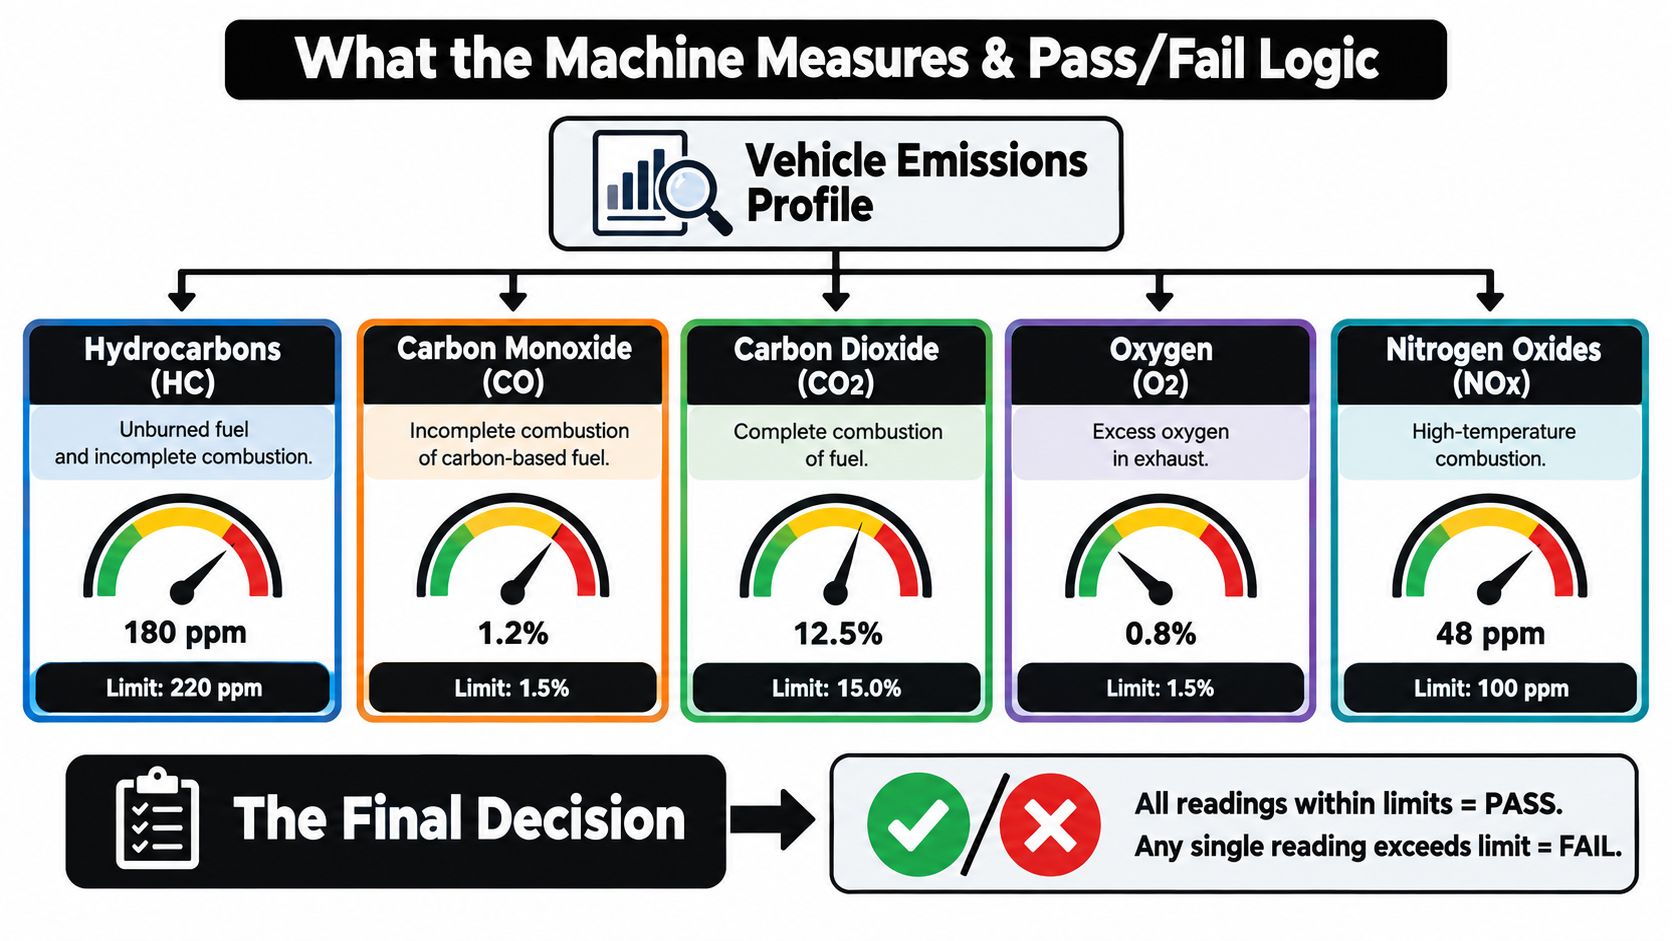
The machine's readings are easier to understand when you treat each pollutant as a clue about combustion and emissions control. Hydrocarbons, or HC, point to unburned fuel. Carbon monoxide, or CO, can indicate incomplete combustion. Carbon dioxide, or CO2, is a combustion product used as part of the measurement picture, while oxygen shows what remains in the exhaust. Nitrogen oxides, or NOx, form under combustion conditions that the emissions system is designed to control.
A BAR-97 system combines several technologies. Its analyzer uses non-dispersive infrared measurement for HC, CO, and CO2, an electrochemical oxygen sensor for O2, and a chassis dynamometer for loaded-mode testing. California regulations require the measured HC, CO, CO2, and NOx values to be compared with table-based cutpoints, and the vehicle passes only when every measured pollutant is at or below the applicable limit (EPA roadside emissions inspection guidance).
Why one pollutant can cause a failure
Suppose an older truck records acceptable CO but excessive HC. That pattern may point toward incomplete combustion, ignition trouble, fuel delivery problems, or an emissions-control issue. A different vehicle could show high NOx while other readings remain within limits, directing the diagnostic conversation toward combustion temperature and NOx-control components.
The machine isn't saying, “replace this exact part.” It's reporting that a measured pollutant exceeded the limit assigned to that vehicle and test condition. A repair technician must then investigate the underlying cause.
The dynamometer matters because loaded-mode testing places the vehicle under controlled demand. Some problems don't appear clearly during an unloaded idle. A vehicle can sound smooth in the bay while producing excess emissions when its engine works harder.
What the report is telling you
A result sheet isn't a general grade for the entire car. It reflects whether the vehicle met the required inspection criteria during the regulated test. For help interpreting the information recorded after testing, use this explanation of smog test results.
The pass logic is strict in a simple way: all applicable readings must remain within their limits. One excessive measurement can produce a failure even when the other gases look acceptable, because the program evaluates each required pollutant rather than averaging the readings into one forgiving score.
How Technicians Use the Machine During Your Inspection
A technician begins by confirming the vehicle information and preparing the inspection record. That step matters because the applicable test depends on the vehicle's identity, model year, fuel type, and required inspection path.
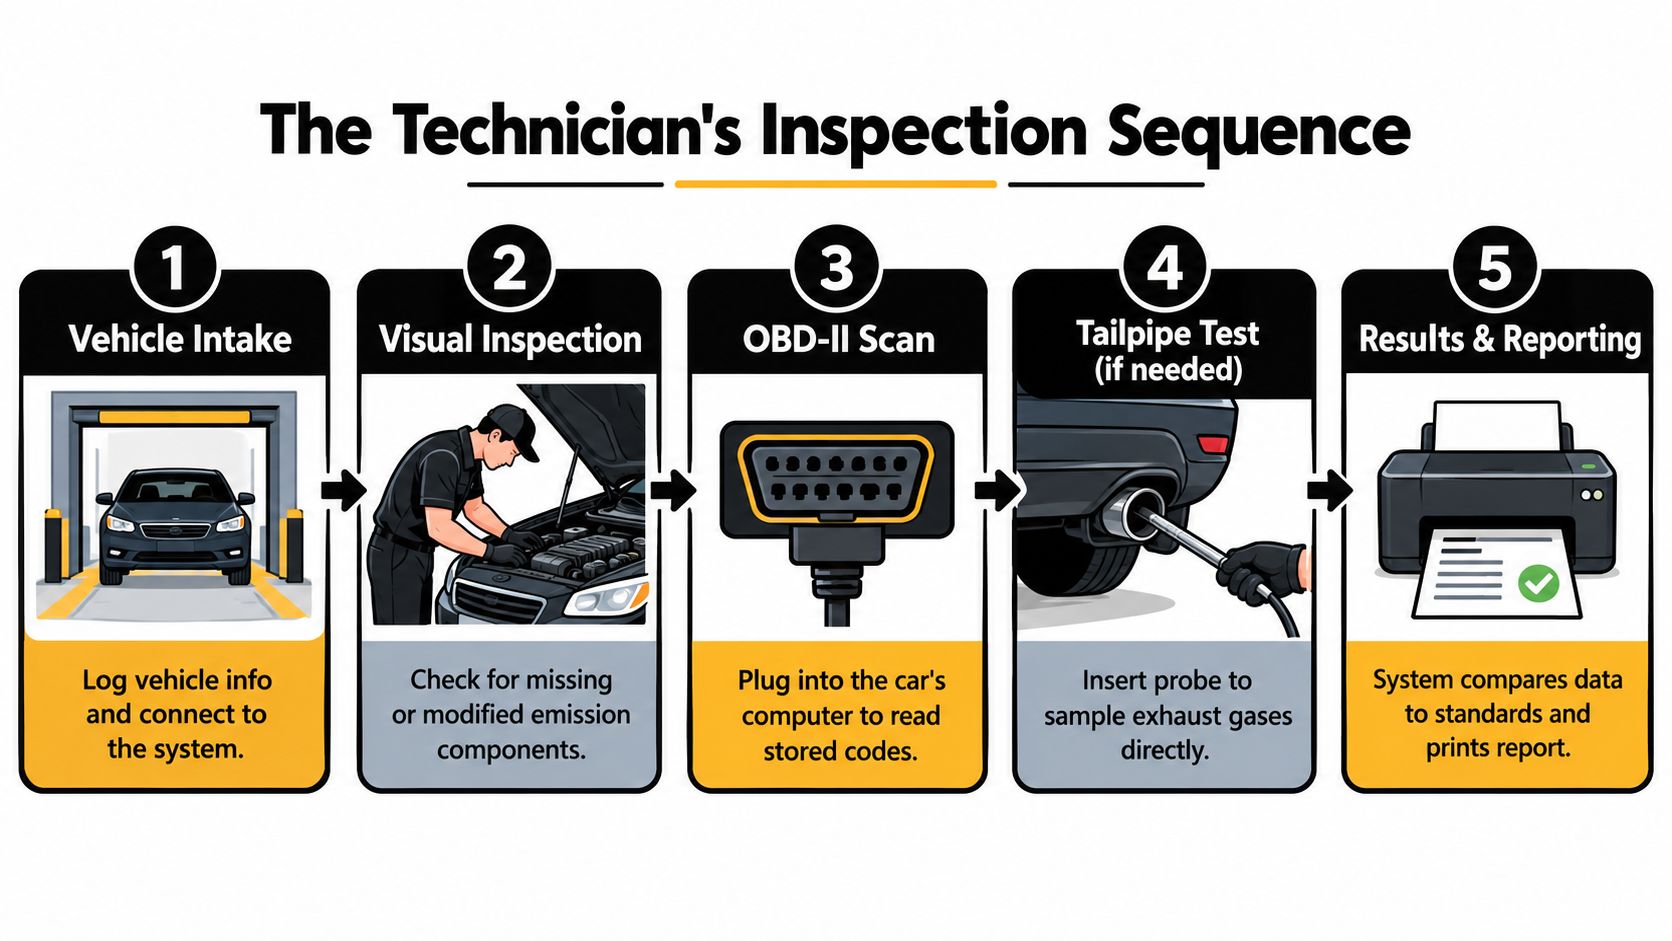
The inspection follows a controlled sequence
First comes the vehicle intake. The technician brings the car into the bay, records the required information, and prepares the machine. Next, the technician performs the visual portion, looking for missing or modified emissions equipment and other conditions that could affect the inspection.
A 2015 sedan will usually follow the BAR-OIS path. The technician connects the approved interface to the diagnostic port, allows the system to read the vehicle's emissions information, and completes the required checks. The machine and technician work together, because the software can read data but can't replace a physical inspection of the car.
A 1995 pickup follows a different path. The technician may position its drive wheels on the dynamometer, place the exhaust probe correctly, and run the required loaded-mode procedure. The analyzer samples the exhaust while the vehicle operates under the test conditions.
The machine provides repeatable measurements, but the technician still controls vehicle setup, connections, safety checks, and correct procedure.
Vehicle design changes the workflow
A hybrid may require special handling because its gasoline engine can stop and restart during the visit. The technician must use the approved procedure for that vehicle rather than treating it like a conventional sedan. A diesel vehicle also needs a station with the appropriate capability and process.
After the electronic scan or gas measurement, the system compares the results with the applicable requirements. The technician reviews the outcome and completes the electronic reporting process.
The visit can feel quick because the software handles much of the data processing, but speed doesn't mean the inspection is casual. Correct vehicle information, a secure connection, stable equipment, and proper test setup all affect the integrity of the result.
For drivers, the practical expectation is straightforward. Keep the vehicle accessible, answer questions about recent repairs, and don't disconnect the battery or clear warning codes immediately before the appointment without understanding how that may affect the vehicle's diagnostic status.
STAR Standards Calibration and Why Machine Quality Matters
A car can be mechanically ready for inspection and still face a problem if the station's equipment is poorly maintained. An analyzer that is out of calibration may report unreliable readings, while a failed data connection can delay a test that otherwise proceeds normally. The machine is one part of the result, and its condition matters.
California's STAR program, created by Assembly Bill 2289 in 2010, was designed to improve inspection quality and support required emissions reductions. STAR stations must maintain the equipment needed for the vehicles covered by the Smog Check Program. Drivers can use the California STAR station certification information to confirm a station's authorization and capabilities.
A station that maintains both BAR-OIS and BAR-97 equipment can inspect any model year, while a station with only OBD equipment must turn away pre-2000 vehicles. That directly affects where those drivers can get tested.
Calibration protects measurement accuracy
BAR-97 equipment requires BAR-approved calibration gases from a BAR-certified gas blender. The gas gives the analyzer a known reference. Technicians use it to check whether the instrument responds correctly before trusting its exhaust readings.
Calibration works like checking a kitchen scale with a known weight. If the scale is wrong, every ingredient measured with it is suspect. An emissions analyzer has the same basic problem. A faulty reference check can undermine confidence in the final inspection result.
The station also needs approved analyzers, OBD interfaces, dynamometers where applicable, and data-reporting equipment. Each component supports a different part of the test. A missing or malfunctioning component can stop the process, even if the vehicle itself is ready.
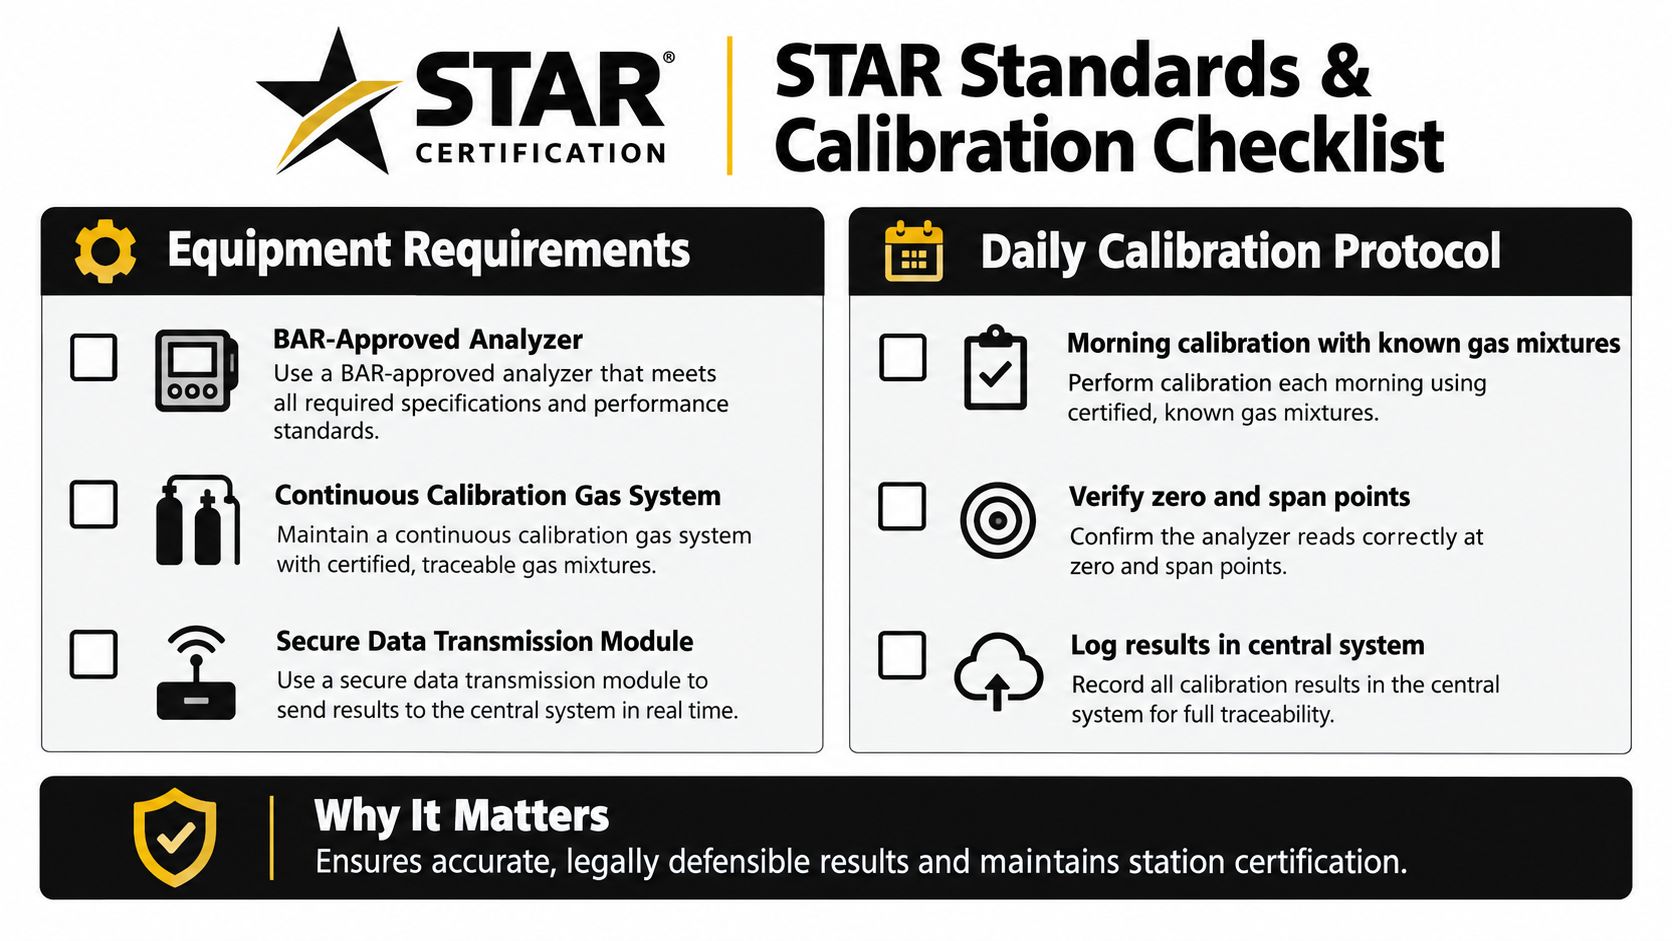
What station quality means for drivers
Before booking, ask whether the station can test the vehicle's model year and configuration. A STAR station should be able to explain whether BAR-OIS or BAR-97 applies and whether its equipment supports the car, truck, hybrid, or diesel being presented.
The machine's quality also defines the meaning of the result. Proper calibration helps ensure that a measured gas value reflects the vehicle rather than an instrument error. It cannot detect every emissions problem, but it can produce a dependable result within the inspection method it is built to perform.
California has maintained formal equipment standards for decades. A 1974 California Bureau of Automotive Repair publication set minimum instrument specifications for participating garages, while federal inspection and maintenance policy later advanced dynamometer-based procedures and other testing methods (EPA inspection and maintenance history).
For a practical explanation of certification, read what a STAR station is.
Getting Ready for Your Smog Check and Choosing the Right Station
Preparation starts with identifying the inspection path. A 2000 or newer vehicle generally uses BAR-OIS, which relies on the vehicle's emissions computer. A 1999 or older vehicle generally uses BAR-97, which measures exhaust gases and may use a dynamometer for loaded-mode testing.
The machine can detect important problems, but it has boundaries. OBD equipment can flag emissions-related faults without directly measuring every real-world driving condition. EPA and California materials describe both false passes and false failures in OBD checks, while California's review found that OBD and tailpipe testing have similar failure rates, with OBD slightly more sensitive at detecting failures (EPA OBD inspection evaluation).
That limitation matters for intermittent, software-related, and aftertreatment problems. A fault that appears only during a particular temperature, load, or driving pattern may not show up during a short inspection. Newer onboard-data models may improve screening for high-NOx vehicles, but today's inspection remains a defined compliance test, not a complete real-world emissions profile.
A short preparation checklist
- Check warning lights: Resolve an illuminated emissions warning before the appointment instead of hoping the machine won't notice it.
- Bring renewal information: Have the DMV notice or vehicle details available so intake can proceed accurately.
- Mention recent repairs: Tell the technician if the battery was disconnected or emissions components were recently serviced.
- Choose compatible equipment: Confirm that the station handles your model year, fuel type, hybrid system, or diesel configuration.
- Ask about STAR authorization: If your notice requires a STAR inspection, verify the station's status before you arrive.
A station's equipment and calibration discipline affect the consistency of the test, while your vehicle's maintenance and diagnostic history affect what the machine finds. Speedy Smog in San Leandro offers STAR Certified inspections for newer and older vehicles, as well as diesel and hybrid vehicles, so East Bay drivers can confirm the appropriate testing path before booking.
Use the machine as a source of evidence, not a mysterious verdict. If the car passes, keep the inspection record for your registration process. If it fails, use the listed result as a starting point for diagnosis, then repair the underlying issue and arrange a retest through an appropriately equipped station.
Visit Speedy Smog in San Leandro for a STAR Certified smog check, with equipment and procedures matched to your vehicle's inspection requirements. Contact the station before your visit to confirm service for your model year, diesel, or hybrid and arrive prepared for a clear, compliant result.
You've got a DMV renewal notice on the counter, your diesel truck is parked outside, and you're searching “diesel emissions inspection near me” from San Leandro, Oakland, or Hayward. The closest listing may not be the right one. Before you book a lane, confirm that your vehicle belongs in California's standard Smog Check program, find out whether the station handles diesel visual and diagnostic checks, and prepare for the conditions that determine a pass.
A diesel inspection isn't a gasoline test with a different fuel. Model year, gross vehicle weight rating, onboard diagnostic readiness, emissions hardware, and smoke opacity can all affect the result. The right process starts with eligibility, then moves through station selection, vehicle preparation, testing, and DMV follow-through.
Table of Contents
- Finding a Diesel Emissions Inspection Near You in the East Bay
- Do You Actually Need a Diesel Smog Check in California
- How Diesel Emissions Inspections Really Work
- What to Bring and How to Prep Your Diesel to Pass
- Where to Go Pricing Timing and Why STAR Certification Matters
- After the Test DMV Registration and Next Steps If You Fail
Finding a Diesel Emissions Inspection Near You in the East Bay
A nearby station can still waste your time if it doesn't handle your diesel category or if it isn't approved for the type of certification your registration requires. California's diesel program has evolved from visible-smoke enforcement into a process that can include equipment verification and OBD checks, so a station needs more than a generic “smog test” listing.
Start with the station, not just the map
When comparing East Bay results, check whether the shop identifies itself as a STAR Certified station, accepts diesel vehicles, and can explain what the inspection includes. STAR status matters when the DMV directs your vehicle to a STAR station, and a diesel-capable shop should be comfortable discussing opacity, readiness monitors, and emissions components before you arrive.
Call ahead with the vehicle's model year, fuel type, and approximate GVWR. A diesel pickup and a heavier work truck may fall under different compliance programs, and the shop should be able to tell you whether it performs the inspection you need or whether you should contact a heavy-duty compliance provider.
Practical rule: A useful phone call should answer three questions: Does the station test this diesel, does it handle the required certification, and what should you bring if the vehicle fails?
For drivers comparing local options, this East Bay guide to vehicle emissions testing can help narrow the search before you drive across town. Look for clear hours, transparent service details, and a realistic explanation of turnaround time rather than relying only on the lowest advertised price.
A good nearby choice gives you a direct path from inspection to registration. If the technician identifies a code, readiness issue, smoke problem, or missing emissions component, you should leave with a specific explanation of what needs attention, not a vague recommendation to “try again later.”
Do You Actually Need a Diesel Smog Check in California
The first question isn't “Where can I test?” It's “Is my diesel subject to a standard California Smog Check?” California generally includes model year 1998 and newer diesel cars and trucks with a GVWR of 14,000 pounds or less in the biennial Smog Check program. Diesel vehicles above that weight are handled under a separate heavy-duty framework. California BAR guidance explains the diesel Smog Check requirements and their scope.
Use three checks before scheduling:
Read the registration notice. A DMV renewal notice usually tells you whether a smog certification is required. Don't assume every diesel receives the same renewal instruction.
Confirm the model year. The California light-duty diesel rule generally applies to 1998 and newer vehicles. Older vehicles can follow different exemption rules, so use your registration information and the vehicle's identification details rather than relying on an online listing.
Find the GVWR. Look at the driver-side door-jamb label or vehicle documentation. The important dividing point for the standard light-duty program is 14,000 pounds GVWR. Trucks and work vans often create confusion because their size and use can make them feel “commercial,” while the state classification depends on the applicable vehicle rules and weight rating.
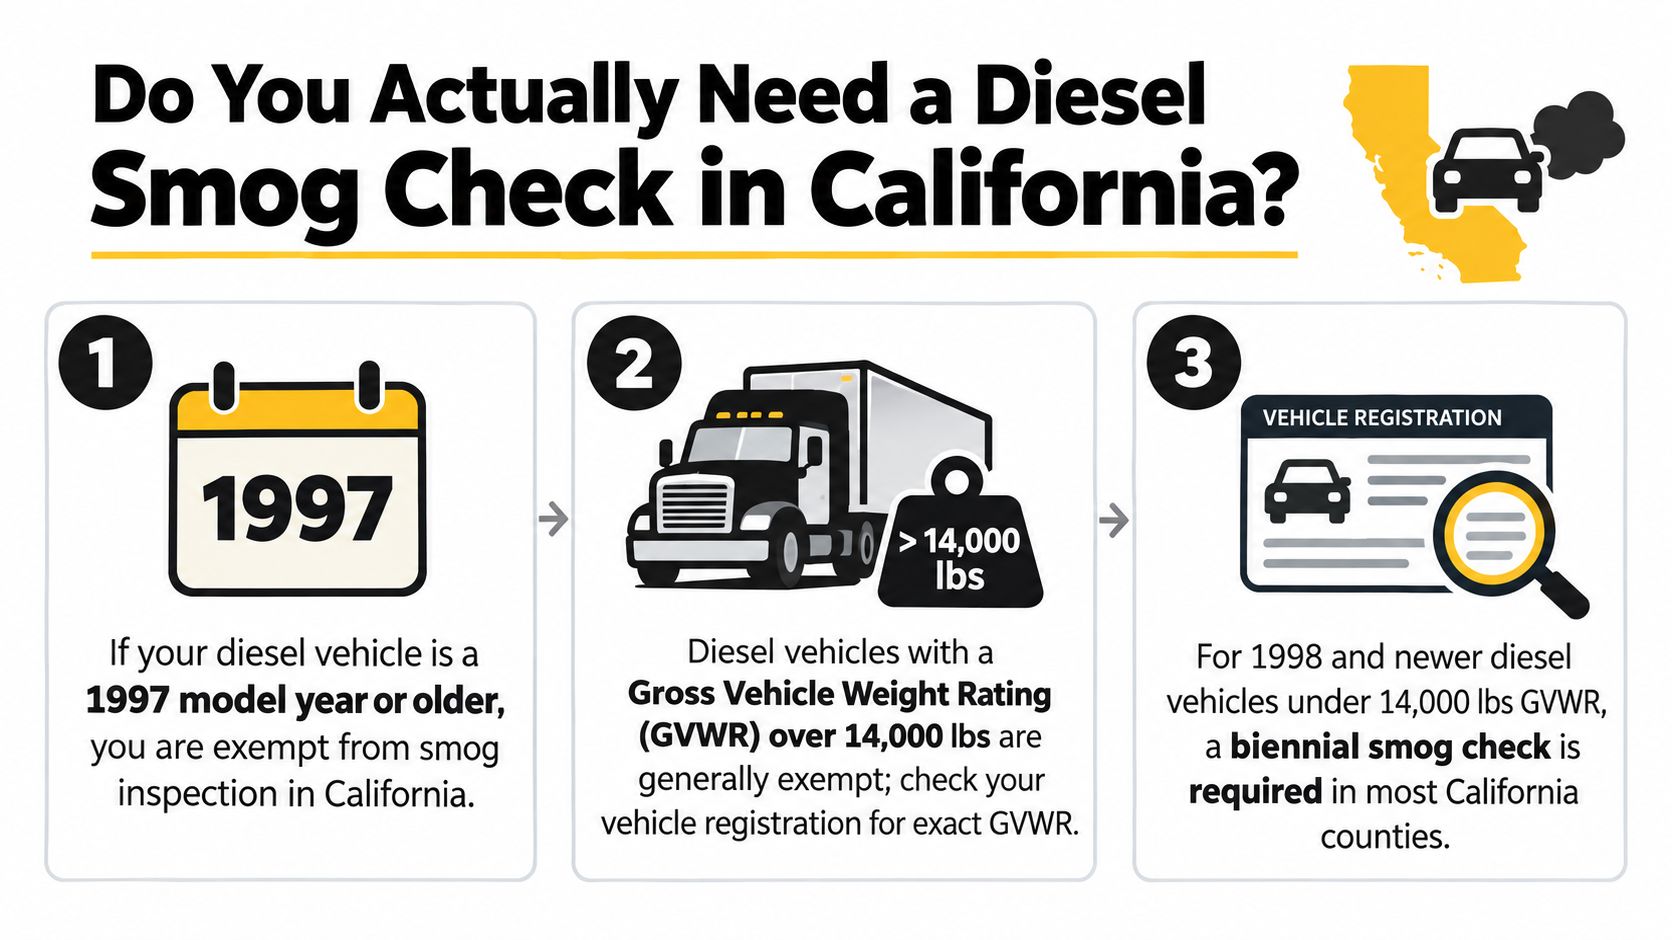
Separate light-duty testing from heavy-duty compliance
A diesel under the applicable GVWR threshold generally belongs at a standard Smog Check station that's equipped and certified for diesel testing. A heavier vehicle may need a different inspection cycle, testing procedure, or compliance program, so taking it to a regular passenger-vehicle lane can lead to a referral instead of a completed certification.
The practical distinction is simple. If your registration requests a normal Smog Check and the vehicle falls within the light-duty diesel category, book a qualified station. If the vehicle exceeds the threshold or your paperwork points to a heavy-duty requirement, verify the correct program first through the diesel Smog Check requirements for California vehicles.
Eligibility also changes the preparation strategy. Owners of qualifying 2007 and newer light-duty diesels need to pay close attention to readiness monitors, not just visible smoke. California expanded the monitor requirements in 2023, and the state's BAR materials state that, effective October 1, 2025, all readiness monitors must be set for a vehicle to pass Smog Check. The California Smog Check Manual provides the current readiness guidance.
How Diesel Emissions Inspections Really Work
A diesel can run smoothly and still fail its inspection. The technician usually combines a visual inspection, an OBD-II scan where applicable, and a smoke-opacity evaluation. Those checks target different failure points: missing emissions hardware, incomplete monitors, stored diagnostic trouble codes, and excessive exhaust smoke. The equipment and process used at a station are described in this guide to diesel emissions testing equipment.
The visual and diagnostic checks come first
The inspector confirms the vehicle category and model year, then checks emissions-control hardware, tampering, exhaust leaks, and obvious defects. On newer light-duty diesels, the scan reads diagnostic trouble codes and readiness monitors. Clearing a code shortly before testing can turn off the malfunction light while leaving the monitors incomplete.
For 2007 and newer light-duty diesels, California's 2023 rule change allowed only the Diesel Particulate Filter and Non-Methane Hydrocarbon Catalyst monitors to remain unset at that point in the program. Later BAR guidance makes monitor status more restrictive under the updated requirements. A vehicle that has not completed its required drive cycle may fail even after a repair.
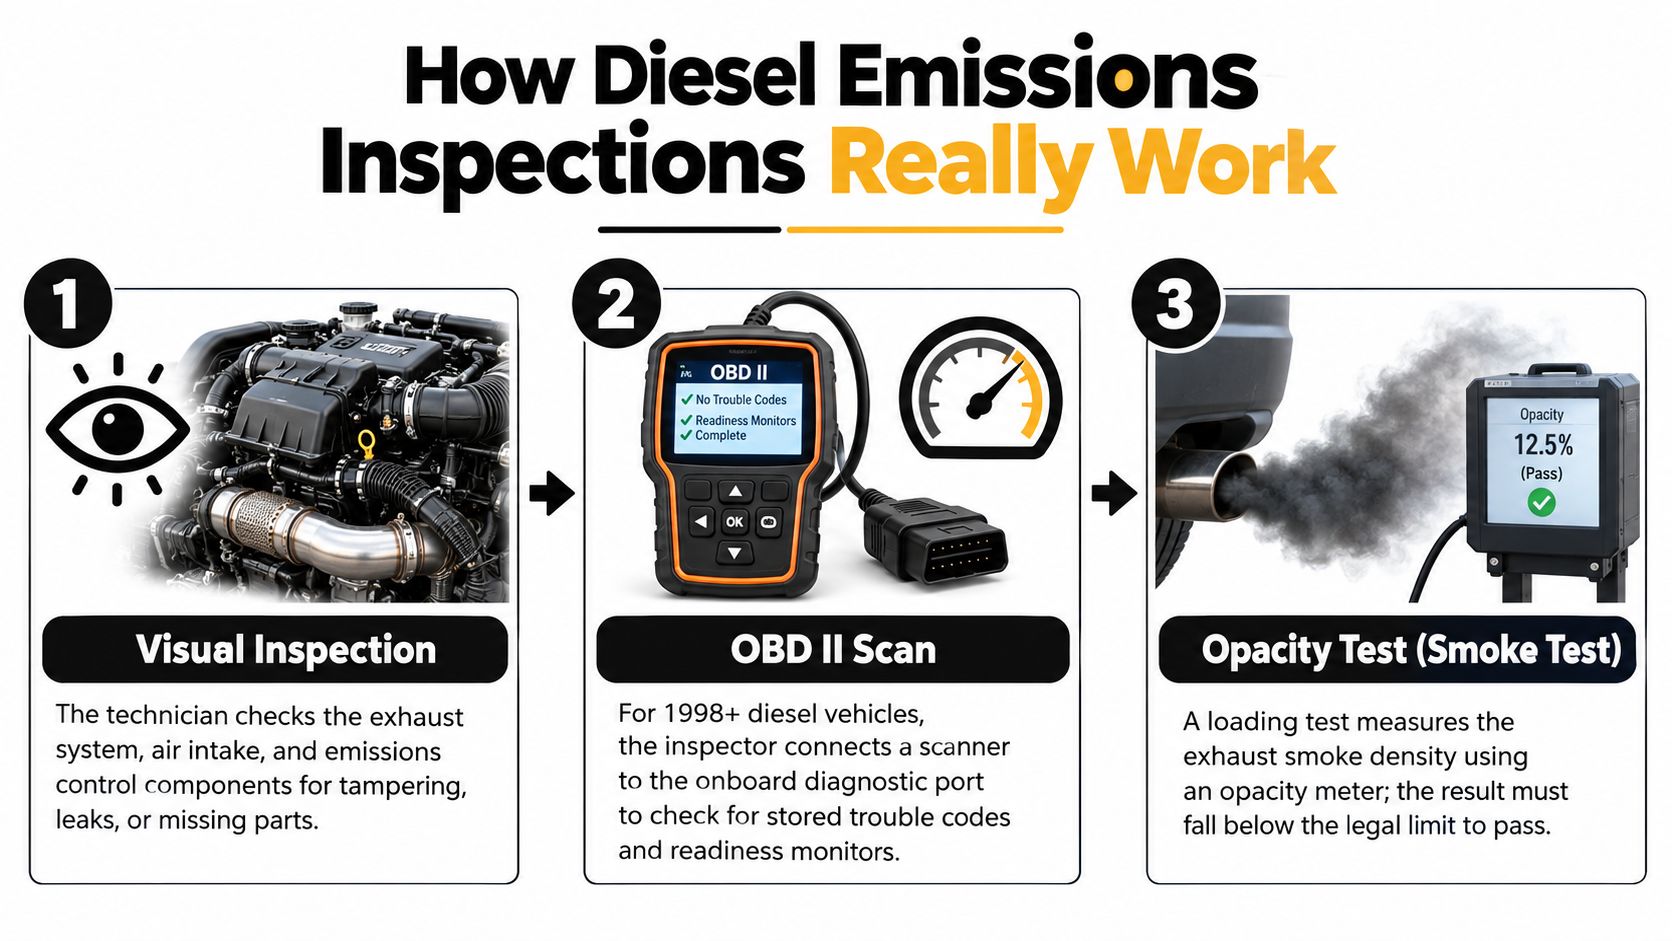
Opacity measures smoke density, not drivability
The engine must reach normal operating temperature before the smoke portion. The inspector may perform a standardized snap-acceleration procedure, such as SAE J1667, or another test required by the applicable program. Illinois requirements connect diesel testing with SAE J1667 and EPA smoke-opacity cutpoints, as described in Illinois diesel testing requirements.
The pass limit depends on the vehicle class, model year, and jurisdiction. California-referenced light-duty standards have historically used a 20% opacity limit at idle for some diesel classes. Other programs use older heavy-diesel cutpoints ranging from 40% to 55%. The applicable program determines which limit and procedure apply, so a result from another jurisdiction cannot predict a San Leandro inspection.
California's Air Resources Board announced a roadside anti-soot program for big-rig diesels in 1991. European diesel limits also tightened through EU Directive 94/12/EC, adopted in March 1994, followed by later implementation milestones. The Air Resources Board's historical announcement shows how anti-soot enforcement shaped modern diesel inspection programs.
What to Bring and How to Prep Your Diesel to Pass
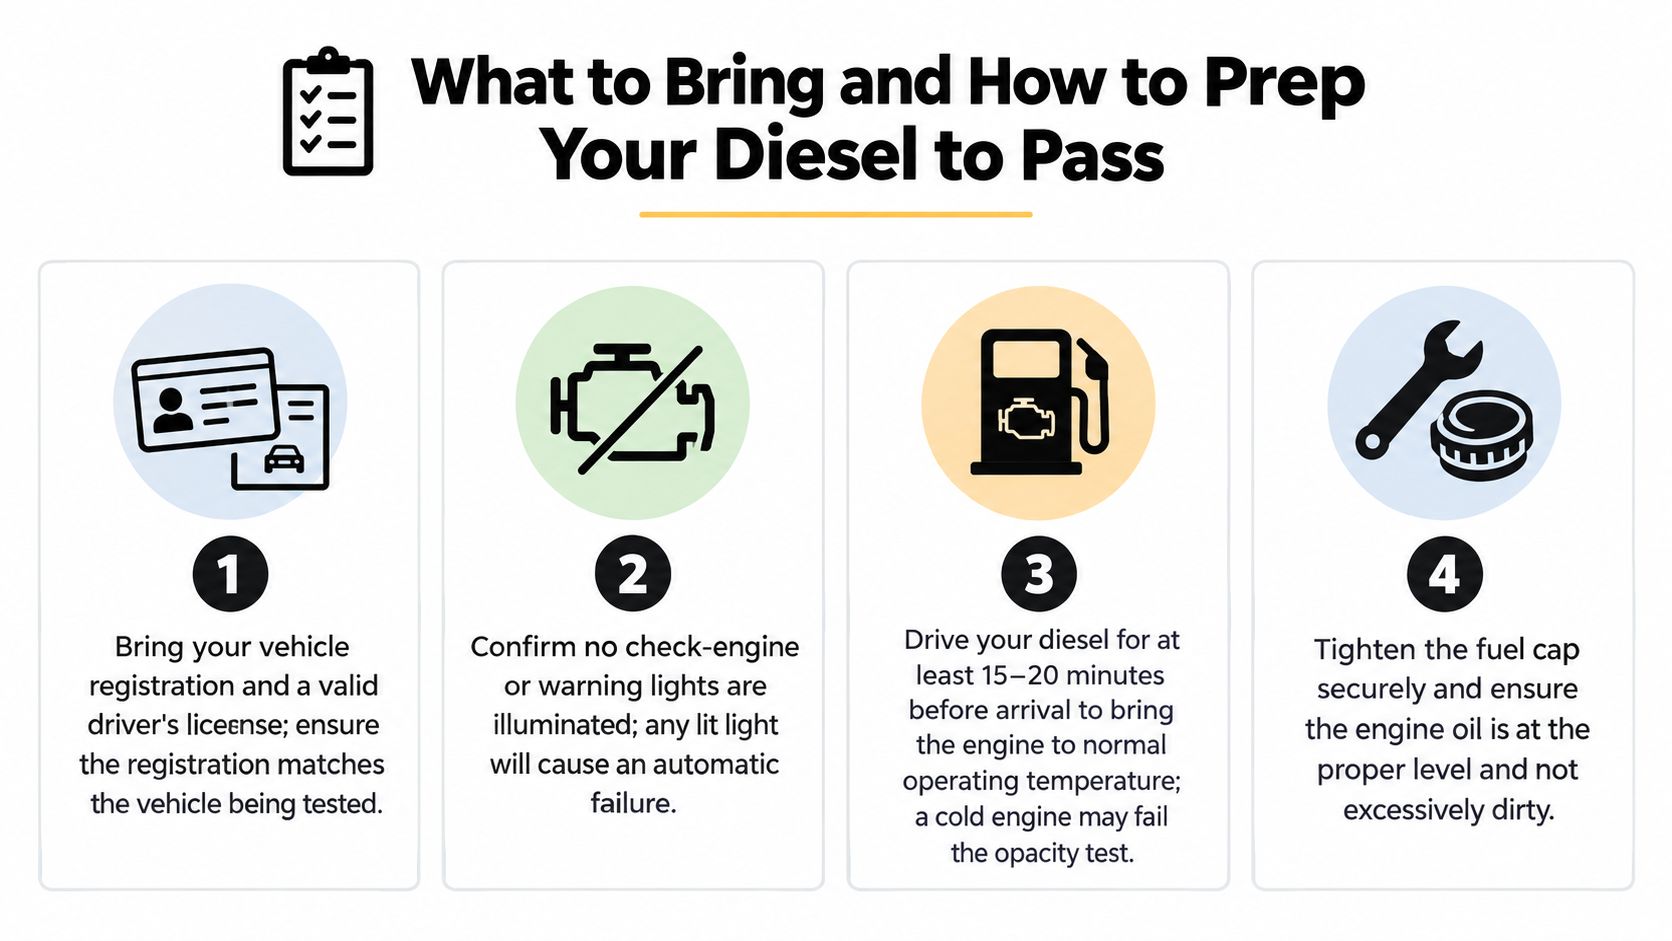
A diesel can look clean outside and still fail because its monitors are not ready, its warning light is active, or its emissions hardware is missing. Before booking a diesel emissions inspection near you, verify the paperwork, diagnostic status, exhaust system, and engine condition.
Bring the information the station needs
Have your vehicle registration, DMV notice, and driver's license ready. If repairs were completed recently, bring the repair order or diagnostic notes. The technician can then determine whether a fault was repaired, merely cleared, or still requires a drive cycle before the monitor becomes ready.
Check the dashboard before leaving:
- Warning lights: An illuminated check-engine or emissions warning light needs diagnosis before the inspection.
- Diagnostic codes: Request a full-code scan rather than a quick light reset. Clearing codes can remove useful clues and leave readiness monitors incomplete.
- Aftertreatment hardware: Confirm that the DPF, EGR system, catalysts, sensors, and related exhaust components are installed and connected. Deleted or altered emissions software can cause visual and diagnostic failures.
- Operating condition: Do not test a truck in limp mode, derated operation, or an active regeneration fault. Diagnose the cause first.
Fix the causes that create smoke
Common failure categories include a blocked DPF, EGR faults, worn injectors, turbocharger problems, and exhaust leaks. Cleaning the exhaust tip changes appearance, not the measured opacity, when the underlying fault remains.
The engine should arrive warmed up according to the station's instructions. Avoid aggressive driving intended to hide a problem. Heavy smoke during acceleration points to an air, fuel, turbocharger, or aftertreatment issue that needs inspection before testing.
EPA-cited research found lower average opacity among passing vehicles than failed vehicles, while repaired vehicles showed substantial smoke reductions after corrective work. The maintenance and opacity analysis details those measured differences and the fault categories technicians should investigate.
Bring repair documentation, but do not assume a cleared code means the vehicle is ready. The inspection result depends on the vehicle's actual emissions condition, monitor status, and smoke output.
Where to Go Pricing Timing and Why STAR Certification Matters
A STAR Certified station is different from a regular Smog Check station because STAR stations meet performance standards set by the California Bureau of Automotive Repair. If the DMV directs your vehicle to STAR, you need that certification rather than choosing the closest general station.
| Feature | What to Look For | Why It Matters |
|---|---|---|
| Diesel capability | The station explicitly accepts qualifying diesel vehicles | Diesel inspections can include visual, OBD, and opacity procedures |
| STAR certification | Current STAR designation when your notice requires it | The result matches the certification pathway assigned by the DMV |
| Testing equipment | Diesel-capable opacity equipment and diagnostic scanning | The technician can evaluate the systems that determine diesel compliance |
| Timing | A stated estimate for the inspection, with extra time for diagnosis | A quick test is useful only when the vehicle is ready |
| Pricing | Clear pricing, diesel surcharges if applicable, and current coupons | You can compare the complete service instead of an incomplete advertised rate |
| Convenience | Posted hours, waiting area, and clear registration follow-up | You avoid a second trip caused by missing paperwork or unclear results |
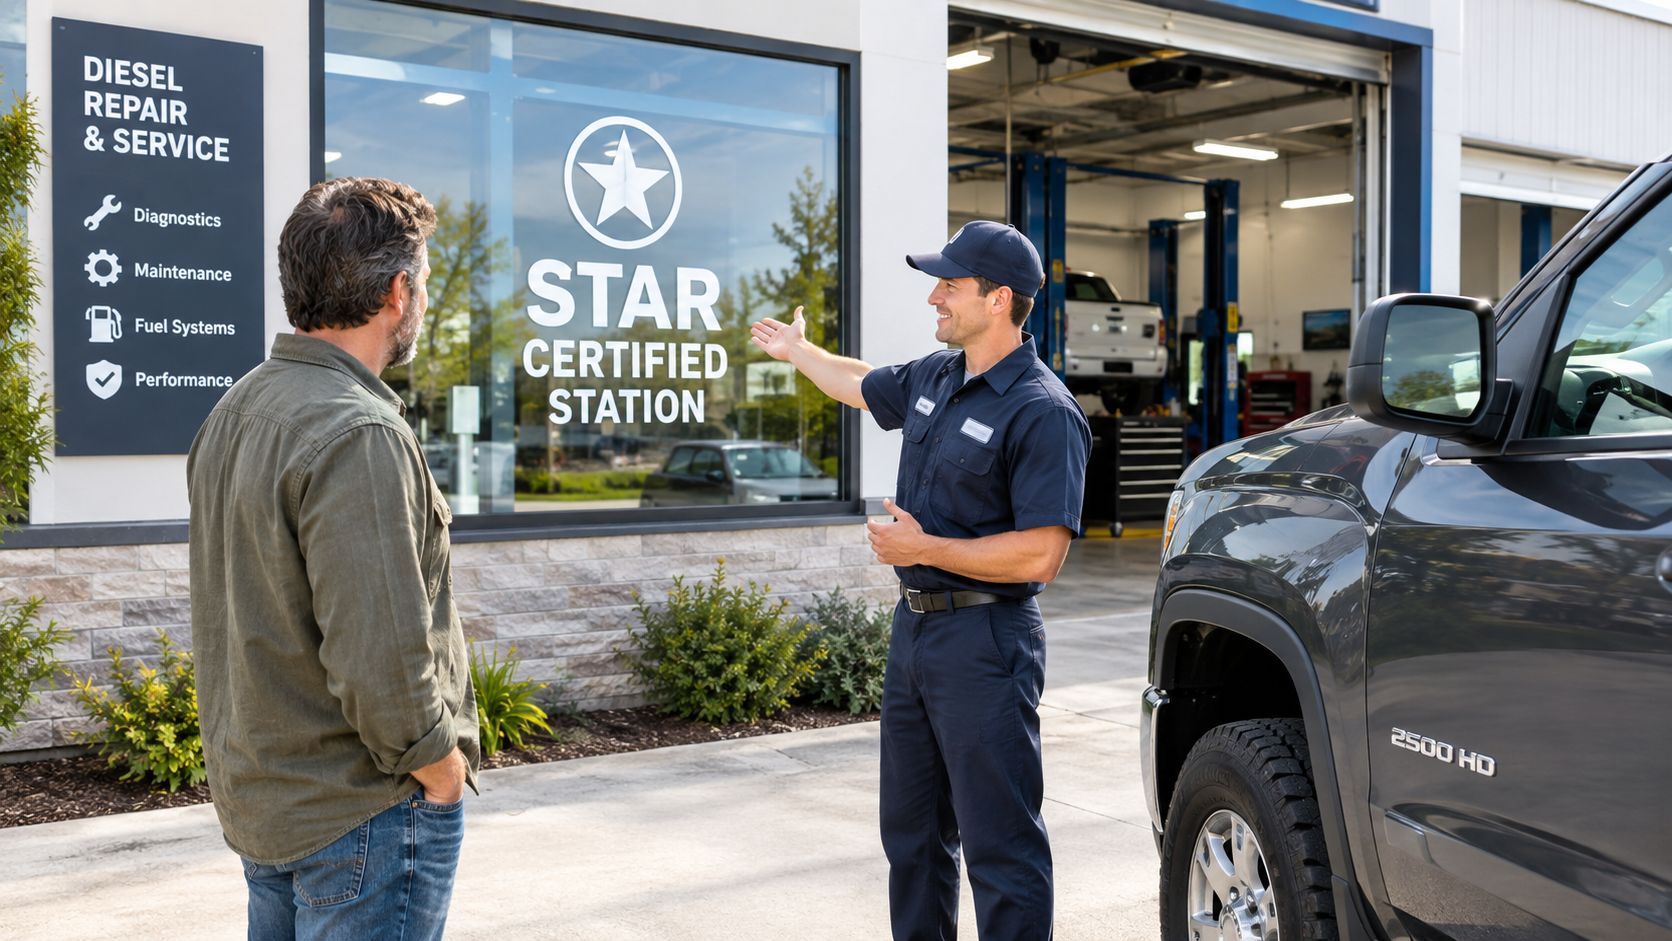
Speedy Smog at 15275 Washington Ave in San Leandro is one local option that lists diesel inspections among its services and handles qualifying vehicles across the listed model-year range. Its publisher-provided service information describes typical tests for 2000 and newer vehicles as taking about 10 to 15 minutes, with coverage for older vehicles, diesels, and hybrids. Confirm the exact price and eligibility before arrival because inspection cost can depend on vehicle type and current offers.
The shop is open Monday through Saturday and provides an indoor waiting room. It also advertises transparent pricing and periodic $25-off coupons for most smogs on newer vehicles. Those details can make a nearby appointment convenient, but the important selection criteria remain certification, diesel equipment, and the ability to explain a failure accurately.
For a broader technical overview of the equipment and procedures involved, review this diesel emissions testing equipment resource. A station that can clearly describe its process is easier to evaluate than one that only promises a fast result.
After the Test DMV Registration and Next Steps If You Fail
After a passing inspection, the station submits the result through the California Smog Check system so the DMV can use it for registration. Keep the receipt and inspection paperwork until your renewal is complete, especially if you're renewing online or need to prove that the certification was completed.
A failure should give you a repair direction, not just a disappointing result. Read the report carefully and separate a readiness issue from an opacity failure or a visual equipment problem. A DPF restriction, EGR fault, injector issue, turbo problem, exhaust leak, stored code, or missing component requires a different repair path.
Don't clear the code and return. Clearing diagnostic trouble codes can leave monitors unset, and the updated California requirements make readiness status increasingly important. Have a technician perform a complete scan, confirm the repair, verify that the vehicle isn't derated, and allow the required drive conditions to establish monitor readiness before scheduling the retest.
If smoke opacity caused the failure, ask for an inspection of the air intake, turbocharging system, fuel delivery, exhaust system, and aftertreatment. The measured result can respond to proper maintenance, which is why repairs should address the root cause rather than the visible symptom.
If you're in San Leandro, Oakland, or Hayward and need a qualifying diesel inspection, visit Speedy Smog for a STAR Certified emissions test with diesel-capable service and a clear explanation of the next step. Call ahead with your model year and GVWR so the station can confirm eligibility before you arrive.
You're looking at a California registration renewal notice, wondering whether your car needs an OBD scan, a tailpipe test, a STAR inspection, or no test at all. The answer isn't based on how many miles you've driven. It starts with fuel type and model year, then shifts to why the DMV is requesting certification, such as renewal, a transfer, or a sale.
I advise drivers to identify the vehicle's test category before booking an appointment. That simple check prevents the most common mistake I see at a busy smog station: arriving with the right paperwork but the wrong assumption about what the car needs.
Table of Contents
- Figure Out What Smog Check You Need Right Now
- How California Decides Your Smog Check by Year and Fuel Type
- OBD Inspection vs BAR-97 Tailpipe Test and What to Expect
- When Renewal Transfer or Sale Changes the Test You Need
- Get Ready to Pass and Avoid the Most Common Fail Reasons
- Book the Right Test Near You and Get Certified Quickly
Figure Out What Smog Check You Need Right Now
A driver in San Leandro may bring in a 2012 sedan for renewal, an Oakland owner may be selling a hybrid, and another customer may have received a DMV notice directing them to a STAR station. Those situations can involve different requirements even when the vehicles appear similar.
Start with the vehicle itself. Find the model year, confirm whether it runs on gasoline, diesel, hybrid, or another approved fuel, and check whether the DMV request is for registration renewal, ownership transfer, sale, or an out-of-state registration change. Mileage helps describe how much the vehicle has been used, but it doesn't determine the basic California inspection pathway.
Practical rule: Don't book a test based only on the renewal notice. Match the vehicle's year and fuel type first.
The second question is whether the vehicle is subject to testing at all. Newer vehicles generally fall under California's smog abatement period, while older gasoline and diesel vehicles can qualify for specific exemptions. If testing applies, the model year usually determines whether the station performs an OBD inspection or a BAR-97 tailpipe inspection.
A STAR requirement adds another layer. If the DMV specifically directs the vehicle to a STAR station, use a station with STAR certification rather than assuming any licensed station will satisfy the request. The technology used during the test still depends mainly on the vehicle's year and fuel type.
For East Bay drivers, Speedy Smog's California eligibility guide can help you check the basic requirement before you arrive. Bring the registration renewal notice if you have it, but let the vehicle details drive the decision.
How California Decides Your Smog Check by Year and Fuel Type
California uses a clear age and powertrain filter. The state's Smog Check Program guidance explains that gasoline, hybrid, and alternative-fuel vehicles generally enter the testing requirement after they are more than eight model years old. Vehicles within that newer period generally pay a smog abatement fee instead of receiving a smog inspection for registration renewal.
The model-year clock matters more than the date you bought the car. A 2020 model-year vehicle first needs a smog check for renewal in 2028, according to the California Bureau of Automotive Repair. You don't move the deadline by purchasing the car later, and driving fewer miles doesn't create a separate testing category.
Use this decision filter:
- Identify the fuel type. Gasoline, hybrid, and alternative-fuel vehicles generally follow the newer-vehicle abatement period before entering the regular testing cycle. Diesel vehicles require separate attention because California applies different age rules.
- Check the model year. If a covered gasoline, hybrid, or alternative-fuel vehicle is eight model years old or newer, it generally pays the abatement fee instead of taking the test. Once it is more than eight model years old, it generally needs certification for registration renewal.
- Look for an older-vehicle exemption. Gasoline-powered vehicles from model year 1975 or older are exempt, while diesel vehicles from model year 1997 or older are exempt under the state program guidance.
- Confirm the DMV reason. Renewal, ownership transfer, sale, and a directed STAR inspection can change what paperwork or station type applies after you determine whether the vehicle is subject to testing.
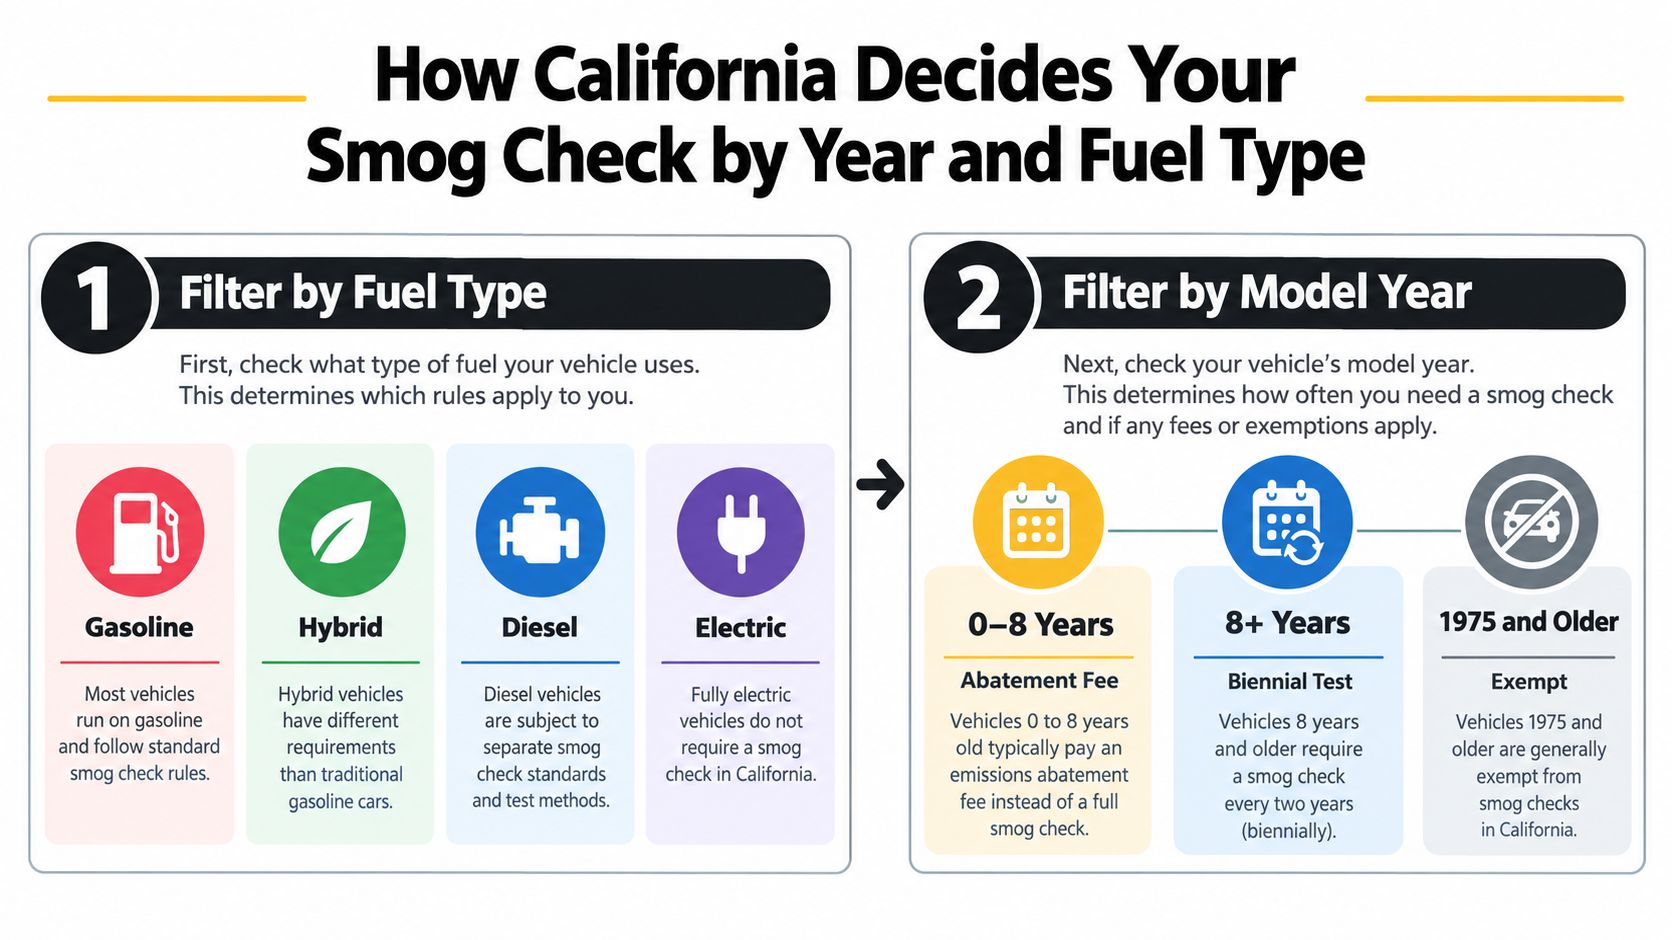
This is why the question “what smog check do I need” can't be answered from mileage alone. A newer hybrid may not need an inspection for renewal, while an older gasoline sedan may need one. An older diesel may fall outside the standard program entirely.
Write down the year and fuel type before you call a station. That two-item check usually tells you whether to ask about an abatement fee, an OBD test, a BAR-97 test, or an exemption review.
OBD Inspection vs BAR-97 Tailpipe Test and What to Expect
The main technical split is straightforward. Most 2000-and-newer vehicles receive an onboard diagnostic inspection, while 1999-and-older vehicles are generally routed to a BAR-97 tailpipe-based inspection, as described in the California Smog Check manual. California can also require visual and functional checks of emissions equipment in addition to the electronic or tailpipe portion.
| Vehicle Group | Test Type | What Is Checked | Typical Time at Station |
|---|---|---|---|
| 2000-and-newer eligible vehicles | OBD inspection | Diagnostic data, warning-lamp status, readiness information, and emissions equipment checks | Usually a short computer-based visit, depending on vehicle condition |
| 1999-and-older vehicles | BAR-97 tailpipe inspection | Tailpipe emissions, visible emissions equipment, and required functional checks | Depends on the vehicle and inspection process |
| Vehicles directed to STAR | Required test pathway at a STAR station | The applicable inspection method for the vehicle, plus required station and program checks | Depends on vehicle type and readiness |
What happens during an OBD inspection
The technician connects approved equipment to the vehicle's diagnostic system and reviews information stored by the car's computers. The inspection isn't a scan for one trouble code. The technician also looks at malfunction indicator lamp behavior, readiness monitors, and emissions-related equipment.
For late-model gasoline vehicles, California replaced the traditional loaded dynamometer tailpipe portion with an OBD-based check. The BAR Smog Check reference guide identifies 2000-and-newer vehicles at 14,000 pounds GVWR and under as using the OBD pathway.
What happens during a BAR-97 inspection
A qualifying older vehicle is evaluated through the BAR-97 tailpipe method rather than the standard late-model OBD route. The technician still checks required emissions components and their function. A vehicle can fail because of a visible emissions problem, not only because of the measured tailpipe result.
If your vehicle is 2000 or newer, read Speedy Smog's STAR Smog Check information before booking when the DMV notice mentions STAR. The station requirement and the vehicle's technical test method are related, but they aren't the same question.
When Renewal Transfer or Sale Changes the Test You Need
The vehicle's year and fuel type identify the likely inspection technology. The transaction reason determines why certification is being requested and whether a particular station designation matters.
For a routine registration renewal, the DMV may require a passing smog result once the vehicle is beyond California's newer-vehicle abatement period. A 2012 gasoline sedan in San Leandro will normally be evaluated through the late-model OBD pathway, provided it falls within the applicable vehicle category. The important point is that renewal is a registration trigger, not a different engine test.
A private sale creates a different situation. If someone in Oakland sells a 2015 hybrid, the buyer and seller shouldn't assume the vehicle's hybrid system makes it exempt forever. California's age-based rules generally bring covered hybrids into testing after the newer-vehicle period, and the sale paperwork can require current smog certification.
The same car can need a different administrative action depending on why the DMV is asking for certification.
Ownership transfers also deserve a careful look. If you're transferring a diesel truck, don't classify it from appearance or engine size alone. Confirm the fuel type, model year, and any applicable vehicle details before deciding whether a standard Smog Check applies.
Out-of-state registration changes can also prompt a California inspection. In that case, the reason for testing is the registration change, but the technical pathway still follows the vehicle's California classification. For 2000-and-newer gasoline vehicles at 14,000 pounds GVWR and under, the BAR reference guide identifies the OBD route instead of a loaded dynamometer tailpipe test.
If the DMV directs you to a STAR station, follow that instruction exactly. A STAR-directed test should be performed at a STAR Certified location, even when the vehicle itself receives an OBD inspection rather than a separate “STAR technology” test.
Get Ready to Pass and Avoid the Most Common Fail Reasons
Most avoidable failures begin before the car enters the bay. A warning lamp, incomplete readiness monitor, recently cleared diagnostic memory, or missing emissions equipment can stop an otherwise well-maintained vehicle from passing.
California's BAR OBD guidance highlights MIL behavior and readiness criteria as central failure conditions. The state's rules also tightened on October 1, 2025, when all readiness monitors must be set for a vehicle to pass, with 2000-and-newer gasoline vehicles allowed only the evaporative monitor to remain unset. Check the current status before you pay for an inspection.
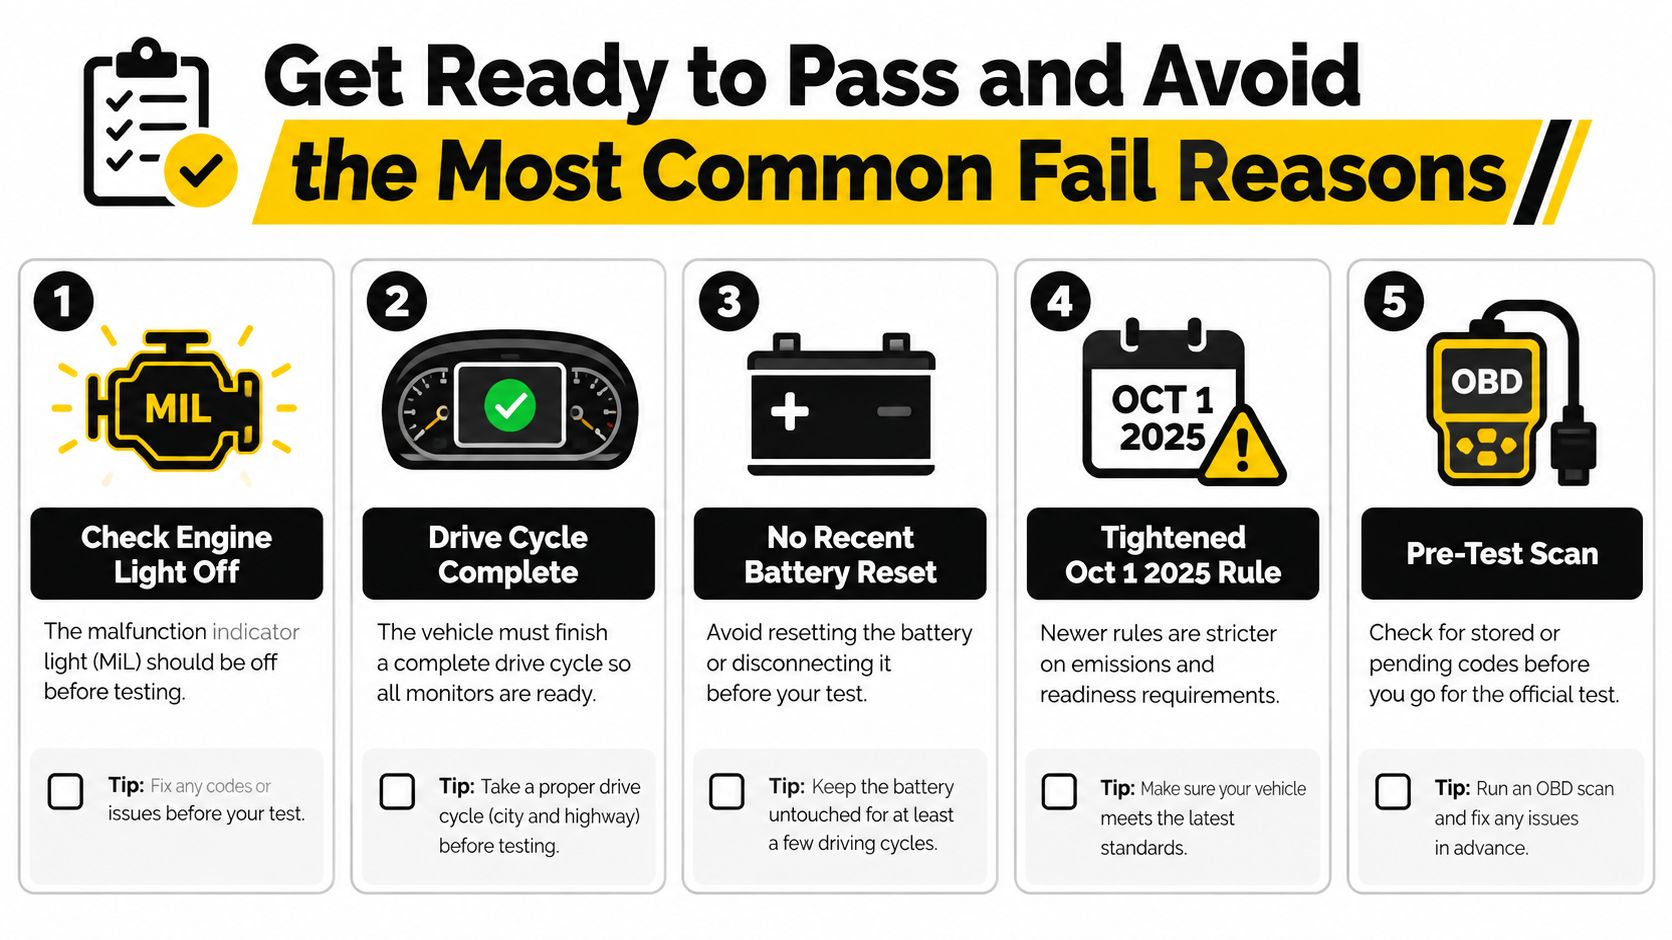
Use this pre-test checklist:
- Check the MIL: The check engine light should not be illuminated. If it came on recently, diagnose the cause instead of just clearing the code.
- Confirm readiness: Have the vehicle scanned for monitor status before the official test. “No codes” doesn't always mean “ready.”
- Avoid a recent battery reset: Disconnecting the battery or clearing codes can erase readiness information and create an automatic failure risk.
- Inspect visible equipment: Make sure the gas cap, catalytic converter, vacuum lines, and other emissions components are present and intact.
- Warm the vehicle normally: Arrive with the engine at normal operating temperature, but don't try to hide a warning light or unresolved fault.
The most common practical mistake is assuming the computer will be ready because the car drives normally. It may not. The BAR OBD test reference explains why warning-lamp behavior and monitor status deserve attention before testing.
For a focused breakdown of preventable problems, review common California smog check fail reasons.
Don't clear a code just before the appointment. That can make the dashboard look better while leaving the vehicle's readiness monitors incomplete. A proper scan gives you a clearer answer and saves a wasted trip.
Book the Right Test Near You and Get Certified Quickly
You can identify the correct starting point with four checks: model year, fuel type, DMV reason, and STAR direction. If the vehicle is covered and 2000 or newer, expect an OBD-based inspection in the applicable category. If it's 1999 or older, ask about the BAR-97 pathway. If the DMV names STAR, choose a STAR Certified station.
Bring your registration renewal notice if available, the vehicle, and any information about recent repairs or battery replacement. If the check engine light has been on, don't book first and diagnose later. Scan the vehicle, address the fault, and verify readiness before the official inspection.
Speedy Smog in San Leandro performs California smog inspections for newer vehicles, older vehicles, diesels, and hybrids, with a typical 10 to 15 minute OBD test for 2000-and-newer vehicles according to the station information provided for this article. The shop is located at 15275 Washington Ave, offers an indoor waiting room, transparent pricing, coupon options, and Monday-through-Saturday service.
Booking advice: Tell the station your model year, fuel type, and whether the DMV requires STAR before you arrive.
That information lets the advisor prepare for the correct inspection rather than making you repeat the visit. It also helps separate a true testing issue from a readiness problem that should be handled before certification.
Visit Speedy Smog with your model year, fuel type, and DMV notice ready, and the team can help match your vehicle to the correct California test. Check readiness before you arrive, then book the appropriate inspection in San Leandro for a faster path to certification.

With the right coupon, a smog check in the SF Bay Area can cost $40 to $70 instead of the usual $60 to $90 base price. For most newer vehicles, that discounted total usually already includes the mandatory $8.25 state certificate fee.
That matters when the DMV notice lands and you need to get the test done without overpaying, sitting in line forever, or showing up with the wrong coupon for your car. Most drivers don't lose money because smog checks are mysterious. They lose money because they grab the first deal they see, miss the fine print, or arrive unprepared and turn a simple inspection into a retest.
A good Smog Check Coupon San Francisco strategy is simple. Match the coupon to the vehicle, know whether you need a STAR station, and make sure the car is ready before the technician plugs in. That's how locals keep the process cheap, fast, and uneventful.
Table of Contents
- Decoding Smog Check Costs in the Bay Area
- Where to Find Legitimate Smog Check Coupons
- Not All Coupons Are Equal and Why STAR Certification Matters
- Prepare Your Car to Pass on the First Try
- Your Smart Choice in the East Bay Speedy Smog
- Smog Check FAQ for Special Cases
Decoding Smog Check Costs in the Bay Area
That DMV renewal reminder usually triggers the same question first. How much is this going to cost me?
In the Bay Area, a standard smog check usually runs $60 to $90 before discounts, but online coupons and local vouchers often bring the final total down to about $50 to $70, including the certificate fee for most 2000-and-newer vehicles, according to Bay Area Groupon smog listings. In practice, that means full-price shopping is usually the expensive mistake.
What you're actually paying for
A lot of confusion comes from shops advertising one number and then presenting another at the counter. For a standard test, think in two layers:
- Base test price: This is the shop's own charge and it varies.
- Certificate fee: This is the state pass-through fee that gets added when the car passes.
That's why coupon hunting matters. You're not trying to shave off a token amount. You're trying to avoid paying the undiscouted retail rate in one of the most expensive operating markets in the state.
Practical rule: If a shop's advertised deal doesn't make clear whether the total includes the certificate fee, ask before they start.
What works and what doesn't
The cheapest path is usually not “find any coupon.” It's “find the right coupon for the exact vehicle.”
Here's the pattern that works for most drivers:
| Situation | Smart move |
|---|---|
| Newer gasoline car | Check direct shop offers first, then compare with coupon platforms |
| Older vehicle or diesel | Confirm STAR requirement before chasing the lowest ad |
| Busy workday | Pick a high-volume station with a clear online offer |
| Tight budget | Focus on total out-the-door price, not headline discount |
The Bay Area has plenty of deals. The trick isn't finding a coupon. The trick is using one that the shop will honor for your vehicle class.
Where to Find Legitimate Smog Check Coupons
The best coupons usually come from three places. Shop websites, major deal platforms, and old-school local mailers. Each one has its own traps.
Start with the shop itself
A station's own website is often the cleanest place to start because the offer usually matches that location's actual workflow. You can see model-year limits, payment restrictions, and whether the deal applies before or after the certificate fee. For an example of how local stations present online deals, check the current smog check deals page from Speedy Smog.
Here's what that looks like in the wild:
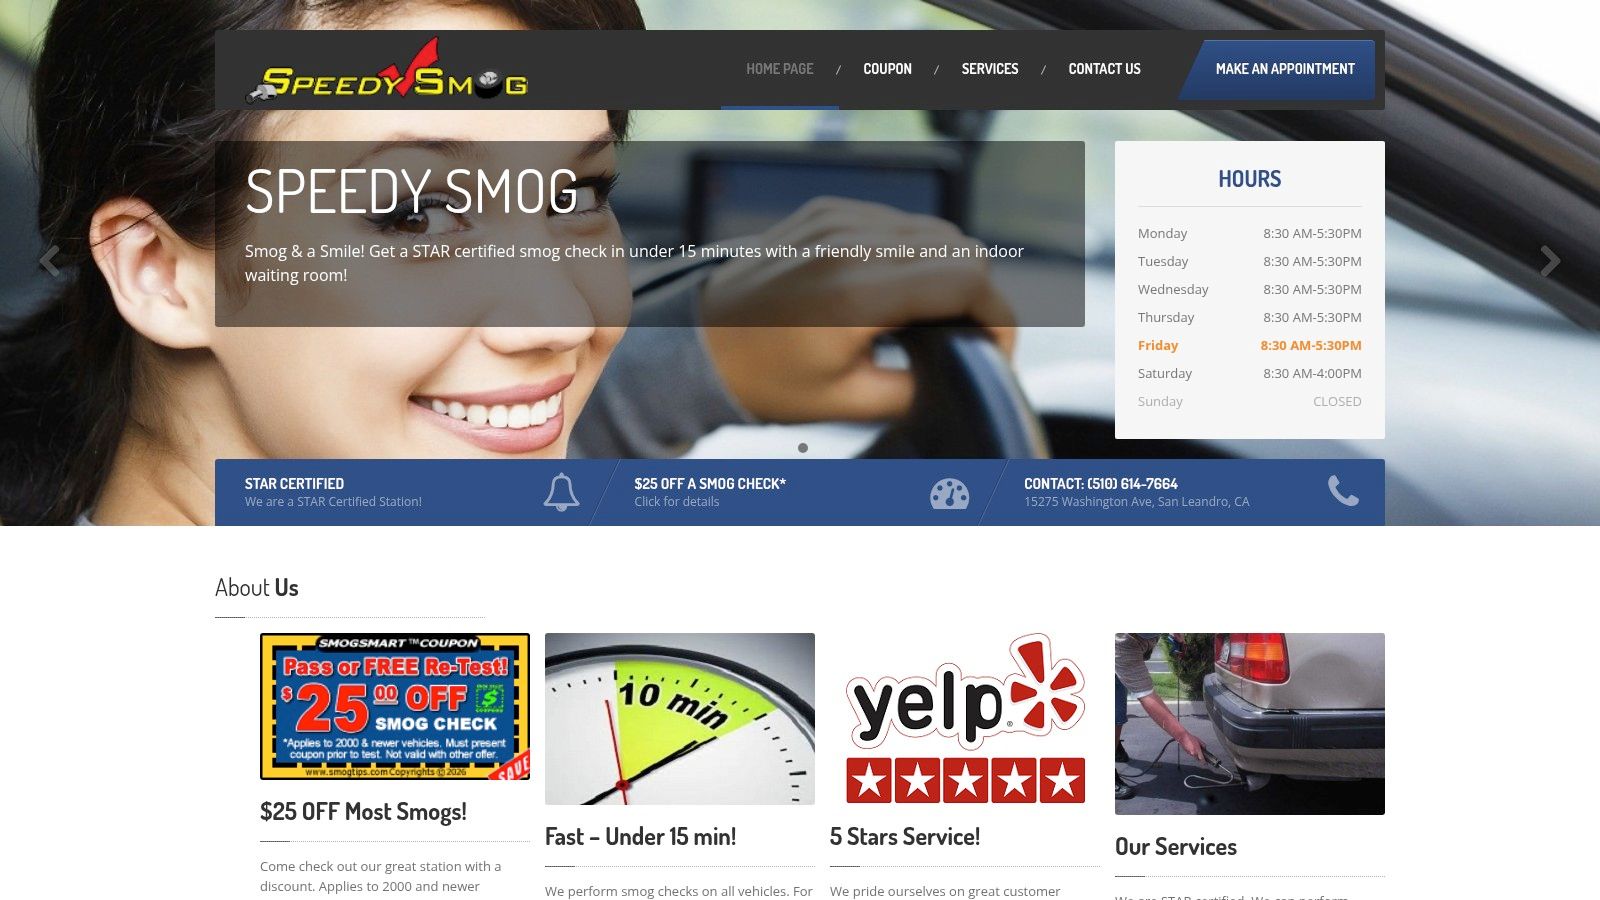
Direct-from-shop coupons tend to be easier to redeem because the shop wrote the terms. That reduces the chance of a front-desk argument over exclusions that were buried on a third-party page.
Use aggregators carefully
Groupon and similar platforms can absolutely save money. They're one reason Bay Area drivers often end up paying less than the posted shop price. But they also reward careful reading.
Look for these details before you buy:
- Vehicle year limits: Many deals apply only to 2000-and-newer vehicles.
- Vehicle type exclusions: Some coupons exclude SUVs, vans, diesels, or larger trucks.
- Appointment rules: A deal may be valid only at certain times or require advance booking.
- Cash-only terms: Some stations offer a lower total if you pay cash and show the coupon first.
Buy the deal only after you've matched it to the car. A cheap coupon for the wrong vehicle is worth nothing at the counter.
Don't ignore mailers and local flyers
Mailers still matter in the Bay Area because some neighborhood stations use them to fill slower hours. They're less flashy than digital deals, but they can be straightforward. The good ones usually spell out the model years covered and whether the certificate fee is extra.
The unwritten rule is simple. If a coupon looks vague, call before driving over. If a shop won't quote a clear out-the-door price tied to the coupon terms, keep looking.
Not All Coupons Are Equal and Why STAR Certification Matters
Most coupon mistakes happen before the car even reaches the bay. The driver assumes all smog coupons are interchangeable. They aren't.
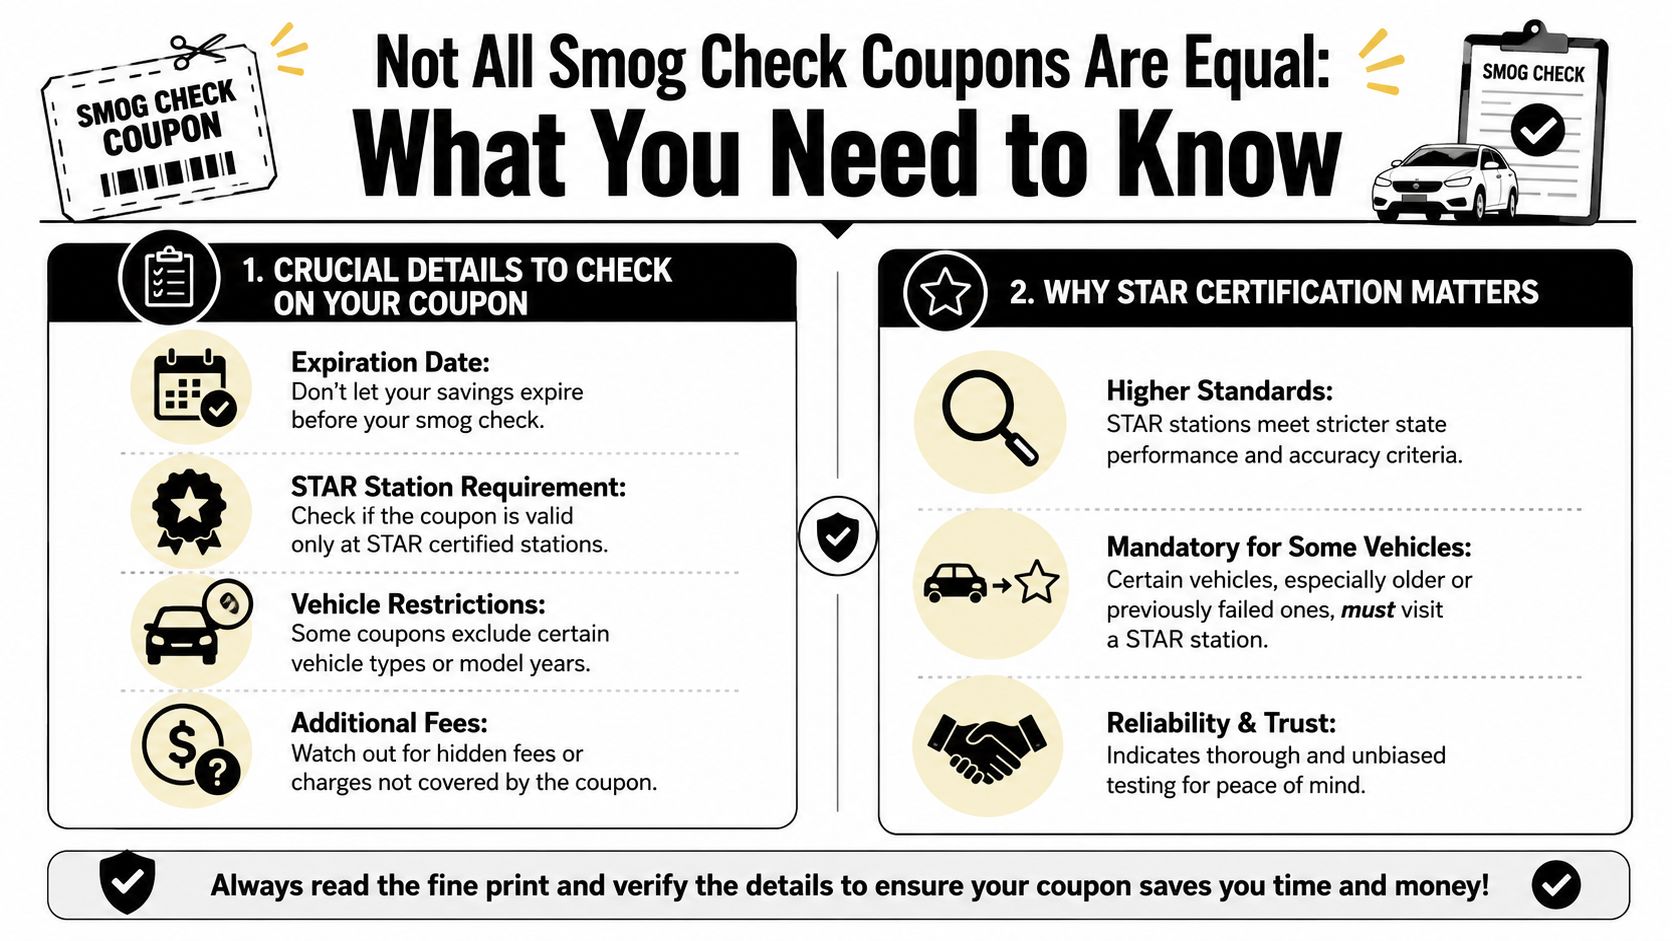
The first question is STAR or regular
If you remember only one screening step, make it this one: Does your car need a STAR station?
STAR-certified coupons are less common than standard coupons in San Francisco, especially for 1999-and-older vehicles, diesels, and high-emitters, as noted by SmogTips' San Francisco station listings. That scarcity is why older-car owners often feel like the cheap deals are always for somebody else.
If you're not sure what a STAR station is, this breakdown of how a smog STAR station works is useful background before you book.
The practical takeaway is that a regular coupon may be a great deal on paper and still be useless for your car. Owners of newer gasoline cars usually have more options. Owners of diesels, older vehicles, or cars flagged for stricter oversight need to screen coupons more carefully.
The fine print that actually changes your bill
A coupon can fail for reasons that have nothing to do with expiration date. The small print often decides whether the deal is real for you.
Watch for these issues:
- Model-year language: “2000 and newer only” is common.
- Vehicle class exclusions: Many low headline-price coupons don't cover SUVs, vans, or larger trucks.
- Fuel type limitations: Diesel and some hybrid-related cases often sit outside the cheapest promos.
- Payment conditions: Some discounts depend on cash payment.
- Pre-test presentation: Some stations won't apply the discount after the inspection has started.
Here's a simple decision filter you can use before you leave home:
| Question | If yes | If no |
|---|---|---|
| Does the DMV notice require STAR? | Shop only for STAR station offers | Standard station offers may work |
| Is the vehicle older or diesel? | Expect fewer coupon options and read exclusions closely | Broader discount pool |
| Does the coupon mention your model year? | Save or print it and bring it in | Keep searching |
| Are the payment terms clear? | Bring the right payment method | Confirm before arrival |
A low advertised price is only a real price if your vehicle qualifies and the shop accepts the coupon under the exact terms shown.
Prepare Your Car to Pass on the First Try
Saving money on the coupon is only half the job. Failing the inspection turns a cheap visit into an expensive one fast.
A modern California smog check for 2000+ vehicles follows a 3-step process: a visual inspection of emissions components, an OBD-II scan for malfunction indicators, and an Idle Test, according to the California Smog Check Program summary.
A quick visual checklist helps before you head out:
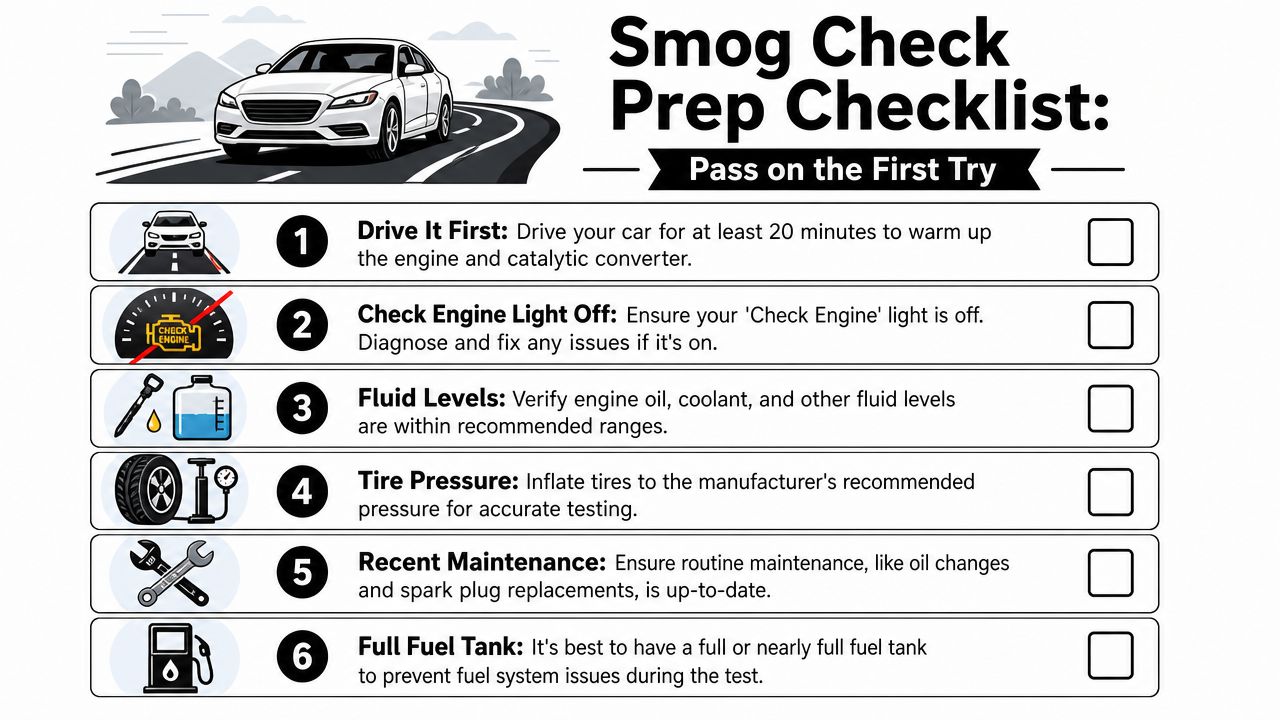
Know what the shop is checking
That three-part process tells you where people usually get tripped up. If the dashboard has a warning light on, if the computer system isn't ready, or if something obvious looks wrong under the hood, the test gets harder than it needs to be.
The easiest way to think about prep is this: arrive with a car that has been driven normally, is fully warmed up, and has no active warning signs. If you've recently had issues, reviewing common smog check fail reasons before your appointment can help you spot a problem early.
A practical pre-test routine
Use a short routine on test day:
- Drive the car first: A normal drive before the visit helps the vehicle reach stable operating condition.
- Make sure the Check Engine light is off: If it's on, don't gamble on the inspection.
- Avoid last-minute battery disconnects: That can reset systems and create readiness problems.
- Bring the coupon before the test starts: Presenting it late often kills the discount.
- Choose a calmer time if possible: Less rush at the station usually means fewer mix-ups and a smoother visit.
The video below gives a helpful visual walkthrough of the process and prep mindset.
Bring your registration notice, your coupon, and the right payment method. The smoothest smog checks usually feel boring, and that's exactly what you want.
Your Smart Choice in the East Bay Speedy Smog
For East Bay drivers, a good station should do three things well. Quote clean prices, handle the vehicle type you own, and move cars through without confusion.
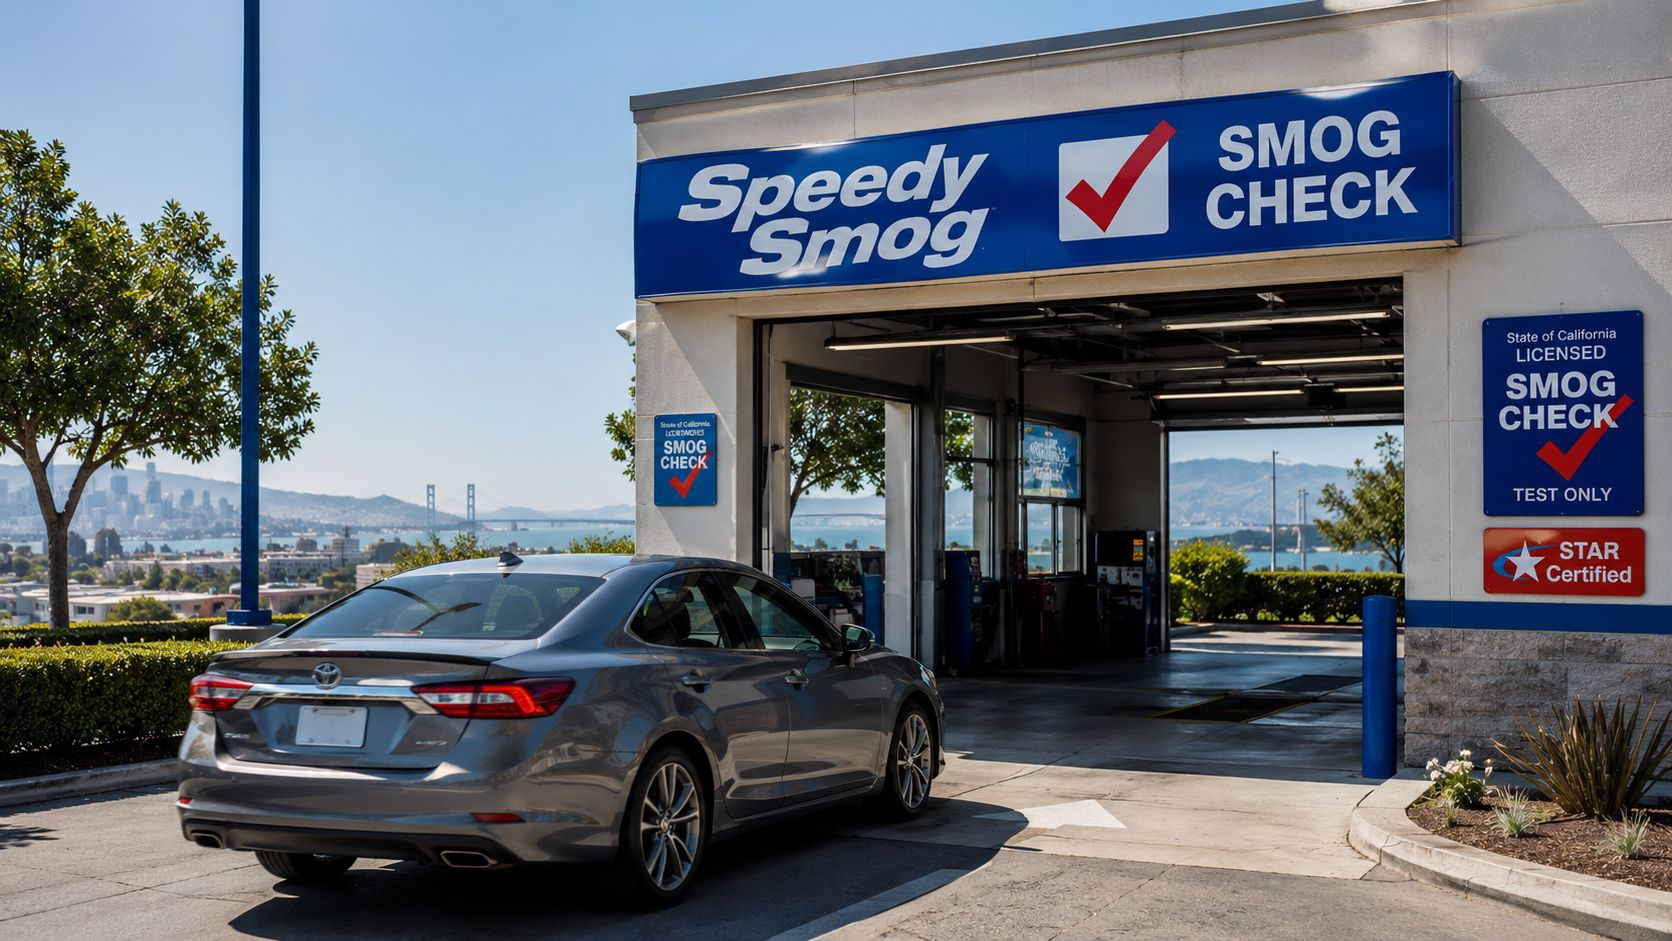
What transparent pricing looks like
A legitimate smog bill has only two real charges: the base test fee and the mandatory $8.25 state certificate fee. Shops can't mark up that certificate charge, which is why STAR Smog Center's FAQ on pricing is a useful benchmark for what transparent billing should look like.
That's the standard worth holding every shop against. If the numbers feel fuzzy, or the offer changes once the car is already in the bay, walk away next time and use a different station.
Why East Bay drivers make the trip
Speedy Smog in San Leandro fits the practical checklist that experienced drivers care about. It's a STAR Certified station, it handles a wide range of vehicles, and it's built around quick inspections rather than drawn-out waiting.
For drivers around San Leandro, Oakland, and nearby East Bay neighborhoods, that combination matters more than flashy advertising. You want a shop that can test the car you have, honor clear pricing, and get you back on the road without making the process harder than it needs to be.
Smog Check FAQ for Special Cases
Some situations need a different playbook.
What if my car is very old
If you own a 1998 or older vehicle and the car is becoming a money pit, there's another option besides chasing repairs and coupons. Starting July 1, 2024, the Bay Area Air Quality Management District launched a program offering $1,500 to Bay Area residents who scrap eligible 1998-and-older vehicles, according to the BAAQMD vehicle replacement announcement.
That won't fit every situation. But if the vehicle's compliance costs are starting to outweigh its usefulness, the scrap incentive is worth looking at before paying for another round of testing and repair.
What if the car fails
First, don't panic. A failure usually means you need to identify the issue, repair it properly, and return for a retest. The expensive mistake is rushing into another test before the underlying problem is fixed.
Ask the station how they handle retests before the first inspection begins. Some shops are more helpful than others about return visits, timing, and what paperwork you should keep.
When does the coupon need to be shown
Before the inspection begins. Not at payment time. Not after the technician has already started.
That single mistake ruins more discounts than people expect. Keep the coupon open on your phone or printed in hand when you pull in, and mention it before anyone touches the car.
If you want a straightforward East Bay option, Speedy Smog in San Leandro is a STAR Certified station that focuses on fast, transparent smog checks with friendly service. It's a strong fit for drivers who want clear pricing, broad vehicle coverage, and a smoother DMV renewal visit without the usual hassle.
You open the DMV renewal notice, scan for the due date, and then see the line nobody wants to read: STAR station required. That usually creates the same questions right away. Is this a harder test? Did something go wrong with your car? Do you need to do anything different before you show up?
The short answer is yes, you should prepare differently, but no, you shouldn't panic. If you want to know how to pass a STAR smog test, the effective answer isn't a gimmick or a last-minute trick. It's making sure the car is properly ready before it reaches the bay.
Table of Contents
- What Is a STAR Smog Test and Why Was You Chosen
- Your Pre-Test Maintenance Checklist for Success
- Understanding and Clearing OBD-II Readiness Monitors
- The Day of Your Test Warm-Up and Drive Cycle Tips
- Common STAR Test Failures and How to Address Them
- Your Next Steps and Partnering with Speedy Smog
What Is a STAR Smog Test and Why Was You Chosen
That STAR notice doesn't mean you've done anything wrong. It means the state wants your vehicle inspected at a station that meets higher performance standards for accuracy and consistency. If you've never dealt with it before, the easiest way to understand it is this: the location requirement changes, but the goal is still the same, making sure your vehicle meets California emissions rules.
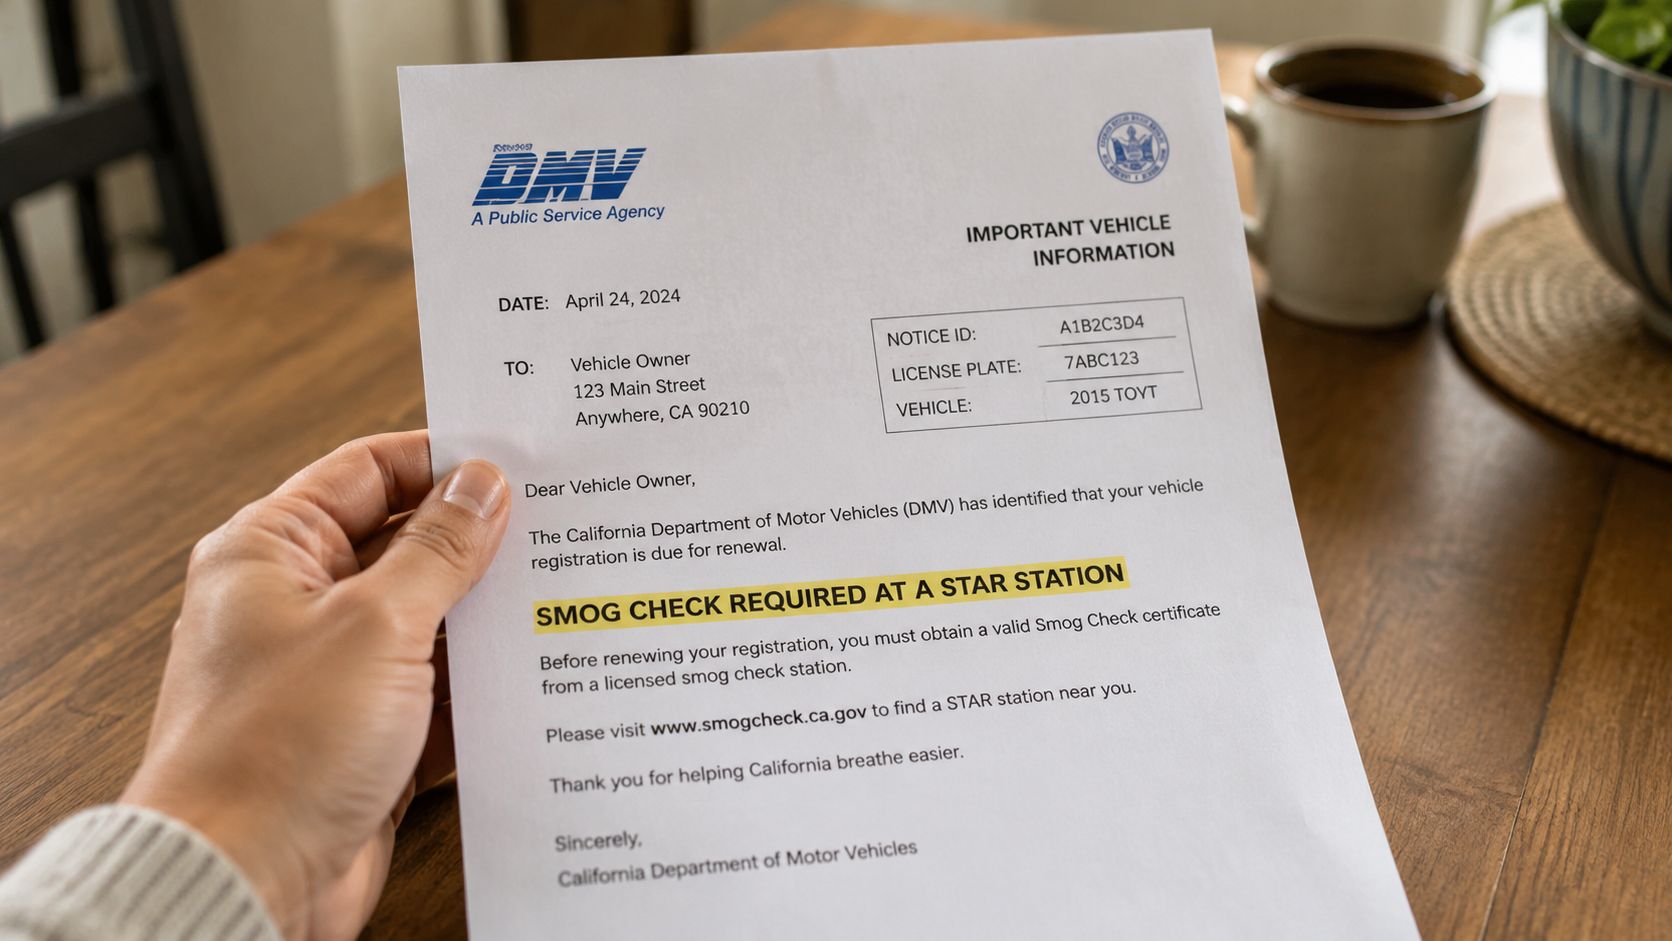
According to this explanation of the California STAR selection process on MechanicAdvice, approximately 1.9% of all vehicles in California are randomly selected for a STAR smog check, and STAR designation is also used for vehicles identified as having a High Emitter Profile or vehicles that have previously failed a standard inspection. That same source says the STAR program was established to target the 50% of smog pollution in California produced by motor vehicles.
If you want a basic breakdown of what a STAR station is, this guide on what a smog STAR station is helps clarify the difference.
The two main reasons drivers get selected
For most East Bay drivers, the STAR requirement comes down to one of these situations:
- Random selection: Your vehicle got picked as part of the state's sampling process.
- Higher-risk profile: Your vehicle falls into a category the system flags as more likely to have emissions issues.
Neither one means failure is coming. It means you need to show up with a car that's ready.
Practical rule: Treat the STAR notice as a preparation notice, not a punishment notice.
What STAR changes for you
The biggest mistake I see is drivers assuming a STAR test has some hidden trick to it. It doesn't. What changes is that the inspection has less room for marginal problems, recent code clearing, questionable aftermarket parts, or a car that only seems fine because the warning light was reset.
If your car is maintained, your monitors are ready, and there aren't emissions-related faults hiding in the system, a STAR inspection is manageable. The stress usually comes from not knowing what the station is going to look for. Once you know that, the path gets much simpler.
Your Pre-Test Maintenance Checklist for Success
A lot of failed STAR tests are preventable.
Drivers come into our San Leandro shop assuming the hard part is the test itself. Usually, the problem started a week earlier with a warning light, a recent battery disconnect, a loose gas cap, or an aftermarket part that looked fine but would never pass a California visual inspection. If you want the best chance of passing on the first visit, handle the easy problems before test day.
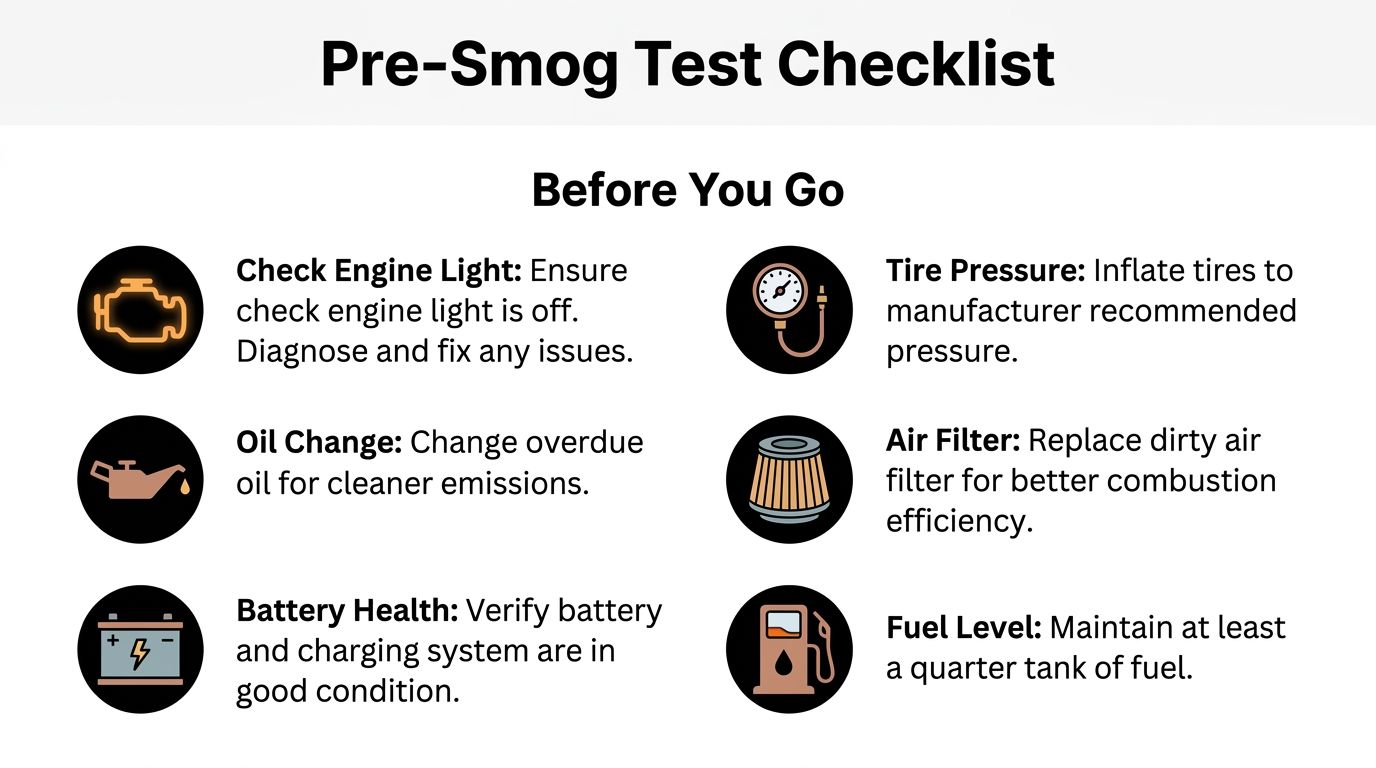
A good pre-test routine will not fix a bad catalytic converter or hide an emissions fault. It will cut out the avoidable failures that waste time and force a retest.
Fix the Check Engine light, don't just clear it
If the Check Engine light is on, stop there and deal with it first. A STAR inspection is not the place to gamble on a temporary reset.
This is a common mistake because some drivers try to clear the code and head straight in. The light may stay off for a short time, but the car's computer still shows recent resets, incomplete self-checks, or the same fault returning. That is one of the fastest ways to fail in California.
Use a scanner to find the actual problem. If you need help understanding the fault before you repair it, this guide on how to read OBD-II trouble codes will help you sort out what the car is reporting.
Then do three things:
- Read the code
- Fix the cause
- Drive the car enough for the system to verify the repair
That last step gets skipped all the time.
Catch the maintenance items that commonly affect emissions
You do not need to rebuild the car before a smog test. You do want it running cleanly and consistently.
Start with the basics:
- Air filter: Replace it if it's dirty enough to restrict airflow.
- Spark plugs: Worn plugs can cause misfires, rough combustion, and higher emissions.
- Engine oil: Old, contaminated oil can contribute to poor engine operation.
- Fluid levels: Low coolant or other neglected fluids can create drivability problems that complicate diagnosis.
None of these items is a magic fix. But if the car is overdue for routine service, bringing it up to date gives you a cleaner-running engine and fewer surprises during the inspection.
Plenty of cars feel "fine" on the road and still fail smog. The driver doesn't notice the problem, but the onboard system or visual inspection does.
Check the visual items before a STAR station checks them
California STAR inspections are strict about more than just the numbers coming from the tailpipe or the data port. The technician also has to verify that emissions-related parts appear correct and compliant.
Two things cause trouble often in the East Bay:
- Aftermarket parts without a CARB EO label: Intakes, tuners, and other under-hood modifications need the proper California approval label, and it needs to be there to read.
- Gas cap problems: A cap that is loose, cracked, or not sealing correctly can set EVAP-related faults.
If you bought the car used, look closely under the hood before your appointment. A lot of owners get caught by modifications they did not install themselves.
Quick checks to do before your appointment
Run through this list the day before you come in:
- Make sure the Check Engine light turns on with the key and goes off after startup.
- Look for loose vacuum lines, unplugged sensors, or obvious under-hood issues.
- Tighten the gas cap until it clicks.
- Handle overdue maintenance you already know about.
- Remove or disable tuning that is not emissions-compliant.
At Speedy Smog, we see the same pattern over and over. Drivers who pass most often are not using tricks. They show up with a car that has been checked, repaired properly, and driven enough to prove those repairs stuck.
Understanding and Clearing OBD-II Readiness Monitors
A lot of modern vehicles don't fail because they pollute too much. They fail because the car's computer hasn't finished checking itself. That's what readiness monitors are about, and they're one of the most misunderstood parts of California smog inspections.
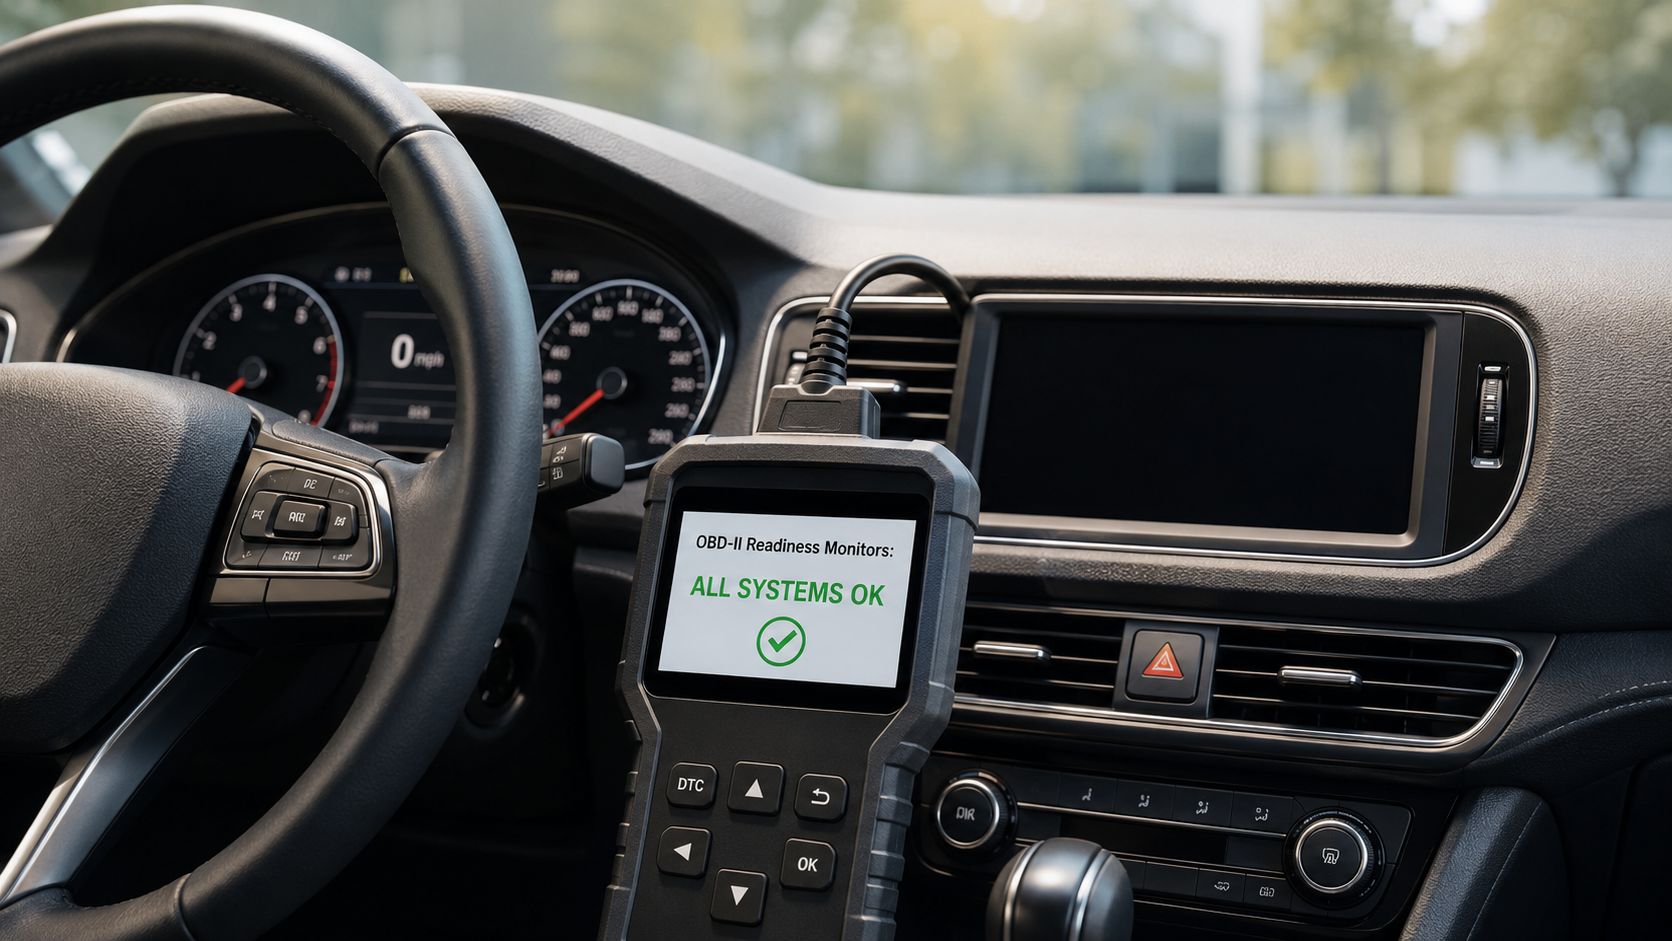
According to this smog technician discussion on DSMTuners, modern vehicles from 2001 and newer require all readiness monitors to be in the "ready" position except EVAP. That same source explains that a recent battery replacement or code clearing can reset those monitors to not ready.
What readiness monitors actually are
Think of monitors as the car's internal checklist. The engine computer runs a series of self-tests on systems like catalytic converter performance, oxygen sensor operation, misfire detection, and evaporative controls. Until those tests complete, the system can't confirm the vehicle is ready for inspection.
This is why a car can have no warning lights and still not be prepared for a smog test.
Common situations that reset monitors include:
- Battery disconnects
- Recently cleared trouble codes
- Certain repairs that interrupt system memory
How to check them before you go
An inexpensive OBD-II scan tool can tell you whether the monitors are complete. If you're not sure how to pull code and monitor information, this guide on how to read OBD codes is a useful starting point.
What you want to see is simple:
- No active Check Engine light
- No pending emissions-related trouble codes
- Monitors showing ready, with the usual EVAP exception for many newer vehicles
Don't rely on a dashboard with no warning lights. The scanner tells the full story.
Here's a visual walkthrough that helps make monitor status easier to understand before you head in:
A practical drive cycle approach
There's no single universal drive cycle that works for every make and model, but a practical routine usually helps. Start with a cold engine, drive at city speeds, include steady cruising, allow some deceleration, and avoid hard acceleration. Then repeat normal driving over the next several trips.
That approach works better than one extreme freeway blast. The computer often needs varied conditions, not just heat.
If you cleared codes yesterday and the car "seems fine," that's not the same as the car being ready.
If a monitor won't set, don't guess. Look up the manufacturer procedure for your exact vehicle or have a technician check for an underlying problem that's preventing completion.
The Day of Your Test Warm-Up and Drive Cycle Tips
You can do everything right the week before, then lose the pass on test day by bringing in a car that is cold, freshly reset, or acting up on the drive over. I see that a lot with East Bay drivers who fixed the original issue, but waited too long after the warm-up drive or cleared codes one last time out of panic.
As noted earlier in the BAR video guidance, a recent battery replacement can leave monitors incomplete for days. A warm engine helps the test reflect how the car runs. It does not cover up a real emissions problem.
What to do before you leave home
Treat test day like the last ten percent of the job. Bring your DMV paperwork if you have it. Keep the fuel level in a normal range. Do not disconnect the battery, pull fuses, or clear codes because you want a clean slate. In California's STAR program, that usually creates a readiness problem, not a shortcut.
If the battery was replaced recently, give the car enough normal driving time before your appointment. If the car was just repaired yesterday, check that it has completed enough driving since the repair. If you are unsure what a previous failure report was really telling you, this guide to common smog check fail reasons can help you sort out whether the issue was monitors, a warning light, or an emissions fault.
What the final drive should look like
The goal is simple. Arrive with the engine fully warmed up and the car driving normally.
For most vehicles, a short mixed drive works better than letting it idle in the driveway. Use city streets first, then a steady stretch at road speed if you can do it safely. That gives the engine, oxygen sensors, and catalytic converter time to get to operating temperature under real load.
A few test-day habits make a real difference:
- Keep the gap short between your drive and the inspection: If the car sits too long, you lose the benefit of the warm-up.
- Do not schedule the test immediately after a repair unless you've driven it afterward: Repairs and readiness are not the same thing.
- Pay attention on the way over: Rough idle, misfire, hard starting, or a raw fuel smell are warning signs that should be checked before testing.
For San Leandro, Oakland, Hayward, and nearby East Bay drivers, using a local STAR station like Speedy Smog helps for a practical reason. You can warm the car up properly and get it into the bay without a long cross-town wait. If your vehicle is borderline, that timing matters.
Common STAR Test Failures and How to Address Them
If a vehicle fails, don't jump straight to replacing expensive parts. Read the failure reason first. The smartest repair path starts with understanding whether the issue is a monitor problem, a warning-light problem, a visual compliance issue, or actual emissions performance.
According to the STAR Smog Center FAQ, failure rates at STAR Test-Only stations can reach 17.55% for subsequent tests after an initial failure, which is one reason guessing gets expensive fast. That same source says that since 2021, modified software not approved by CARB can trigger an automatic failure regardless of actual emissions levels.
What a failed result usually means
One failed test can point in very different directions.
A monitor-related failure often means the car wasn't driven enough after codes were cleared or after power was disconnected. A visual failure usually means something under the hood doesn't match California requirements. An emissions failure points more toward a mechanical or control-system problem.
If you need a plain-language breakdown of what the station report is telling you, this page on smog check fail reasons can help you interpret the result before you approve repairs.
Don't authorize parts based only on a symptom like "failed smog." Authorize diagnosis based on the actual failure category.
Common STAR Smog Test Failure Codes and Fixes
| Failure Reason | Potential Cause | Common Fix |
|---|---|---|
| Check Engine light on | Active emissions fault, sensor problem, misfire, EVAP issue | Diagnose the stored code and repair the underlying fault |
| Readiness monitors not ready | Recent code clearing, battery disconnect, incomplete drive cycle | Complete the proper drive cycle and verify monitor status with a scanner |
| Visual inspection problem | Aftermarket part missing CARB EO label, missing or altered emissions component | Reinstall compliant parts or provide proper CARB EO documentation |
| EVAP-related issue | Loose gas cap, leaking cap seal, EVAP leak fault | Tighten or replace the gas cap, then confirm the fault is resolved |
| Software-related failure | Non-CARB-approved tune or modified engine software | Return the vehicle to CARB-compliant software |
| Tailpipe emissions too high | Poor combustion, sensor issues, catalytic converter weakness, maintenance neglect | Diagnose engine performance and emissions components before retesting |
The trade-off is simple. A quick guess can feel cheaper today, but the wrong repair often leads to another failed inspection. A targeted diagnosis usually costs less than replacing parts at random.
Your Next Steps and Partnering with Speedy Smog
Passing a STAR inspection usually comes down to preparation, not luck. If the Check Engine light is off because the issue was fixed, the monitors are ready, the gas cap seals, and the under-hood parts are compliant, most of the common failure points are already off the table.
If your vehicle passes, the certificate is sent electronically to the DMV and you're basically done. If it fails, use the report to guide the repair. Don't treat every failure the same, because a monitor issue and an emissions hardware issue need different next steps.
Speed matters too, especially when you're trying to fit a smog check into a workday. For many vehicles, especially newer ones, a fast and accurate STAR inspection is a lot easier when you arrive prepared, bring your paperwork, and test while the car is still fully warmed up.
If you're still trying to sort out how to pass a STAR smog test, keep the process simple. Fix warning lights instead of hiding them. Verify readiness before leaving home. Check the visual items that get people into trouble. Show up with the car warm, not rushed and not half-prepared.
If you're due for a STAR inspection in San Leandro or nearby, Speedy Smog is a straightforward local option for getting your smog check handled with fast service, DMV certificate submission after a pass, and a convenient setup for East Bay drivers who want the process to be smooth and clear.